Chapter 9 Programming Cues, and Scenes
This chapter deals with storing and editing Editor values.
The following is covered in this chapter:
- 9.1. What Are Qlists, Cues, Scenes, and Submasters?
- 9.2. Tracking Principals
- 9.3. Storing Cues and Scenes Directly to Controllers
- 9.4. Master Controller
- 9.5. Storing Cues to the Master Controller
- 9.6. Storing Qlist Cues to any Controller
- 9.7. Cue Store Options
- 9.8. Assigning Text Labels
- 9.9. Modifying Cues and Scenes
- 9.10. Creating New Cues from Existing Cue Data
- 9.11. Cue Time Properties
- 9.12. Additional Cue Properties
- 9.13. Parameter Time
- 9.14. Parameter Profile
- 9.15. Group Submasters
9.1 What Are Qlists, Cues, Scenes, and Submasters?
Qlists:
Qlists are containers that hold cues. They might metaphorically be thought of as file folders.
Each Qlist has its own unique Cue numbering system.
Qlists currently may contain up to 8,000 cues.
Qlists containing Cues must be assigned to Controllers before they can be output to the stage.
Cues:
Cues are stored containers of editor values. They might metaphorically be thought of as files or records.
Cue may only exist within Qlists.
Cues may be numbered from 0.001 ⟶ 999.999
Cues cannot be stored without a Qlist destination.
Cues may be assigned:
In Time
Out Time
Delay In Time
Delay Out Time
Text Label
Scenes:
Scenes are essentially a QList and a Cue combined.
Scenes may only contain a single “Look” of editor values.
Scenes assigned to Slider Controllers are given the default settings of:
{GO + Jump Parameters}
{Release At Bottom}
Scenes may only be assigned In-TIme.
Scenes may be given Text Labels
Submasters: - A special type of Scene where stored fixtures inhibit their dimmer values proportionate to their assigned slider controller’s value. All other parameter values are ignored.
- Groups may directly be assigned to controllers to create Group Submasters. Group Submasters reference the original Groups and update automatically if the Groups are modified.
9.2 Tracking Principals
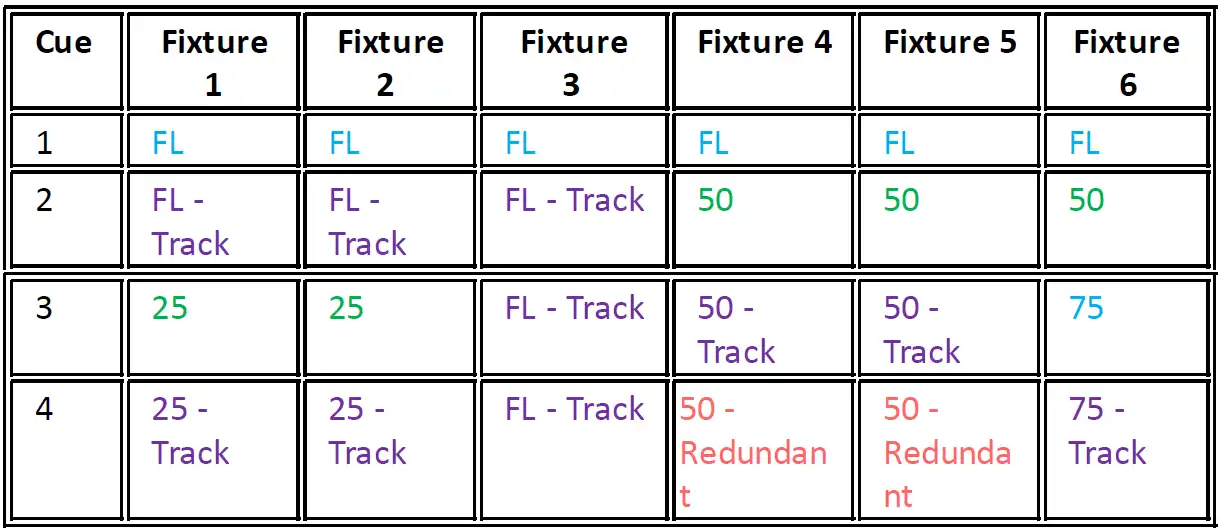
Vibe uses the Tracking/Move Fade philosophy common in most current lighting consoles. In tracking consoles, “Hard Values” (parameter values with stored information) track forward from cue to cue until new hard values are encountered.
If we think of cues and values as a spreadsheet, basic tracking systems have two kinds of parameter value cells:
“Hard Value” Cells
“Tracking Cells” get their values by “seeing above” to the original hard values. They are basically transparent and only hard values are stored for a Cue. This is more efficient.
Storing Cue information on a cell basis has other advantages:
Each parameter cell can have its own individual time which overrides overall cue time. This allows, for example, Pan/Tilt to have a separate transition time or Color Wheels to snap to their values instead of using overall cue time.
As Vibe’s default behavior for parameters it LTP (The last action takes precedent), a cell assigned its own time will continue to run its time until either the stored time runs out or it encounters a new hard value.
Some traditional theatre consoles call “Hard Values” “Move Instructions” and cells that are in transition, “Move Fades”.
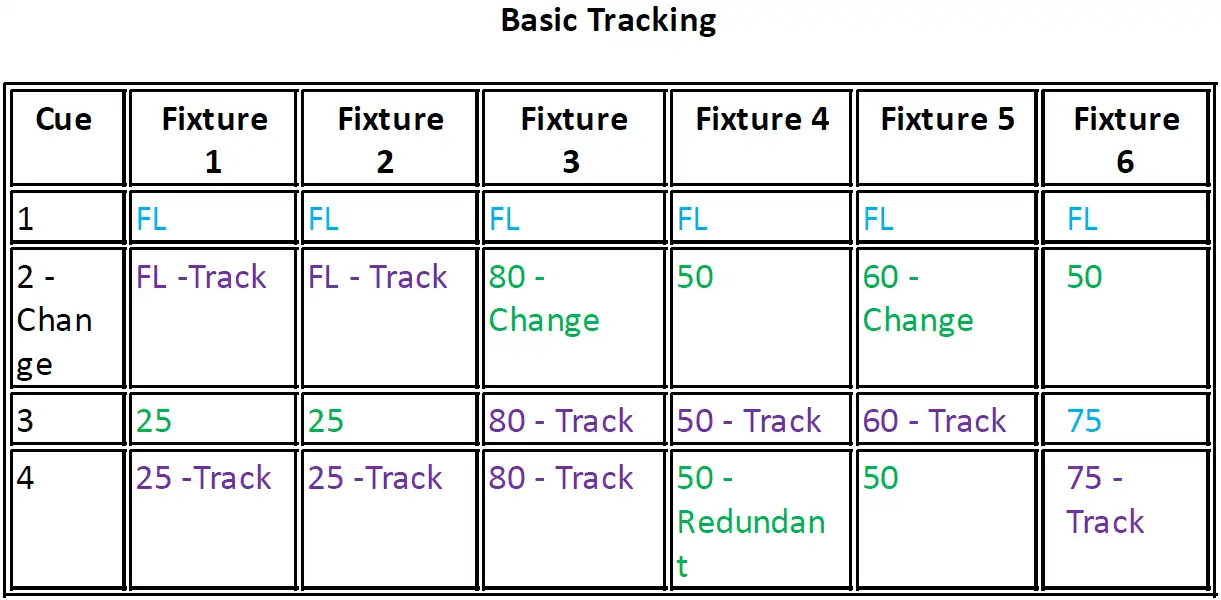
- Another advantage of tracking is that if you have values that are tracking through a number of cues, all you have to do is change the original hard values and that information will change down to the next hard value. You do not have to copy the change to each cue.
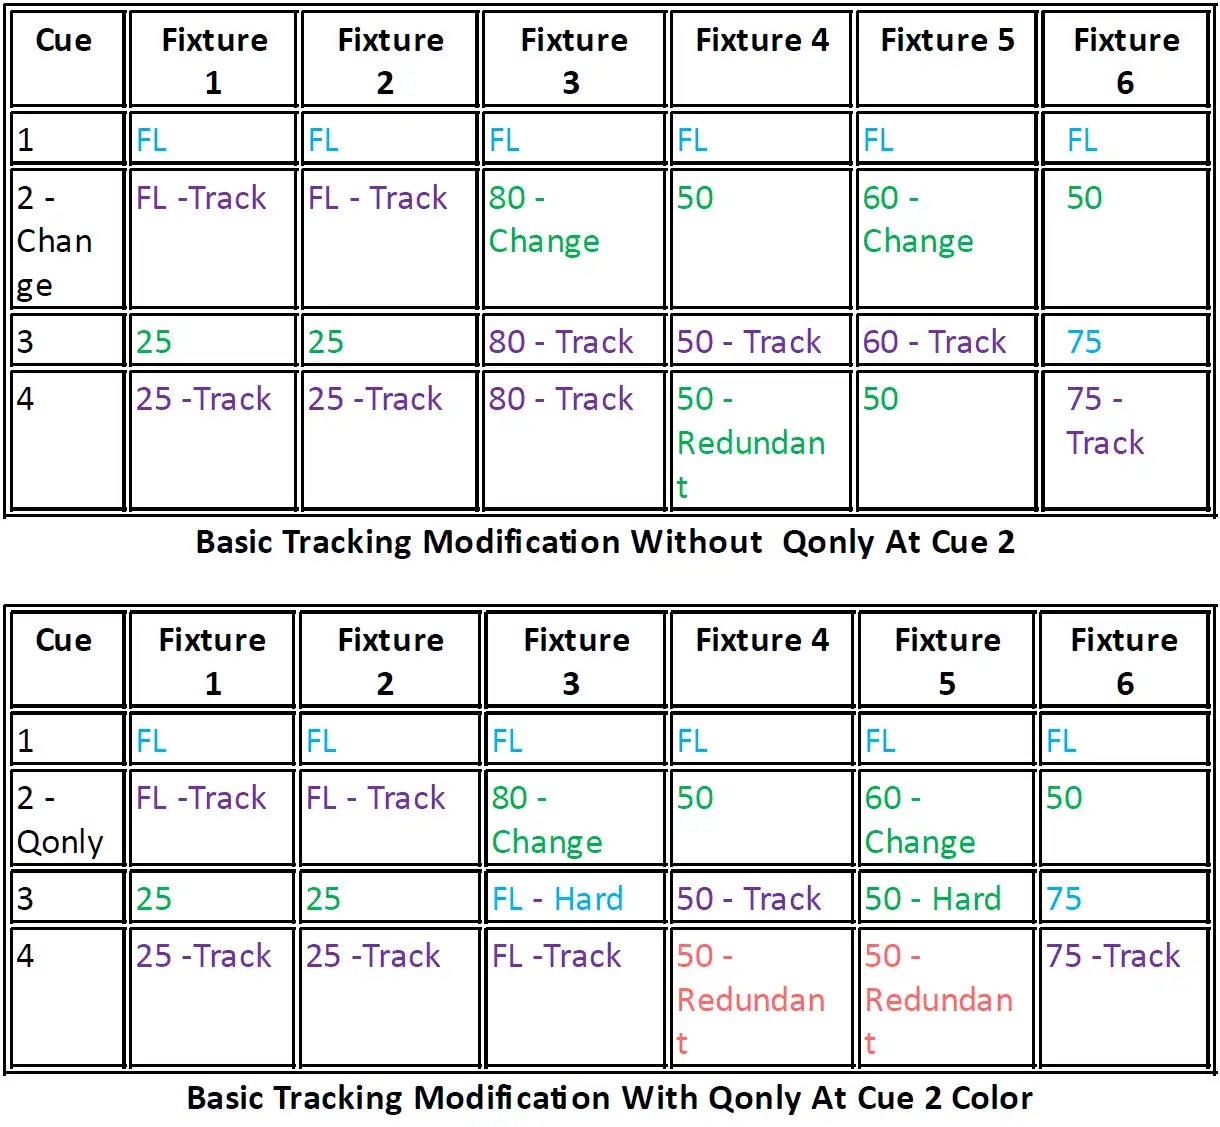
An issue with tracking is that making a modification to values in one of the cues in the tracked range will change the values in all the cues following it. To solve this problem, Vibe offers two options:
- Qonly
{Qonly} - Used in any case where cue modification, cue insertion, or cue deletion must affect “This Cue Only”.
The look of the cue following any of the above operations will maintain the appearance it had before the operation. This is done by automatically copying the hard values that made up the original look (stage state) and pasting them into the cue following the modification. The downside is that there is no longer a tracking link from the original hard values even though the values match the original values.
- Skip Track
{Skip} - Stores modified values as a special kind of cell that acts like a normal Tracking Cell until the Skip Cell is reached. The Skip Cell then behaves as if it has hard values and outputs its value to the stage. When the Qlist is advanced past a cue with the Skip Cells, they again behave as tracking cells, thus restoring the link to the original hard values.
Storing a Cue modification using Skip, has the same apparent result as storing Qonly. The main difference is that with Qonly, the link to the original hard values is lost, and with Skip, the link is preserved.
To make it easier for users to identify cues with Skip Cells, the parameter value with the Skip will be displayed in Magenta.
Tracking examples:

9.3 Storing Cues and Scenes Directly to Controllers
Cues and Scenes may be stored:
Directly to the Master Controller using command line syntax.
Directly to a specified Qlist and Cue using syntax.
Directly to a controller.
To store the first cue directly to a controller:
Set parameter levels in the Editor then press [STORE] [HERE] (to any of the buttons of a controller). The first available Qlist will be assigned to the controller and Cue 1 will be created.
Alternately a Cue # may be specified in advance: [STORE] [CUE] [3] [HERE] (press any of the buttons of the destination controller).
A Qlist # may also be specified in advance: [STORE] [QLIST] [3] [CUE] [1] [HERE] (press any of the buttons of the destination controller).
To append additional cues to a controller:
- Set parameter values in the Editor then press the [STORE] [HERE] (press any of the buttons of a controller that already has cues stored on it). A cue will be appended to the first available whole number of the Qlist
To Store a Scene to a controller:
Set parameter levels in the Editor then press [STORE] [SCENE] [HERE] (press any of the buttons of the destination controller). The first available Scene # will be assigned to the controller. No Qlist will be assigned.
Alternately a Scene # may be specified in advance. [STORE] [SCENE] [3] [HERE] (press any of the buttons of the destination controller).
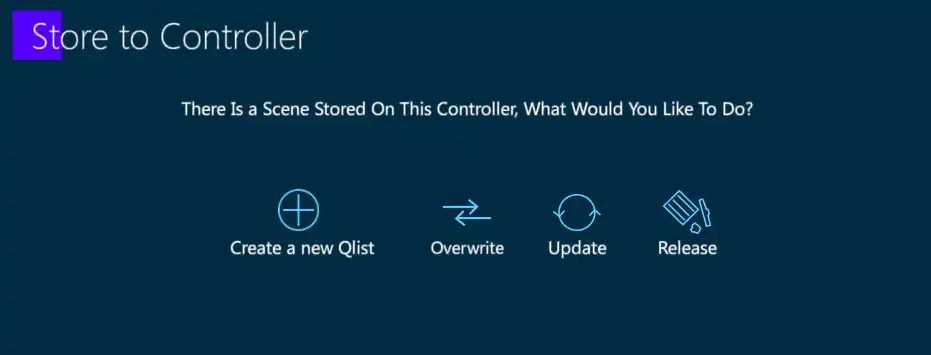
To convert a Scene to a Qlist:
Press [STORE] [HERE] to an existing Scene.
The Store to Controller pop-up will appear. Tap {Create a new Qlist} the Scene will be assigned the first available Qlist with the Scene’s look being converted to Cue 1.
9.4 Master Controller
In Vibe, at least one controller must be assigned as the [SELECT] controller. This controller will now be linked to the Master Controller.
The Master Controller has 4 large buttons associated with it:
[GO] - Initiates a forward timed fade between cues in the selected Qlist.
[BACK] - Backs up one cue at a time using system timing properties’ Back Time.
[HOLD] - Pauses the progress of a fade
[GOTO] - Advances to the specified cue in system timing properties’ GOTO Time.
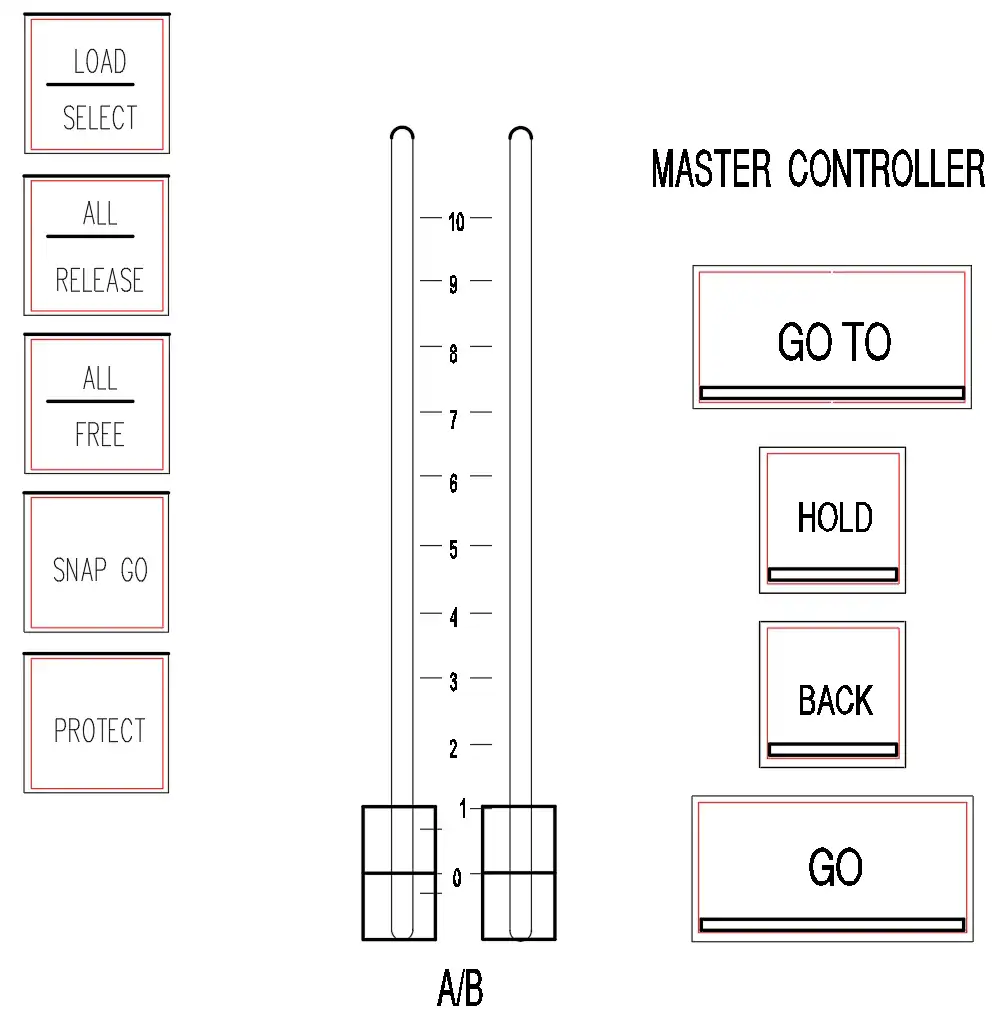
Associated with but not limited to the controller assigned as the [SELECT] Controller are the following 3 buttons:
[Load] - Preloads a controller with a specified cue # but does not advance to the cue. Pressing [GO] will advance to the preloaded cue using cue time.
[Release] - Releases the destination controller from affecting the stage (Turns it off).
[Free] - Unloads the controller.
[Load] [Release] and [Free] do not work with the big Master Controller buttons, only with any button on the controller that is associated with it as the [SELECT] controller.
By default cues that do not have a Qlist or Controller specified in their destination will be stored to the controller selected as the Master Controller.
9.5 Storing Cues to the Master Controller
A Qlist must be assigned to the [SELECT] controller before cues can be stored using theatre style keypad syntax
A Qlist does not have to contain cues to be assigned to a controller
To assign a Qlist to a controller and make it the Master Controller:
Press [QLIST] [#] [HERE] (press any of the buttons of the destination controller) - The Qlist will be assigned to the controller.
Press [SELECT] [HERE] (press any of the buttons of the destination controller) - The destination controller will now be the Master Controller and the [Second Button] of the “Selected” controller will turn dark blue to indicate that it is now assigned to the Master Controller. The top header of the Controller Display on the main monitor above the controller will also turn dark blue.
To Store a cue to the Master Controller:
Set Parameter levels in the Editor the press [CUE] [#] [STORE]. The cue will be added to the Master Controller’s assigned Qlist.
Valid Cue numbers per Qlist = 000.001 → 999.999
Addition cues may be stored via keypad syntax or the Direct Store method.
Pressing [STORE] [STORE] or [STORE] [ENTER] will store editor values to the next whole number cue at the end of a Qlist. (Next spacing can be customized in system settings).
Vibe uses the “Clear Editor After Store” behavior common in most theatre consoles. The Controller will by default advance to the stored cue and clear the Editor. This behavior may be disabled in System Settings.
9.6 Storing Qlist Cues to any Controller
The destination Qlist must be assigned to a controller in advance or after storing the first Cue, the destination Qlist will bump the current cue on the Master Controller out and replace it..
To store a Cue to a Qlist that is already assigned to a Controller: (Usually not the Master Controller)
Press [Qlist] [#] [HERE] to any button of the destination controller. The Qlist will be assigned to the controller
Set parameter levels in the Editor
Press [Qlist] [#] [CUE] [#] [STORE]
Valid Cue numbers per Qlist = 000.001 → 999.999
Addition cues may be stored via keypad syntax specifying the Qlist # in advance or 9.3. Storing Cues and Scenes Directly to Controllers
9.7 Cue Store Options
In the process of storing a cue, a number of filters and settings are available.
To open the Store Options pop-up, two methods are available:
- Store cues using keypad syntax:
Set values in the Editor.
[CUE] [#] [OPTIONS] Cue Store Options pop-up opens. Make selections and press [STORE].
- Store directly to a Qlist on a Controller:
Set Values in the Editor.
Press [STORE] [OPTIONS] Cue Options pop-up opens. Make selections and press [HERE] to any button on the destination controller.

Cue Store Options Pop-up
Options are:
Editor as Source:
- {Red + Grey} Editor Values in 100% 90% will be stored.
- {Store Stage} All fixtures outputting ANY DMX from the console will be stored. This includes tracked values, home values and dimmer values at zero.
- {Red Only} Only Editor values in Red will be stored. This can be a useful way to filter parameters.
- {All Param For Selected} All parameters from the fixture selection will be turned red and stored in the cue.
- {All Param If Active} All parameters of all fixtures in the editor will be stored if the dimmer parameter is greater than zero (WYSIWYG).
Additional:
- {DMX In} Takes a snapshot of incoming DMX and attaches it to the cue.
- {Force Black} When it is not desirable to see values move from one cue state to another, Force Black may be used to save programming time. In a cue tagged as Force Black, the dimmer parameter is first “forced” to Black Out, parameters they move in black, then the dimmer parameter is faded up again. The total speed of a Force Black operation is relative to the overall cue time.
Filtering:
- {Show Filters} Opens user prebuilt filters in the pop-up.
Source behavior when stored:
- {Track} Normal system behavior
- {Skip Cue} - Tags a cue as a skip cue in the case of inserting a new cue. In the case of updating a cue by storing to an existing cue, only the values being updated will be made into Skip cells. .
- {Qonly} Inserted cues will not affect the look of cues following them
Look Ahead: (sometimes referred to as Mark Cue) See: 14.3. Force Black
- Unlike having to Look Ahead automatically preposition all dark parameters for all cues in a Qlist, a cue tagged in Cue Store Options as {Look Ahead} will preposition dark parameters for just the tagged cue.
Force Black - See: 14.1. Look Ahead (Move in Dark)
- Tagged a cue as {Force Black} in Cue Store Options, is the same as setting the cue as {Force Black} in {Cue settings}.
9.8 Assigning Text Labels
Assign a Text Label to a Qlist:
Method 1 - [QLIST] [#] [TEXT] opens the Text Entry pop-up.
Method 2 - [QLIST [#] [SETTINGS] opens the Qlist Properties tab or Qlist popup.
Method 3 - Press the Qlist header above a loaded Controller, The Qlist Properties pop-up opens - Enter Qlist Text in the white box.
To assign a Text Label to a Cue:
Method 1 - [QLIST] [#] [CUE] [#][TEXT] opens Text Entry pop-up.
Method 2 - If assigned to the Master Controller, [CUE] [#] [TEXT] Opens Text Entry pop-up.
Method 3 - [CUE] [#] [SETTINGS] opens {Cue Properties} tab of Cue Settings pop-up. Enter Qlist text in the Text Box.
Method 4 - [TEXT] [HERE] press any button on the destination controller.
Method 5 -
- Press {Cue label} area of the display above the Controller - The Cue Properties pop-up opens.
- Select the desired cue.
- Enter cue text in the text box.
- Optionally notes may also be entered for the selected cue.
9.9 Modifying Cues and Scenes
Modify a Cue or Scene using [UPDATE]:
Make a change to parameter values already outputting to the stage from an active cue or scene.
Press the [UPDATE] and the Update pop-up will open. Two columns will appear. The left column shows Cues available for updating and the right column shows Libraries available for updating. If affected values are not referencing a library, the Cue column will indicate the source cue that the modifications will be updated to.
If the Editor parameter values are new to all active cues, destination cue. Will be dependent on the New Values setting:
If {All Selected Objects} is selected, a list of all possible active cues will appear in the Cue column.
If {Master PB Only} (controller) is selected, new values will be only be updated to the Qlist assigned as Master Controller.
If {Don’t Store} is selected, no new parameter values will be updated.
Selected cues may be freely deselected in the Update pop-up.
Set Tracking Options as required.
Set Source Filters as required.
Press
 or press [ENTER] to close the pop-up and complete the Update.
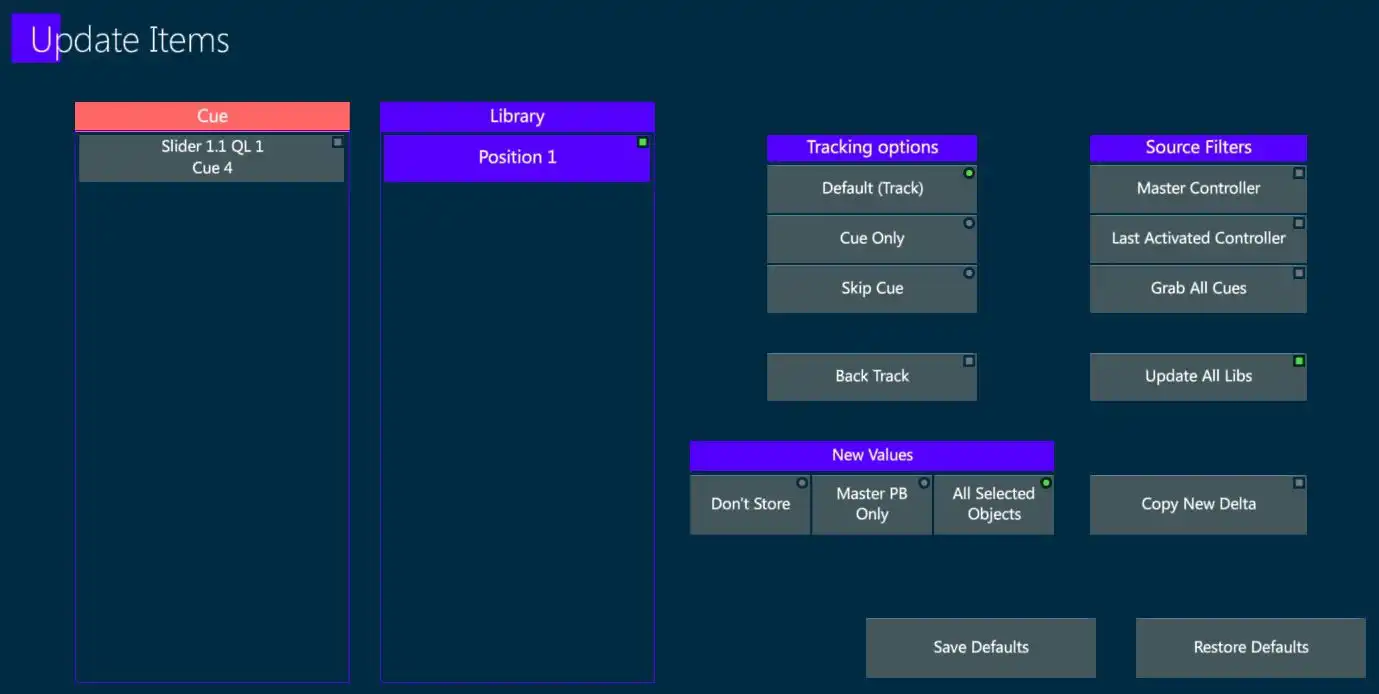
UPDATE Source Filters:
{Master Controller} - Updates will only be made to the active cue on the controller assigned to the Master Controller.
{Last Activated Controller} - Updates will be made to the last controller that asserter priority.
{Grab All} - All Active Controllers will be shown in a list and the user must select the destination of the updates.
UPDATE Tracking Options:
{Default (Track)} - Changes will track forward to the next cue if it does not have a hard value.
{Cue Only} - Changes will be made to “This Cue Only” preserving the look of the next cue (Hard values will be added to next cue).
{Skip Cue} - Changes will be made to the current cue but the changes will be “skipped over” preserving the link to the original hard values.
{Back Track} - Updates the changes to the original hard value that made the stage look.
Update directly to a Controller:
Make a change to parameter value outputting to the stage.
Press [UPDATE] - The Update pop-up will open.
Make option changes if needed.
Press [HERE] to any button on a destination Controller - the Editor values will be updated into the active cue on the destination Controller.
Update values to a cue or range of cues using keypad syntax:
Make a change to parameter value outputting to the stage.
Type [Qlist] [#] (if destination cue/cues are not on the Master Controller) [CUE] [+ ⟶ -] [CUE] [#] [UPDATE] - Modifications will now be updated to the destination cue selection.
Cues may alternately be modified using the universal syntax below:
Modify cues using EDIT:
[QLIST] [#] [CUE] [#] [EDIT] - Cue values will be placed in the Editor and the [UPDATE] key will flash red.
Modify the parameters in the Editor as required.
Press [UPDATE] to complete the edit and restore control to the source controller.
This method may be used in [BLIND] and unlike live, fixtures may be released from the source cue. Effects may also be edited
Modifying cues using {Overwrite}, {Update}, or {Release} keys - (Traditional method common to most consoles)
Make a change to parameter value outputting to the stage.
Press [QLIST] (in not not on the Master Controller) [CUE] [#] [STORE].
If the cue exits, the Cue Exists pop-up will appear with options for {Cancel, Update, Overwrite, Release}.
Tap {Overwrite} to replace all fixtures with those in the Editor.
Tap {Update} to merge the Editor into the selected cue.
Tap {Release} to remove the selected fixtures from the cue.

Cue Exists pop-up
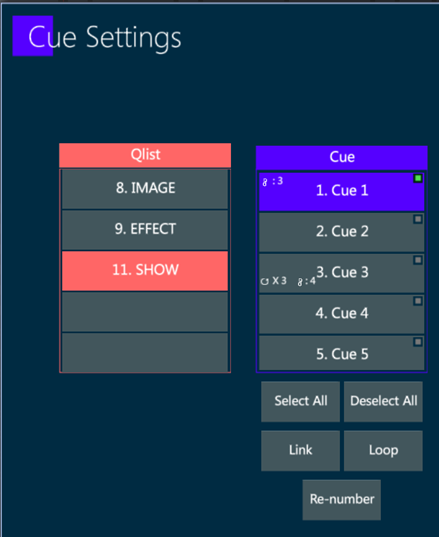
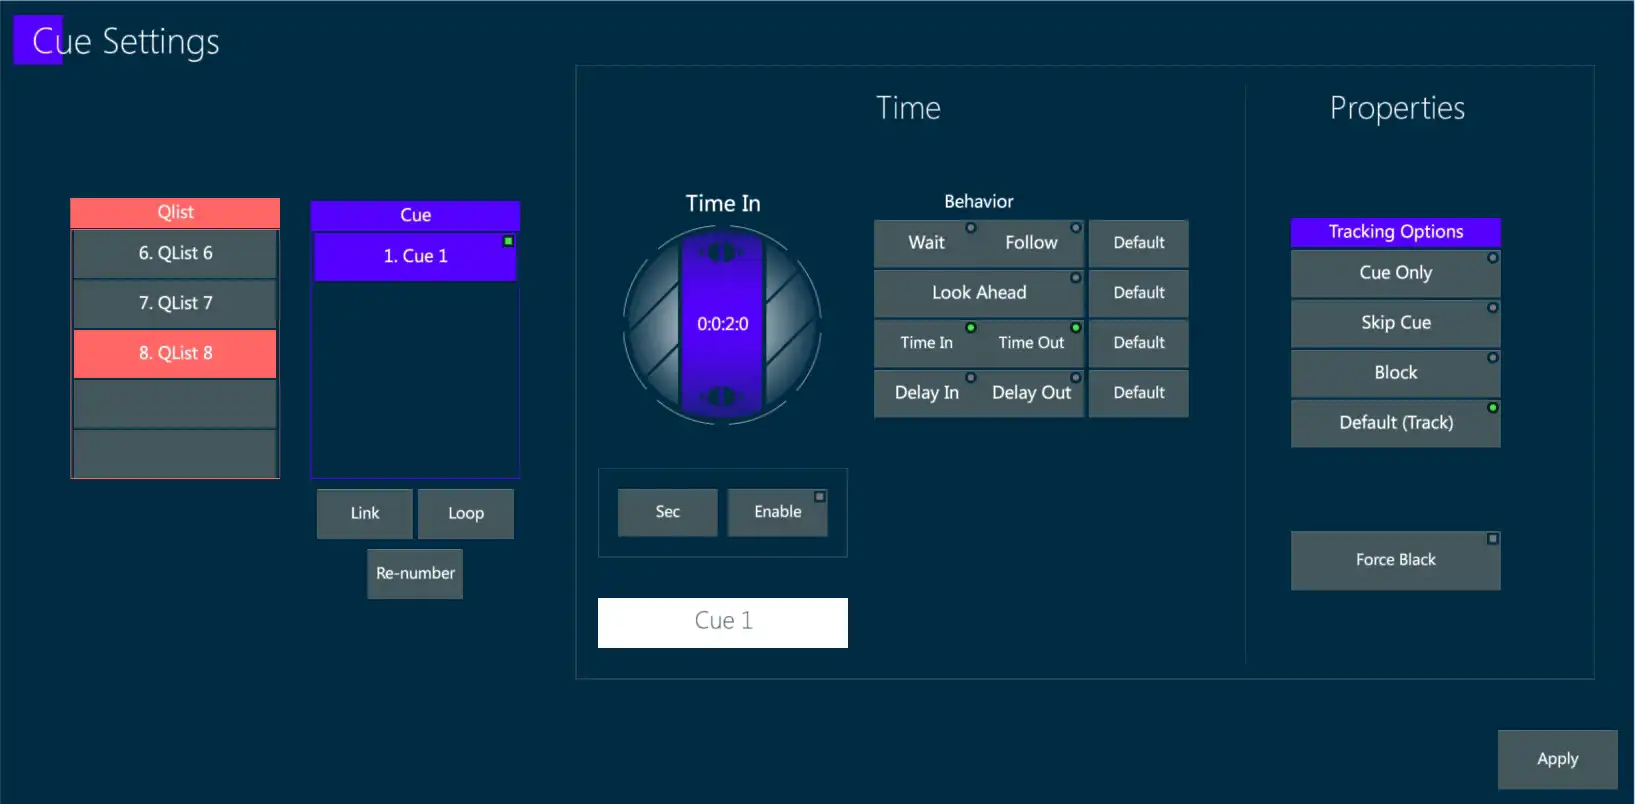
Cue Settings pop-up
Cue Settings for Text Label, Cue Time, Cue Linking and Looping, Cue Re-numbering and Cue Tracking options may be changed at any time after they are created using the Cue Settings pop-up:
Press [CUE] [#] [SETTINGS] - The Cue Settings pop-up will appear.
Alternately tapping the {Cue # } area of the source Controllers’ display, will open the Cue Settings pop-Up.
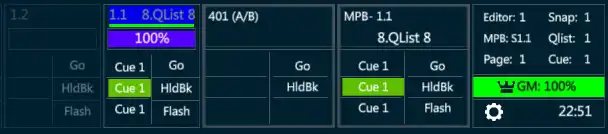
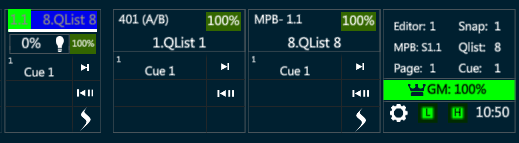
Controller Display (Sliders, A/B, Master Controller (MPB), System Settings)
To Delete a Cue:
- [Qlist] [#] (Optional if [SELECT] controller) [CUE [#] [DELETE]
9.10 Creating New Cues from Existing Cue Data
To Copy a Cue to a new Cue:
[CUE] [#] [COPY]
The Copy Cue Pop-up will open
Three Options are available:
{Actual Cue} - Copies cue properties as well as stored parameter values
{State} - Copies all of the hard values and tracked values that make up the source cue’s “End State” (Stage look)
{Values Only} - Copies only the hard values that are stored in the source cue
[CUE] [#] [PASTE] - The Cue Only Pop-up will open
Three Options are available::
{Paste} {Cue Only}
{Paste} {Skip}
{OK}
{Cancel}
Choose an option and the operation will be completed
To create a new cue using values from an existing cue, use one of the following two menu commands:
[CUE] [#] {LOAD} - Loads the cue’s actual hard values into the Editor. Tracked values are ignored. Or
[CUE] [#] {LOAD STATE} - Loads the cue’s hard values and current tracked values (Stage State) into the Editor.
Continue modifications and store as a new cue.
9.11 Cue Time Properties
Cue Time Properties:
9.11.1 Assigning Cue Time {(#assigning-cue-time-9.11.1.}
Cues may be assigned the following time properties:
Time
Time In
Time Out
Delay In
Delay Out
Follow Time
Wait Time
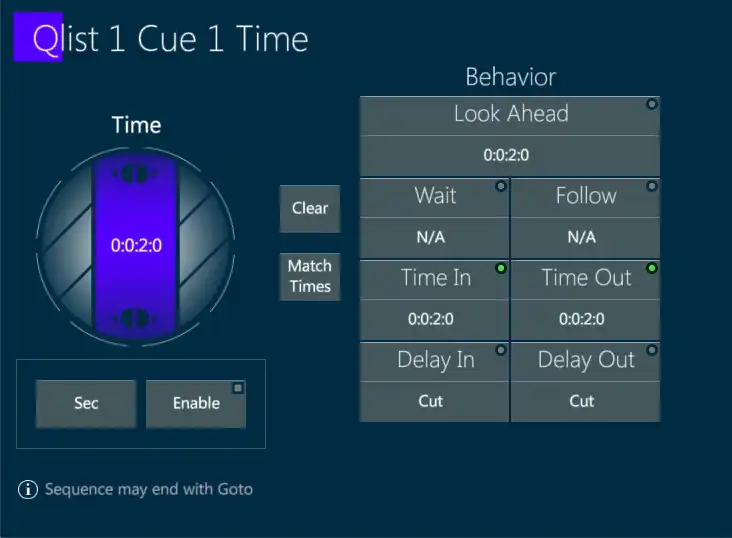
Time Pop-up
Assign a simple in/out time to the current cue:
Press [CUE] [#]
Press [TIME], the Time pop-up will appear
Enter a value with the keypad. The default unit of time will be seconds.
Press [ENTER] or
to exit the pop-up and assign the cue time.
Assign a separate {Time In} {Time Out}, and/or {Delay In} {Delay Out} times to the current cue:
Press [CUE] [#]
Press [TIME], the Time pop-up will appear.
Press [TIME] again and the display will advance to {Time In}.
Press [TIME] again and the display will advance to {Time Out}.
Press [TIME] again and the display will advance to {Delay}.
Press [TIME] again and the display will advance to {Delay In}.
Press [TIME] again and the display will advance to {Delay Out}.
Alternately times can be randomly entering by tapping the desired time field and making a keypad entry or turning the virtual wheel.
When typing any time value, the time indicator of the virtual wheel will turn green for approximately 4 seconds. While it is green time values may be entered in the format of: Hour.Minute.Second.Millisecond
If the {Enable} key is pressed, the user may manually toggle between time units using the {Units} key to the left of it.
Out times only apply to dimmer parameters.
9.11.2 Wait and Follow Times
There are two ways to make a cue automatically follow another:
Wait Time - Starts counting down from the [GO] press before the next cue is executed.
Follow Time - Advances to the next cue upon completion of the cue time and all of its individual parameter times.
Set a Wait Time:
Select the cue you want the Wait to be executed from.
Press [TIME] - the Time Pop-up will appear.
Tap {Wait} and either type in the Wait Time or use the virtual time wheel to set the Wait Time.
To clear a Wait Time, turn the physical Wait Wheel until its display and the {Wait} display say N/A , Press [ENTER]
Set a Follow Time:
Select the cue you want the Follow from.
Press [TIME] - the Time pop-up will appear.
Tap {Follow} and either type in the Follow Time or use the virtual time wheel to set the Follow Time.
To clear a Follow, turn the physical Follow Wheel until its display and the {Follow} display say N/A Press [ENTER}
9.12 Additional Cue Properties
Additional Cue Properties:
9.12.1 Link
Cues may be linked out of sequence using any of the following three methods:
Using keypad and Toolbar:
Source [CUE] [#] {LINK} on the Editor Toolbar - The Link pop-up will appear.
Type link destination [#] (Do not press [CUE]).
Press Enter or
to complete the operation.
Using Cue Setting pop-Up:
Source [CUE] [#] [SETTINGS] - Cue Settings pop-up will open.
Tap {Link} - The Link pop-up will appear.
Type, scroll or drag to the desired destination cue.
Press Enter or
to complete the operation.Press Enter or
again to close the Settings pop-up.
Direct using the cue sheet:
Tap in the Link field of the source cue in the Live Master Controller Cue Sheet
The Link pop-up will appear.
Type, scroll or drag to the desired destination cue.
Press Enter or
again to close the Settings pop-up.
To remove a Link:
Select the source cue and open the Link pop-up by any of the above methods.
If the proper source cue has been selected, the {Unlink} key will appear.
Tap {Unlink} key to remove the Link.
Alternate method:
Select the source [CUE] [#] and tap {Link} on the Editor Toolbar, the Link pop-up will appear.
Press [RELEASE] to remove the link.
If the source cue is forgotten, check the Link # field in the Live Master Controller Cue Sheet.
In cue sheet, cues that are disabled because of a Link are grayed out.
9.12.2 Loop
In many consoles, the only way to create a loop is to create a link from the end of a range of cues back to the beginning. Follow time must then be assigned to all of the cues. In Vibe this is also possible but a shorter more efficient method is also provided. LOOP is a function similar to LINK. It is assigned in the Loop pop-up or via the Cue Settings pop-up.
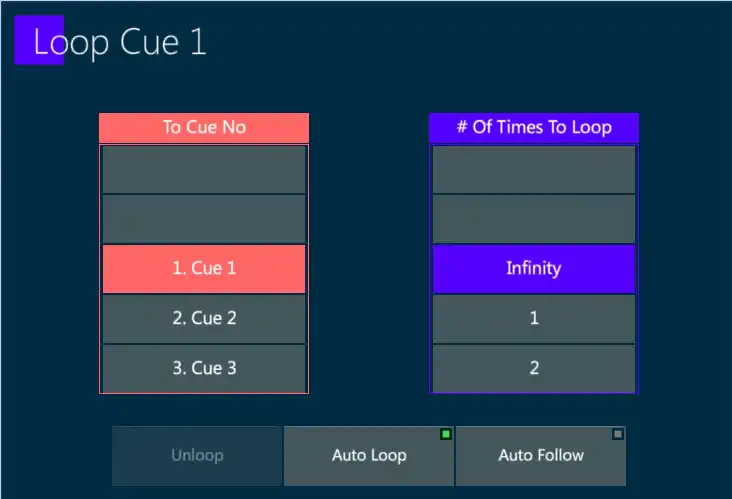
Loop Pop-up
To assign a Loop:
Using keypad and Editor Toolbar:
Start [CUE] [#] tap {LOOP} on the Editor Toolbar - The Loop pop-up will appear.
Type end [#] or use {To Cue No} field list to select the end cue.
Press Enter or
to complete the operation.
Using Cue Setting Pop-Up:
Start [CUE] [#] [SETTINGS] - Cue Settings pop-up will open.
Tap {Loop} - Loop pop-up will appear.
Type end Cue [3] or scroll the value picker to the desired end cue [#].
Press Enter or
to complete the operation.Press Enter or
again to close the Settings pop-up.
Direct via the cue sheet:
Tap in the Loop # field of the start cue in the Live Master Controller Cue Sheet - The Loop pop-up will appear.
Type, scroll or drag to the desired end cue.
Press Enter or
to complete the operation.
To assign a Loop Count - A Loop Count may be assigned using any of the above methods to open the Loop pop-up.
Make sure {Auto Loop} is selected.
Under the {# Of Time To Loop} field, Type loop count number, or scroll the value picker to the desired loop count number.
Press Enter or
to complete the operation.
To enable {Auto Follow} - Auto Follow loops advance to the cue following the loop, after completion of the loop count.
- Toggle {Auto Follow} - On/Off as required.
To set a Loop as Manual Loop (Does not advance automatically)
- Toggle {Auto Loop} - Off
To remove a Loop: (Qlist must be released first)
Select the start cue and open the Loop pop-up by any of the above methods.
If the proper start cue has been selected, the {Unloop} key will appear.
Tap the {Unloop} key to remove the Link.
Press Enter or
to complete the operation.
Alternate method: (Qlist must be released first)
Select the start {CUE] [#] and tap {LOOP} on the Editor Toolbar - The Loop pop-up will appear.
Press [RELEASE] to remove the loop.
In live playback view, cues that are set as Loop Cues have an orange color.
9.12.3 Tracking Options
Individual cues may be tagged with one of four Tracking Options:
Cue Only - Removes tracked values from asserting to the stage and sets them at home values (Not to be confused with Cue Only when used with {UPDATE} which works a cell basis).
Skip Cue - All cells in the cue will behave like Skip Cells. Values will still “skip around” a Skip Cue, even if the values in the Skip Cue are modified.
Block Cue - All cue parameter values whether tracked or hard will be made to act like hard values. Any new values added to cues above the Blocked cue will not track past a cue tagged a Block.
Track - The systems default behavior.
There are two additional properties a cue can be tagged with:
Force Black - When it is not desirable to see values move from one cue state to another, Force Black may be used to save programming time. In a cue tagged as Force Black, the dimmer parameter is first “forced” to Black Out, parameters then move in black, then the dimmer parameter is faded up again. The total speed of a Force Black operation is relative to the overall cue time.
Look Ahead cue - When Look Ahead is disabled for a Qlist, Individual cues with dark values may be tagged to perform Look Ahead pre-positioning.
In live playback view, cues that are set as Block Cues have a blue color. In live playback view, cues that are set as Skip Cues have a magenta color.
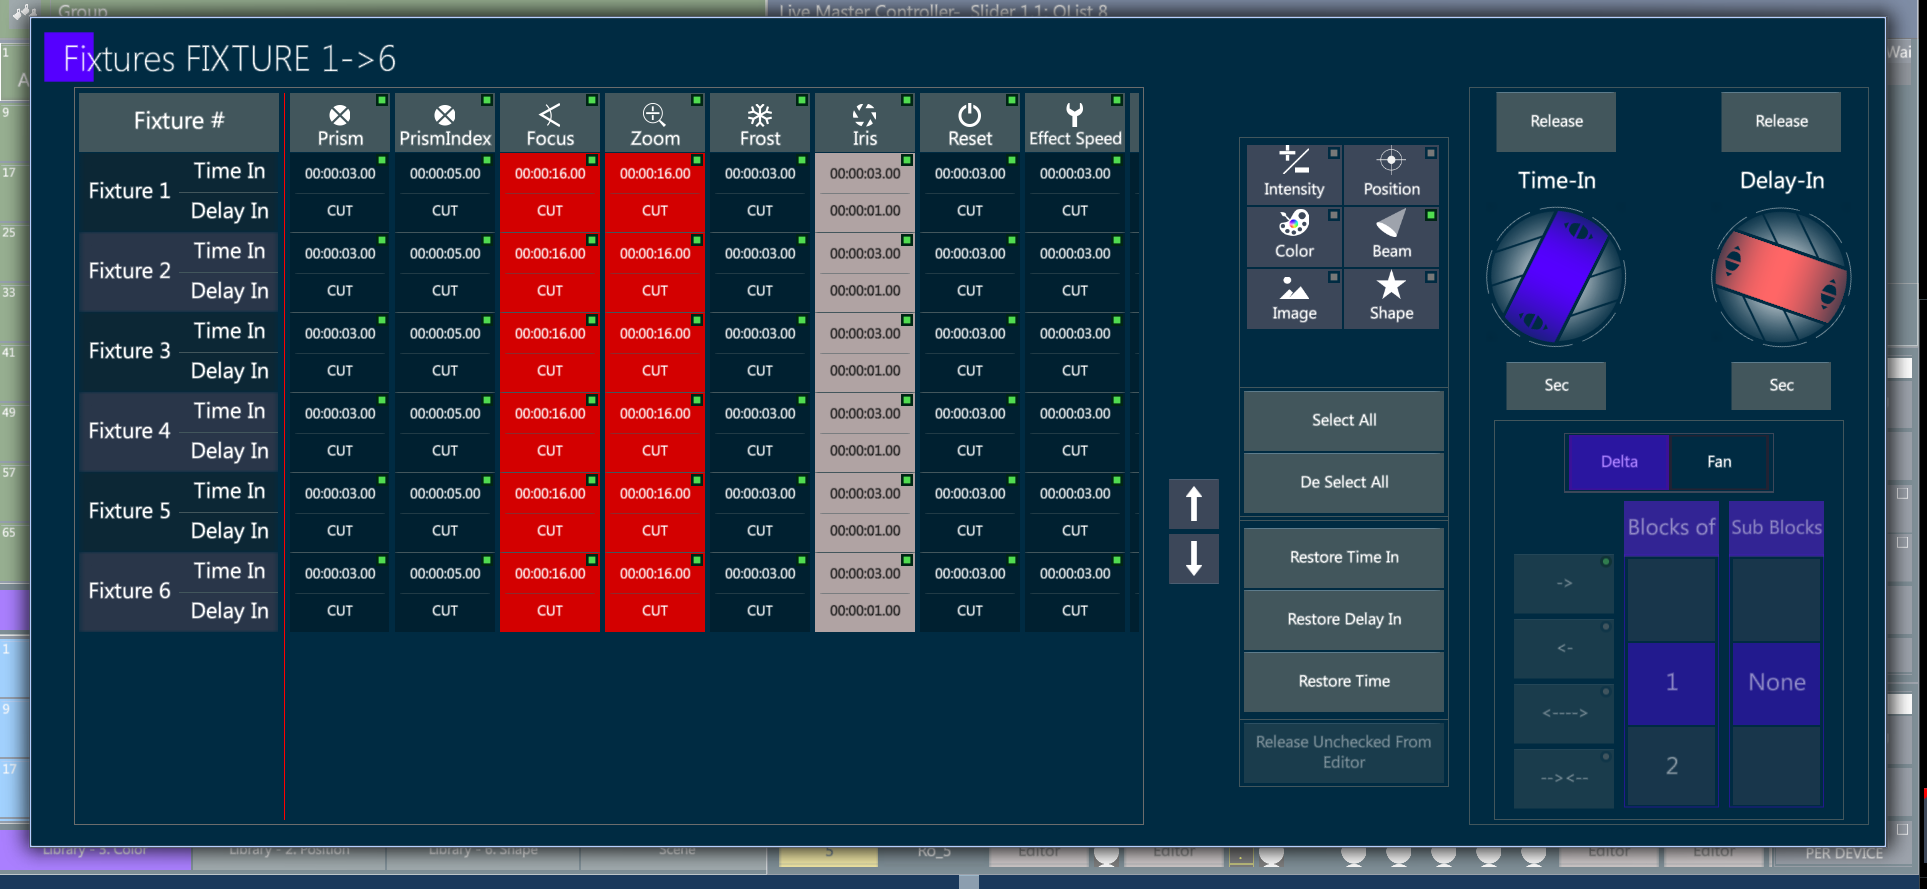
9.13 Parameter Time
Parameter Time:
9.13.1 Assign Parameter Time During Cue Creation
Set fixture parameter values in the Editor.
Select the fixtures requiring Parameter Time.
Press [TIME] - The Parameter Time pop-up will appear.
oggle on/off the parameters requiring Parameter Time
Parameter view may be filtered by banks.
Fixtures may be selected and detected freely in the pop-up.
Toggling the parameter header will select reselect all fixtures.
Set the parameter time for the selected fixtures directly using the keypad, or by using the virtual or physical time wheels.
Press [Enter] or tap
to close the pop-up.Selected fixtures will now show a clock icon in the Live Display.
Store the Cue using any of the methods described under:
- 9.3. Storing Cues and Scenes Directly to Controllers
- 9.5. Storing Cues to the Master Controller
- 9.6. Storing Qlist Cues to any Controller
Parameter Time pop-up
9.13.2 Adding or Modifying Parameter Time after Cue Creation
Method 1:
Select fixtures that are active on the stage - Specific parameters may be selected before pressing [TIME].
Press [TIME] - The Time pop-up will open.
Toggle on/of the parameters that require Parameter Time.
Parameter view may be filtered by banks.
Fixtures may be selected and detected freely in the pop-up.
Toggling the parameter header will select reselect all fixtures.
Set the parameter time for the selected fixtures directly using the keypad, or by using the virtual or physical time wheels.
Press [Enter] or tap
to close the pop-up.Selected fixtures will now show a clock icon in the Live Display.
Press [UPDATE].
See Also: 9.9. Modifying Cues and Scenes
Method 2:
Press [CUE] [#] [EDIT] - Update will flash red and the cue will be placed in the Editor.
Select the fixtures that need parameter time editing.
Press [TIME] - The Time pop-up will open.
Toggle on/of the parameters that require Parameter Time.
Parameter view may be filtered by banks.
Fixtures may be selected and detected freely in the pop-up.
Toggling the parameter header will select reselect all fixtures.
Set the parameter time for the selected fixtures directly using the keypad, or by using the virtual or physical time wheels.
Press the [UPDATE] again to complete the modification. The Update light will stop flashing.
Remove a parameter time:
Press [CUE] [#] [EDIT] - Update will flash red and the cue will be placed in the Editor.
Select the fixtures to release time from - Specific parameters may be selected before pressing [TIME].
Press [TIME] - The Time pop-up opens.
If they were not already selected, toggle on/of the parameters that require Parameter Time to be released.
Parameter view may be filtered by banks.
Fixtures may be selected and detected freely in the pop-up.
Toggling the parameter header will select reselect fixtures.
Press either the {Release} key over the Time-In wheel or the {Release} over the Delay-In wheel.
Press the [UPDATE] again to complete the modification. The Update light will stop flashing and the parameters will be released back to cue time.
9.13.3 Fanning Parameter Time
Method 1:
Select fixtures that are active on the stage - Specific parameters may be selected before pressing [TIME].
Press [TIME] - The Time pop-up will open.
Toggle on/of the parameters that require parameter or delay time.
Parameter view may be filtered by banks.
Fixtures may be selected and detected freely in the pop-up.
Toggling the parameter header will select reselect all fixtures.
Tap the Time-In or Delay-In virtual wheel.
Tap {Fan}.
Toggle the desired fan direction key.
Rotate the appropriate virtual wheel to fan the In-Time or Delay-Time.
Press [Enter] or tap
to close the Parameter Time pop-up.Press [UPDATE] - Check that the correct cue is selected.
Press [Enter] or tap
to close the Update pop-up.
The above sequence will also work with [CUE] [#] [EDIT] but step 10 is redundant.
Method 2:
Select fixtures that are active on the stage - Specific parameters may be selected before pressing [TIME].
Press [TIME] - The Time pop-up will open.
Toggle on/of the parameters that require parameter or delay time.
Parameter view may be filtered by banks.
Fixtures may be selected and detected freely in the pop-up.
Toggling the parameter header will select reselect all fixtures.
Tap the Time-In or Delay-In virtual wheel.
Type a time or delay range. E.g. to evenly fan delay-in time for tilt in a selection of 8 fixtures, Tap {Delay-In} wheel and then 0 → 8 seconds on the keypad.
Press [Enter] or tap
to close the Parameter Time pop-up.Press [UPDATE] - Check that the correct cue is selected.
Press [Enter] or tap
to close the Update pop-up.
The above sequence will also work with [CUE] [#] [EDIT] but step 8 is redundant.
Remove a fanned parameter time:
See: 9.13.2. Adding or Modifying Parameter Time after Cue Creation
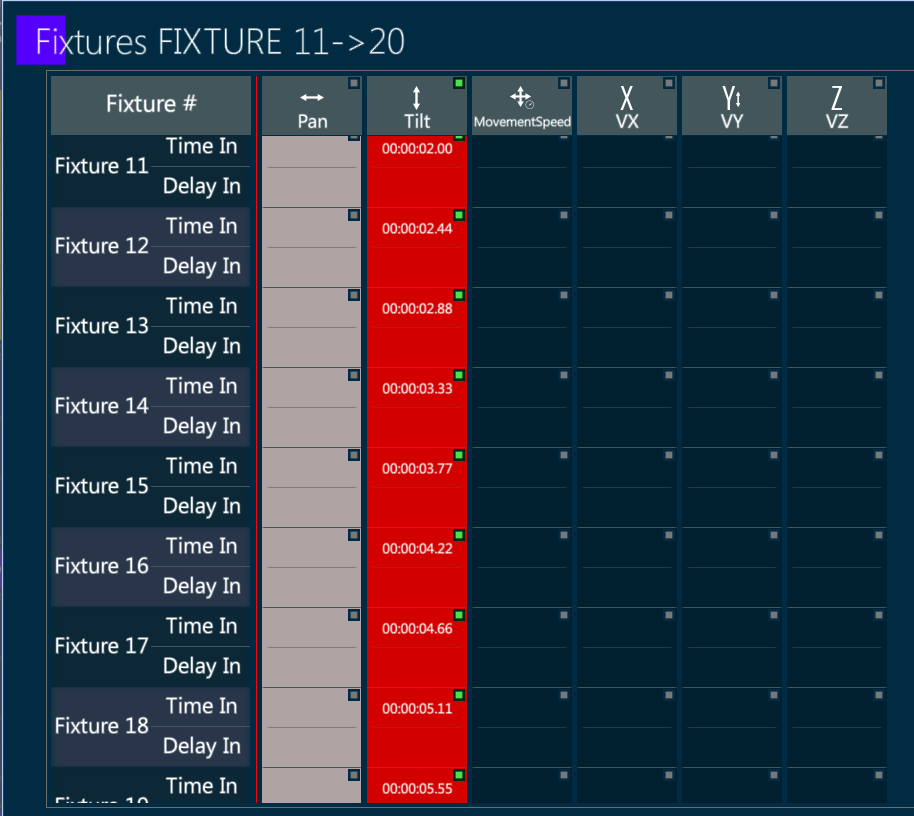
Cell Time Fan
The following command combination enables a cell time fan without the need to touch the screen and set the time with the wheel.
To Set Fan Cell Time:
Select Fixtures
Give values to a parameter
Press Time
Popup opens
Press #→# and ENTER The first number is the base for the fan and the second number is the end value of the fan. In the picture below there is a fan between 2 and 6 seconds.
9.14 Parameter Profile
Profile determine a parameter’s behavior during a fade. Profiles are always relative to the fade time. Profile options are available in a popup that is triggered from a button on the toolbar named Profile. This button is valid once there is a valid parameter selection.
Profile examples: - Linear (default) – on go, the parameter fades in cue time to its new level - Jump on Start (One) – on go, the parameter jumps to its level - Jump on End – when the fade is complete, the parameter jumps to its new level - Jump on 50% (Step) – when the fade reaches 50% of the cue time, the parameter jumps to its new level Any function from the system functions can be applied as a profile.
To Set a Parameter Profile 1. Select fixtures 2. Select parameter(s) 3. On the Editor Toolbar tap Profile 4. Popup opens

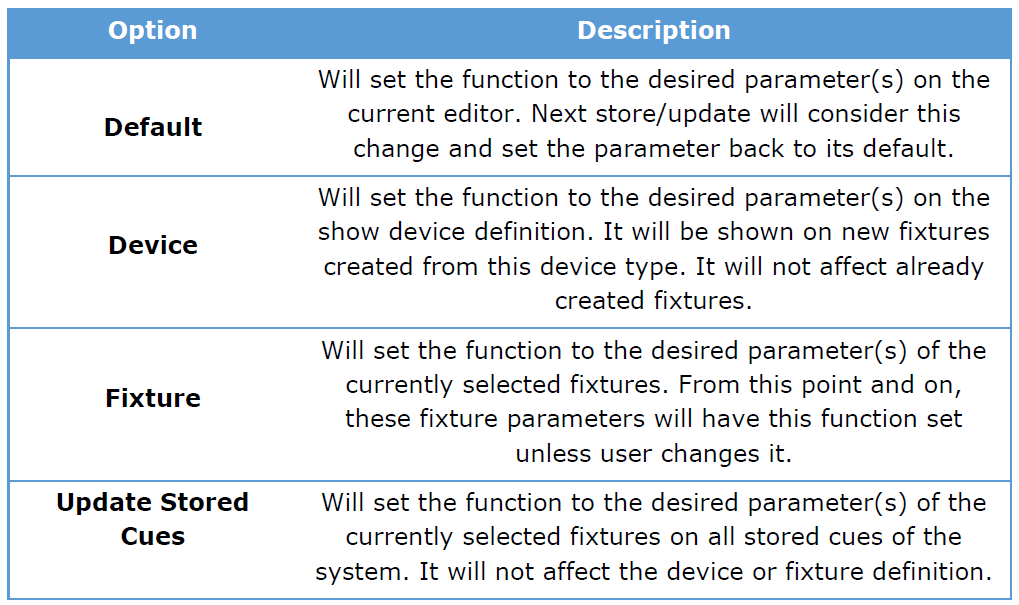
Popup Options
On the left side, there is a list of active parameters in the editor. Colored are the parameters that the settings will be applied to. User can switch a parameter on or off.
In the middle, there is a list of functions. User may select the desired function as the profile for the parameters.
On the right side, there are options that can be changed and explained in the table below.
User may apply the popup with nothing selected on the options or with all the options active.
9.15 Group Submasters
Group Submasters:
9.15.1 Convert a Scene into a Group Submaster
Any Scene can be easily converted into a Group Submaster (Known in some consoles as Inhibitive Submasters or Group Masters).
- Press [SETTINGS] [HERE] to any button of a controller that has a Scene assigned to it.
Alternatively, tap any of the controller {function labels} on the controller display on the main monitor above the Scene Slider.
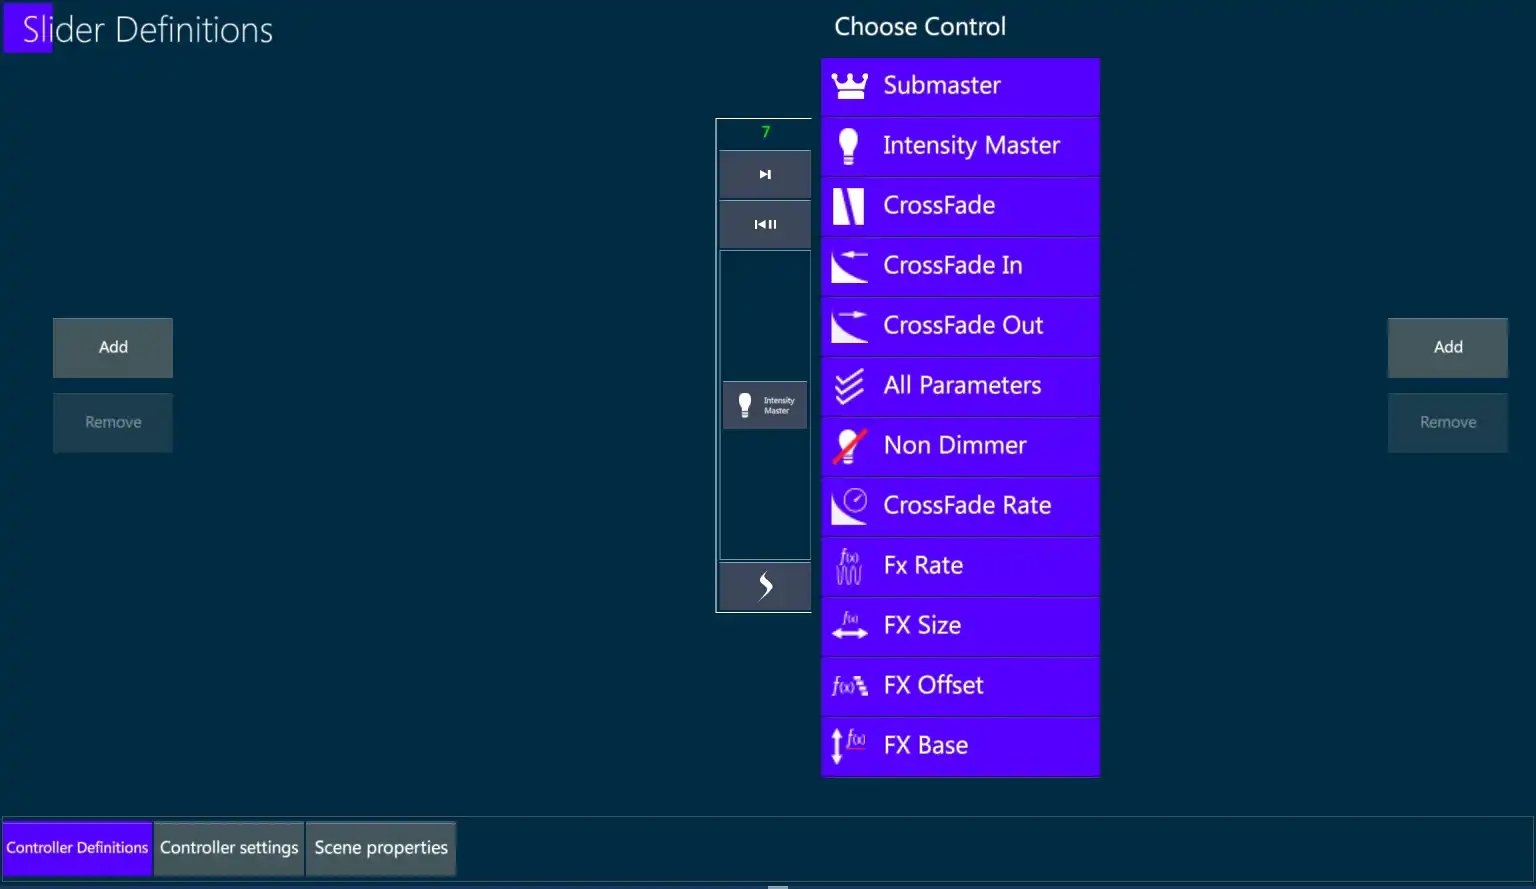
- The Slider Definitions pop-up will appear with the {Controller Definitions} tab selected.
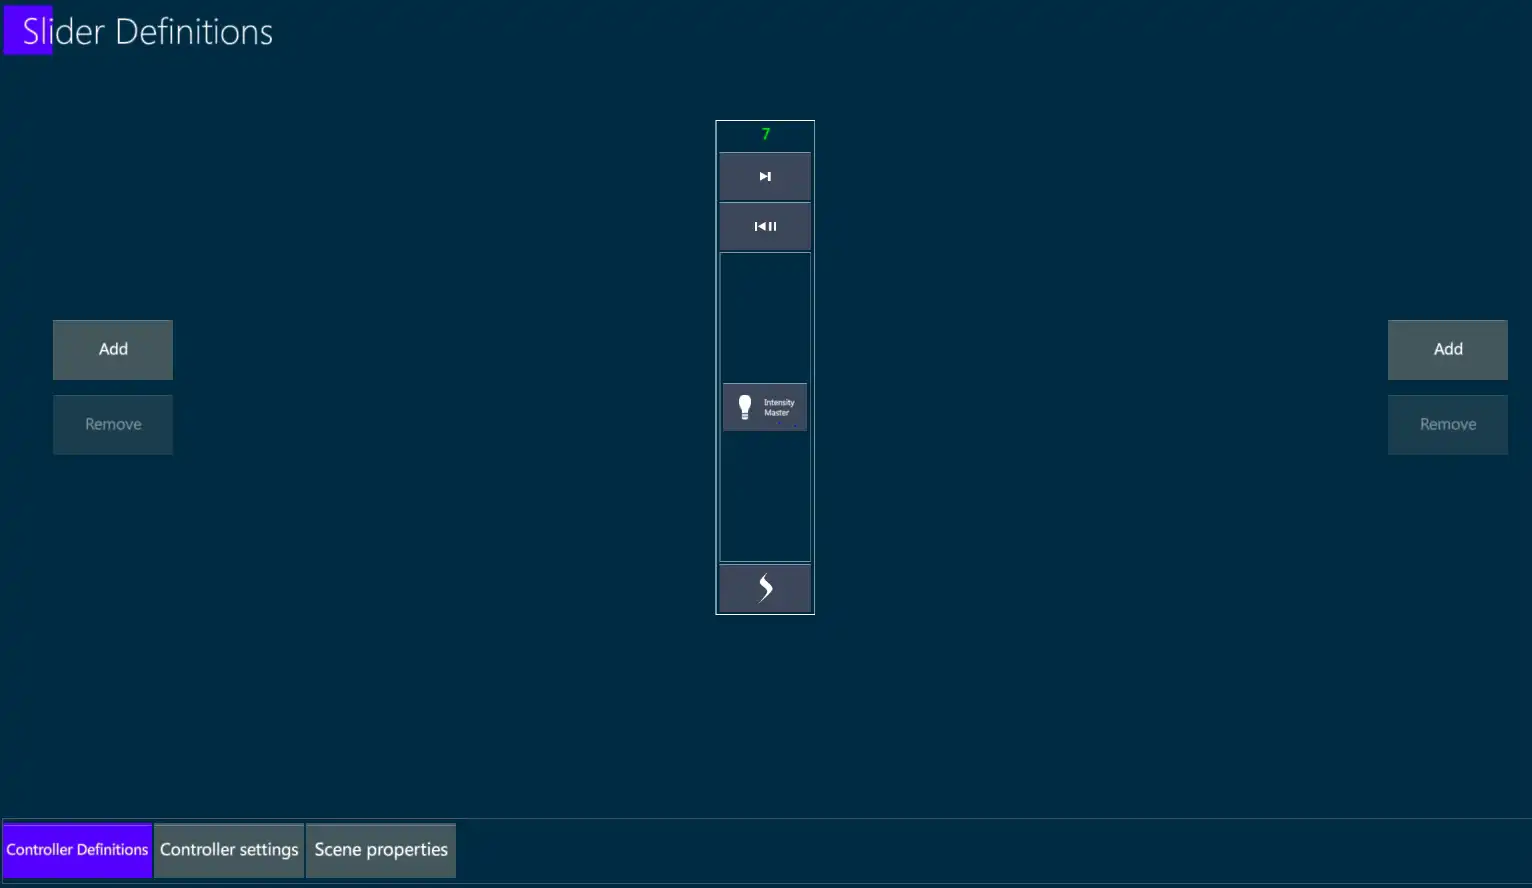
Tap the middle {Button label}. By default, it should say {Intensity Master}. The Choose Control drop-down menu will appear.
Select the {Submaster} option with the Crown in front of it.
The middle button mimic should now say {Submaster}.
Close the pop-up by pressing [Enter] or tap
.
All fixtures in the Scene will now act as Group Submasters. Scene fixture values will be ignored.
When a Scene is a Group Submaster, its softkey shows that information with the label “GRP M”.
9.15.2 Assign a Group Submater directly to a Slider Controller
Specify a fixture selection but do not assign editor values.
Press [STORE] [SCENE] [HERE] to any button of the destination controller. [FIXTURE] [1] → [6] [STORE] [SCENE] press the [TOP Buton] of Fader Controller # 1
The [Top Controller Button] will now turn light blue to indicate that it is now a Group Submaster.
When the slider handle is down, the [Top Button] will flash to indicate that levels are being inhibited. When it is at full, the button’s blue backlight will go steady.
9.15.3 Assign a Group Submaster using existing Groups
Assign a Group to a Slider Controller using keypad syntax:
Press [GROUP] [#] [HERE] - To any button of the destination slider controller.
The top controller button will turn light blue to indicate that it is now a Group Submaster.
Assign a Group to a Slider Controller using Group softkeys:
Press a {GROUP} softkey.
Press [HERE] to any button of the destination slider controller.
The [Top Controller Button] will now turn light blue to indicate that it is now a Group Submaster.
When the slider handle is down, the [Top Button] will flash to indicate that levels are being inhibited. When it is at full, the button’s blue back light will go steady.