Chapter 21 MIDI
This chapter deals with configuring and assigning MIDI
The following is covered in this chapter:
- 21.1. What is MIDI
- 21.2. General MIDI Configuration
- 21.3 Configuring MIDI Notes and Commands
- 21.4. MIDI Show Control
- 21.5 MIDI Time Code
21.1 What is MIDI
MIDI (Musical Instrument Digital Interface) is a protocol that was originally developed by the music industry to allow multiple MIDI sound devices to be triggered from just one source, usually a master keyboard or synthesizer. It is a control protocol and does not transmit audio. Over the years the MIDI protocol has evolved to also be a popular way to synchronize and “Play” lighting equipment. MIDI is based around a 7-bit architecture and therefore has a theoretical 127 possible notes for a keyboard. (Most pianos use 88 notes and synthesizers use even less)
In the basic MIDI implementation it is possible to have:
16 independent MIDI channels - The channels systems listen on.
127 Note ONs - Pressing down on a keyboard.
127 Note OFFs - Lifting off a keyboard.
Note On Velocity of 1 ⟶ 127 - How hard the key is struck.
After Touch pressure of 0 ⟶ 127 - Ho muce pressure is applied after the key reaches the bottom.
127 controllers each with a range of 0 ⟶ 127 - Encoder wheels or faders.
Patch changes from 0 ⟶ 127 - change from one instrument to another.
Pitch bend wheel that has a 14-bit resolution.
A section for MIDI time code, and other manufacturer’s “System Exclusive” information. In lighting, we often assign matching notes and controllers to common keys and wheels to synchronize playback.
E.g. A GO Button on console A is configured to send Note #46, and a GO button on console B is configured to receive note #46. Pressing GO on console A console will press the GO on console B. In EDM shows, DJ’s frequently control lighting via MIDI touchpad controllers.
MIDI Show Control or MSC - Not yet implemented
is a significant Real Time System Exclusive extension of the international Musical Instrument Digital Interface (MIDI) standard. MSC enables all types of entertainment equipment to easily communicate with each other through the process of show control.
The MIDI Show Control protocol is an industry standard ratified by the MIDI Manufacturers Association in 1991 which allows all types of entertainment control devices to talk with each other and with computers to perform show control functions in live and canned entertainment applications. Just like musical MIDI, MSC does not transmit the actual show media - it simply transmits digital information about a multimedia performance.. * Courtesy Wikipedia
MIDI Time Code - Not yet implemented
MIDI time code is similar to the SMPTE time code and is used to synchronize audio, video, and lighting equipment. Unlike SMPTE it does not use an audio signal.
MIDI time code is available in the following frame rates:
24 frame/s (standard rate for film work)
25 frame/s (standard rate for PAL video)
29.97 frame/s (drop-frame timecode for NTSC video)
30 frame/s (non-drop timecode for NTSC video)
Vibe can receive MIDI time code but does not generate MIDI time code.
Local MIDI:
- MIDI is generated and received from the 5 pin DIN connectors on the back of the console.
MIDI over USB:
- Transmits and receives MIDI over standard USB connectors. The device must be MIDI over USB class compliant to work with Windows without a driver. If the device has a Windows driver available it is recommended to install the driver for optimal results.
MIDI over Ethernet:
- Windows class compliant MIDI over Ethernet is supported. Compulite VC MIDI over Ethernet is also supported.
21.2 General MIDI Configuration
I/O General:
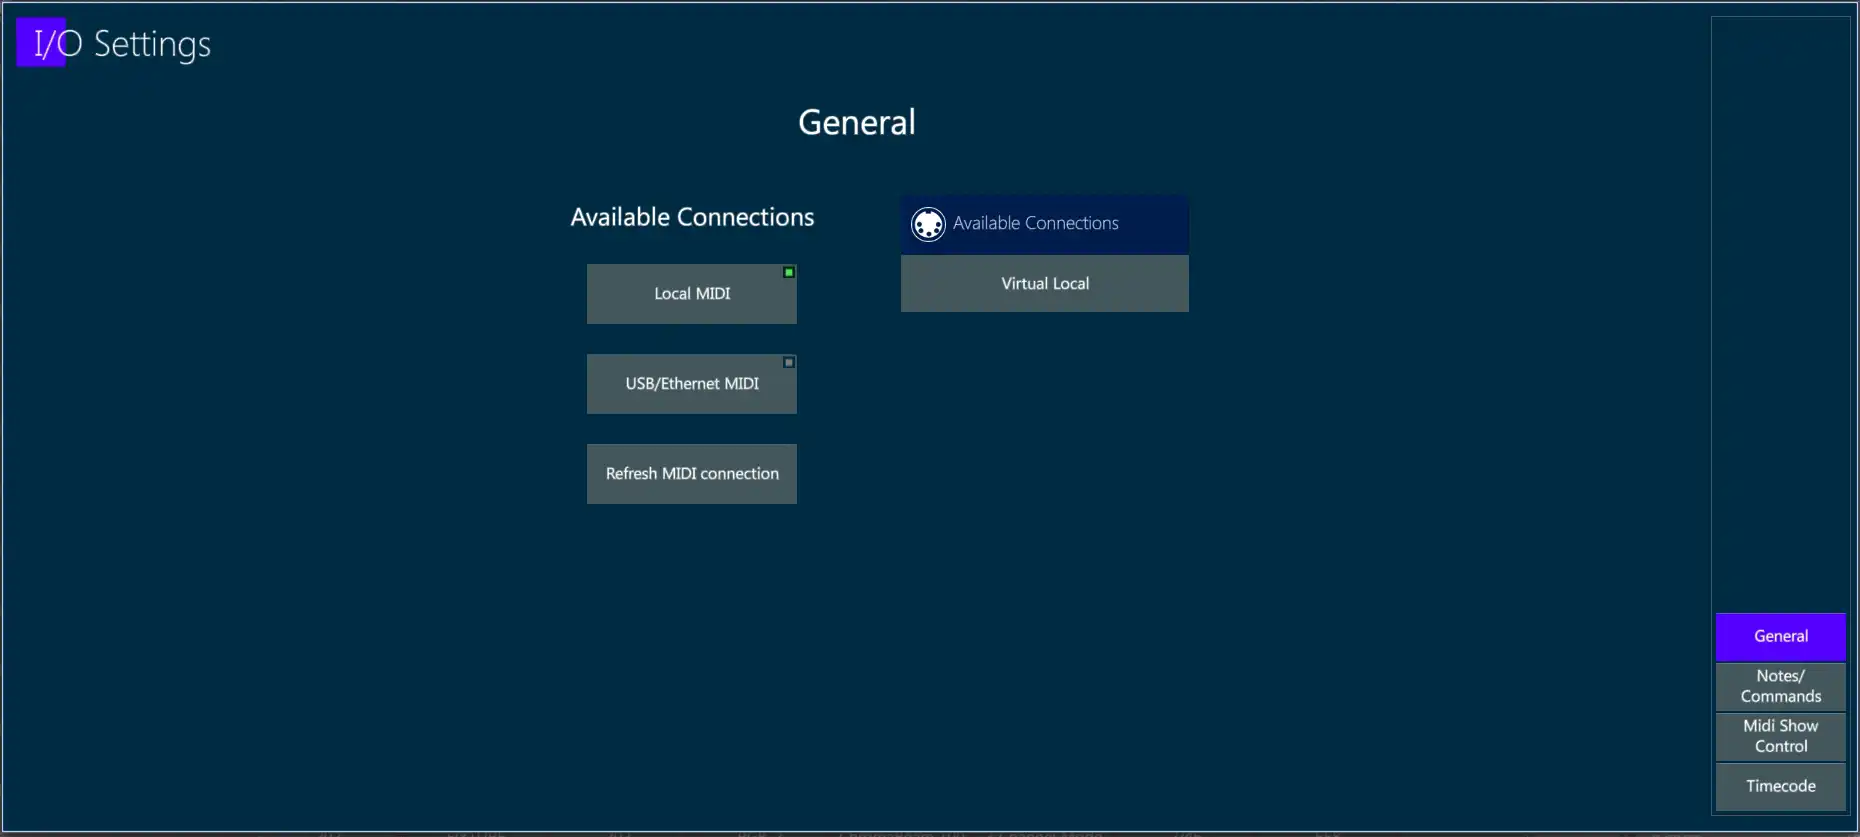
General configuring Vibe MIDI:
Connect all appropriate MIDI devices and power them on.
Toggle a MIDI Connection source
Local MIDI.
MIDI over USB/MIDI over Ethernet.
Refresh looks for new connections if devices are added later.
- Press Apply to stay in I/O settings or Press the
 or press [ENTER] to close the pop-up.
21.3 Configuring MIDI Notes and Commands
MIDI Notes and Commands:
The numbers 0 ⟶ 127 on the MIDI grid represent 10 3/4 octaves of notes from C-0 ⟶ G-10.
Tabs at the bottom filter the type of MIDI message to be received.
Channel # may also be selected to filter just messages being received on the selected channel.
The MIDI grid is used to select any of the 127 values available for the MIDI message types selected with the tabs.
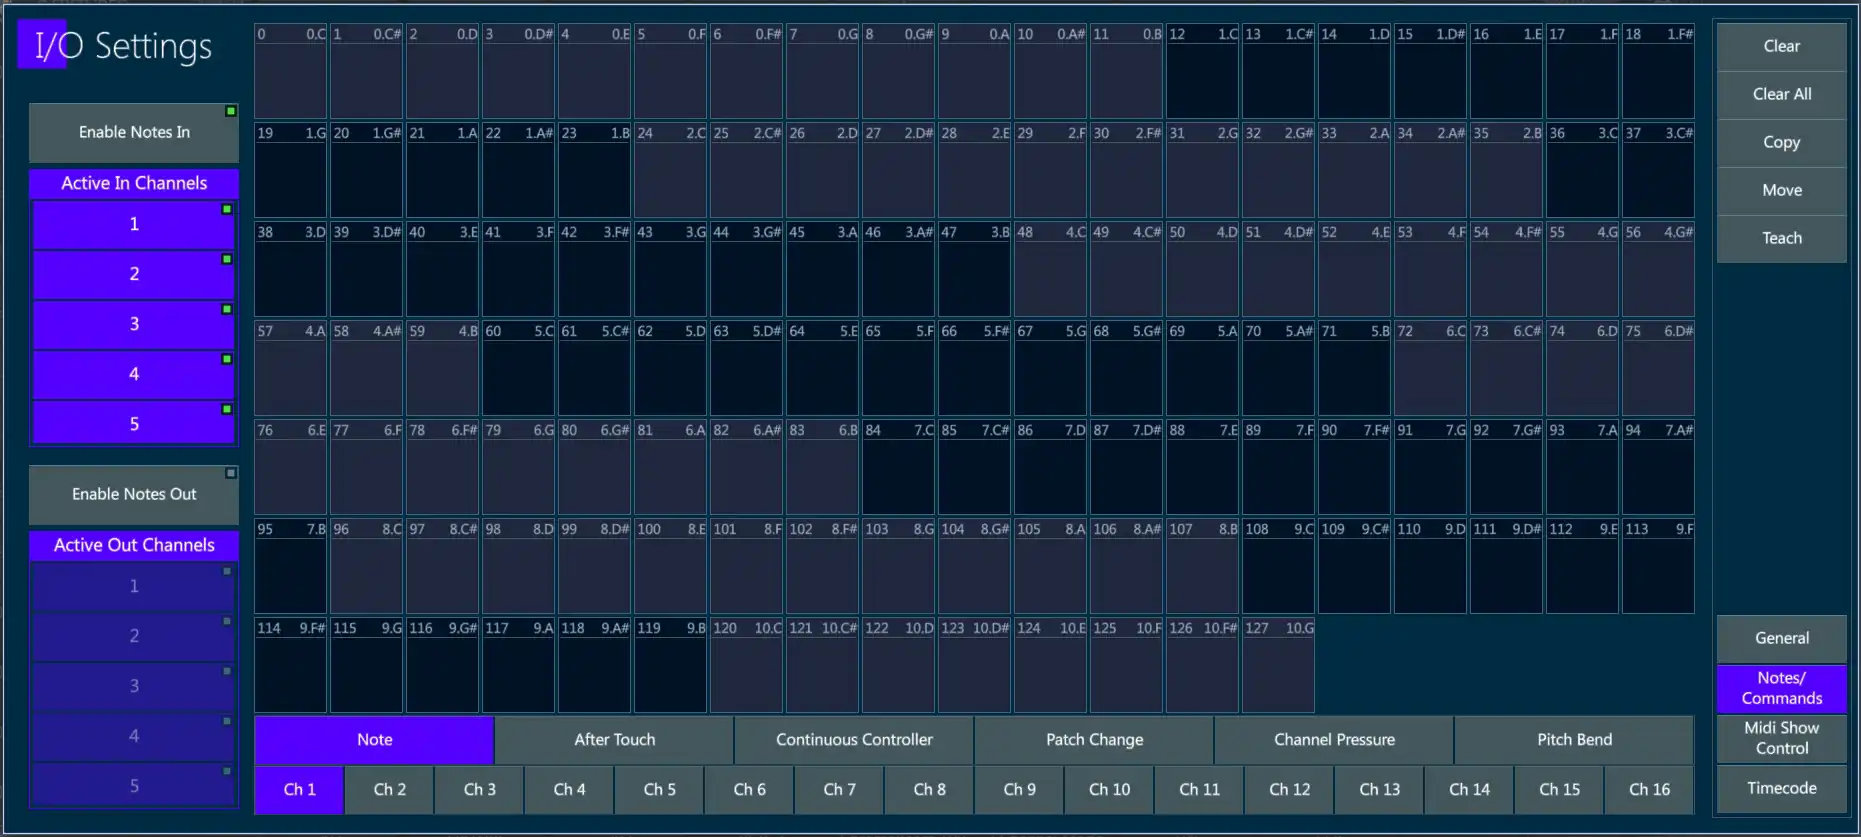
Assign MIDI Notes to Controllers:
Enable Notes in or Notes out.
By default, all 16 available channels will be selected. Deselect as needed.
Select the tab for the type of MIDI message to be received. In this case Note (Note ON = press down on controller key, Note off = release of controller key).
Tap {Teach } - The Teach key will turn purple.
Tap the desired note box in the MIDI grid - The box will turn purple.
Press any one of the controller keys - The location and button function of the controller will appear in the box.
Tap the {Teach} key again to toggle it off.
Press the
or press [ENTER] to close the pop-up.
Assign MIDI Continuous Controller to Vibe Controller:
Select the channel that the MIDI message will be received on.
Select the tab for the type of MIDI message to be received. In this case Continuous Controller.
Tap {Teach } -The Teach key will turn purple.
Tap in the desired continuous controller # in the MIDI grid - The box will turn purple.
Move any of the Vibe slider faders - The location and controller type will appear in the box.
Tap the {Teach} key again to toggle it off.
Press the
or press [ENTER] to close the pop-up.
Assign Macros to a MIDI note:
Select the channel that the MIDI message will be received on.
Select the tab for the type of MIDI message to be received. In this case Note.
Tap {Teach } - The Teach key will turn purple.
Tap the desired note box in the MIDI grid - The box will turn purple.
Press [MACRO] - The Macro selector pop-up will appear.
Select or type a previously recorded {Macro #} - the Macro # will appear in the the box.
Tap the {Teach} key again to toggle it off.
Press the
or press [ENTER] to close the pop-up.
Additional functions:
Tap {Clear} followed by a MIDI grid box to clear its assignment.
Tap {Clear All} to clear all MIDI assignments.
Tap {Copy} followed by the source MIDI assignment and then the destination MIDI assignment to copy from one note to another.
Tap {Move} followed by the source MIDI assignment and then the destination MIDI assignment to move the assignment from one note to another.
21.4 MIDI Show Control
Midi Show Control was developed as a simple standard method of triggering basic commands on dissimilar devices. Basic MSC commands are:
Go
Stop
Fire - Generally used for macros
Also supported on receive are:
All fixtures
General lights
Moving lights
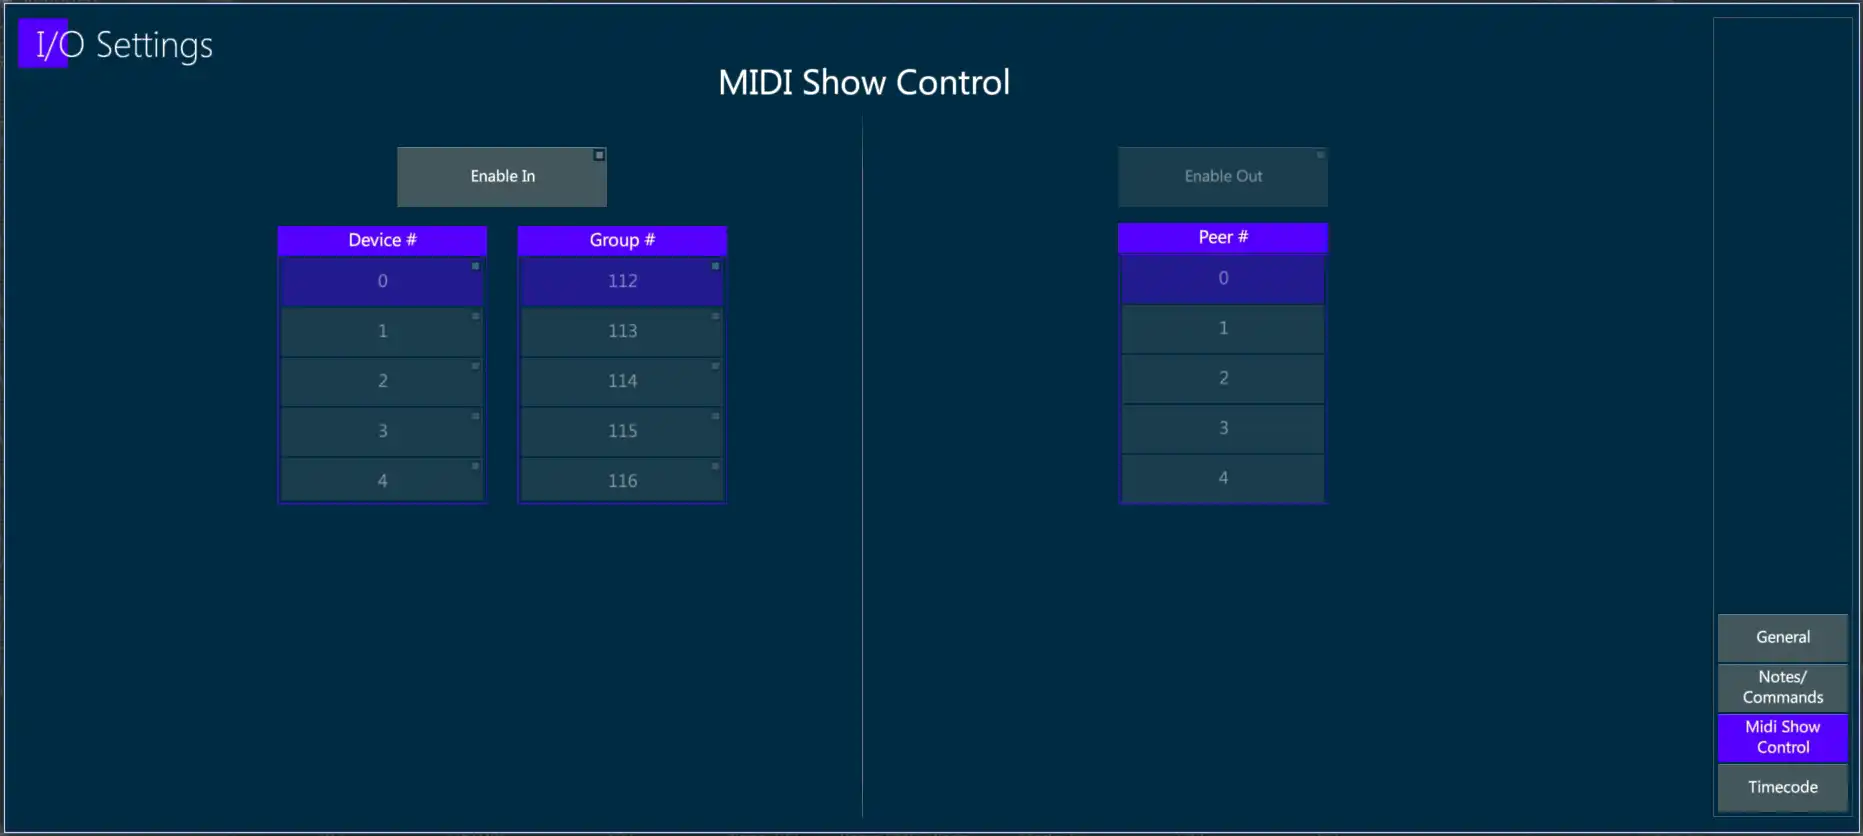
To receive MSC:
Tap {Enable In}
Match the {Device #} to number of the peer that will be sending the control commands.
If the Peer # is above 111, select a Group # that matches and all devices set to that Group # will receive MSC packets.
If the Peer # is 127 (Broadcast Mode) packets will be received on all devices regardless of their Device or Group numbers.
To Transmit MSC: This function is currently under development.
Recommended reading: http://jac.michaeldrolet.net/SCS_10_Help/scs_options_mid_msc.htm