Chapter 12 Effects
This chapter discusses Vibe’s two effect editors.
The following is covered in this chapter:
- 12.1. Effect Basics
- 12.2. Smart Screen Effects Editor
- 12.3. Advanced Effects Editor
- 12.4. Library Effects
12.1 Effect Basics
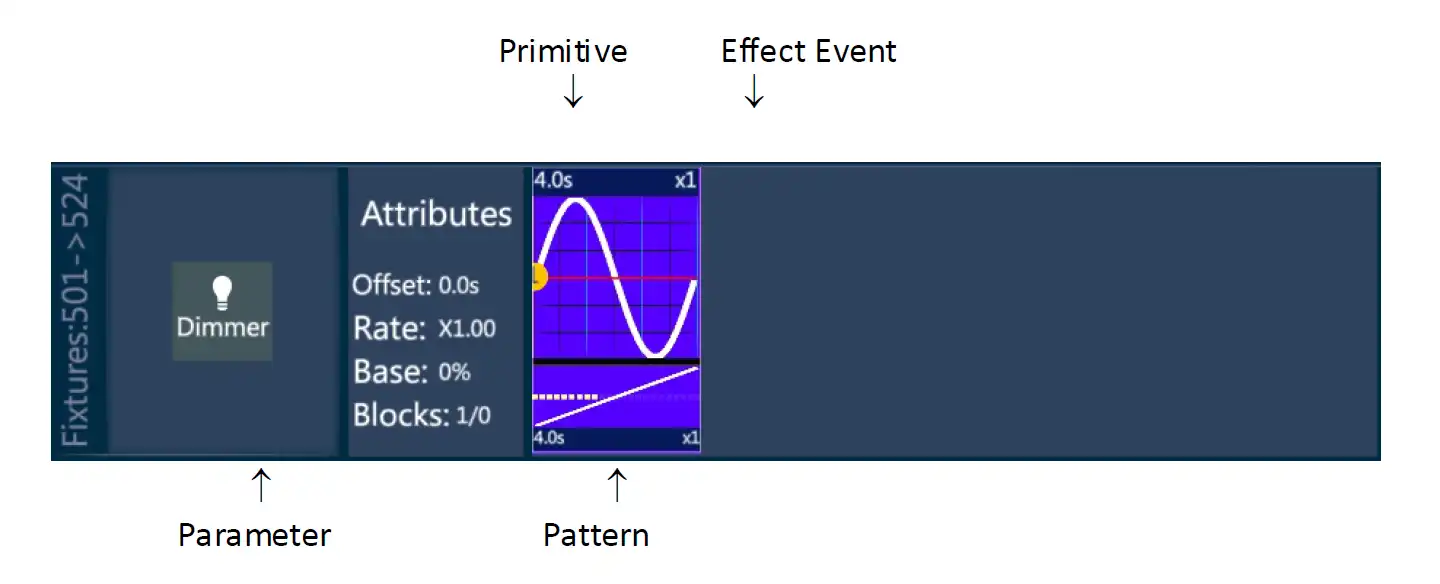
All Screen captures below are from the Advanced Effects Editor.
Vibe Effects are made up of Effect Events running along horizontal Effect Tracks.
Each Event Track must have:
At least one parameter assigned in the far left column. Additional parameters may be added but they will respond simultaneously to the Effect.
One Effect Event. Additional Effect Events may be added to the track each with its own time base or Effects may be merged and share a time base.
Multi-track effects:
Effects requiring more than one parameter may be stacked on separate Effects Tracks.
Examples of Multi-track effects would be:
CMY and RGB color effects
Pan/Tilt Circles
Blade effects
All Effect Events are built from the following components:
Functions
Primitives
Patterns
Functions:
- Are the basic building blocks of effects. They may be assigned to Primitives and Patterns.
Vibe uses functions as the raw building blocks for three features of the console:
Primitives - Main element of Effects
Profiles - Used for cue transitions
Curves - Used for dimmer behavior
Vibe ships with a number of “read only” Functions. They may not be edited. Users may create their own functions in the Advanced Effect’s Function Editor.
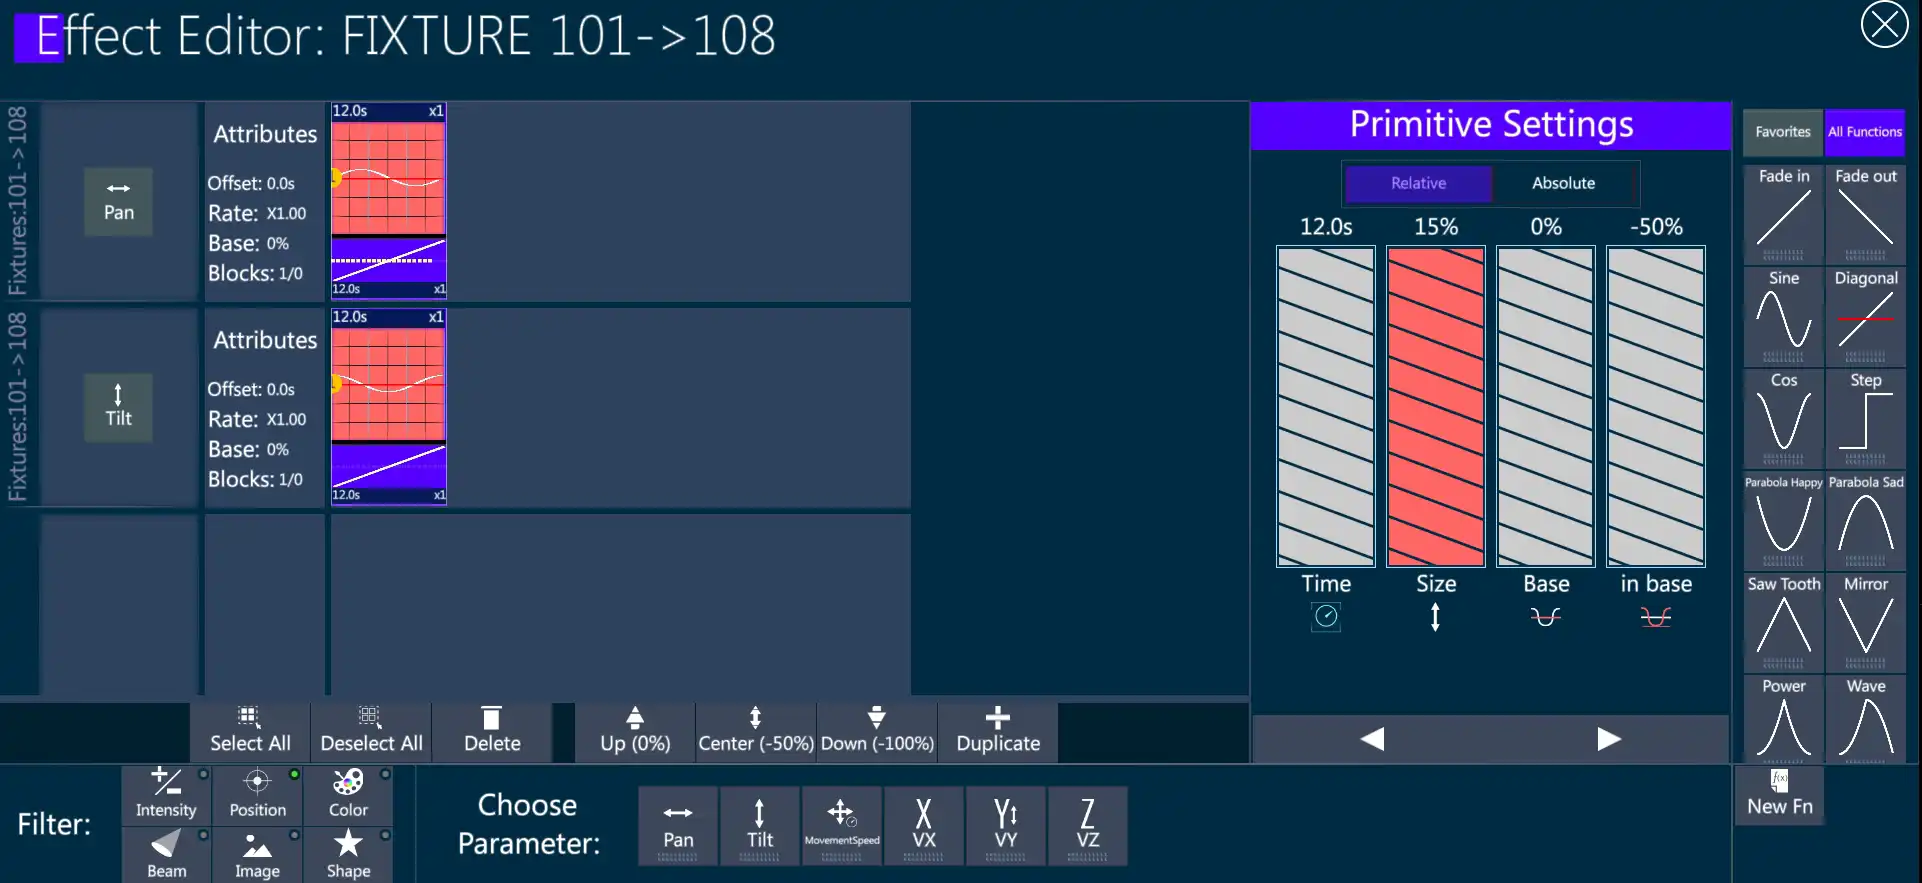
Primitives:
When Functions are linked to parameters on an Effect Track, the are called Primitives.
Primitives modulate parameter values based on their assigned Functions.
Primitives may be modified by a number of Primitive settings.

Primitive Settings:
Time - The duration of time it takes each fixture to complete one cycle across the Primitive.
Size - The amplitude of the Primitive’s function.
Base - The Y axis of start of the Primitive’s function when each fixture crosses it.
In Base - Adjusts the direction from the parameters start point (Base) it is linked to the Swing {Up} [Center} {Down} keys.
E.g. If the Base value of tilt is 50% (0°) and the In Base is Center (-50%), tilt would split center with a sine wave primitive assigned to it. Up (0%) would send the tilt from strait down to full out into the audience. Down (-100%) would send the tilt from strait down to full up upstage.
Pattern:
- Sets the behavior of fixture selection as it transitions across the Primitive.
Pattern Settings:
Spread (Offset) - Sets the percentage of offset between each fixture in a selection. 100% would evenly divide up the selection’s transition across the Primitive. A Spread of 0% would have all fixtures transitioning across the Primitive in unison.
UP - Based on the UP group #, Each UP grouping will complete a full cycle across the primitive before the next UP group can start.
e.g. A selection of 8 fixtures assigned to a primitive with a sine wave function and a spread of 100%, UP is set to 1, Fixture 1 will have to complete its full cycle across the Primitive before fixture 2 will begin. If the UP # is set to 2 fixture 1 and 2 will have split the cycle before the next two fixtures start.
Effects:
- The combination of Parameters, Primitives, and Patterns.
Effects Settings:
Settings that affect both Primitives and Patterns (Effect Event) are called Effect settings.
Effect setting are integrated into the Smart Screen Editor and are available by tapping the empty space beside the Effect Event in the Advanced Editor.
Offset All - Moves the start time of the Effect Event along the X axis of the Effect Track.
Params Spread - Is a toggle button that enables the proportional offsetting of the start times of multiple Effect Tracks at the same time.
{Params Spread} is a quick way to make CMY or RGB effects where colors need to spread apart so as not to mix to black or white.
Effects Libraries:
Once effects have been created then may be directly stored in cues and scenes or saved in Effects Libraries for future use.
Effect Libraries are stored similar to normal Libraries Store and Modify Bank Libraries.
Effects libraries have one additional option to allow users to include the base values. This is useful when effects must start from an absolute value.
12.2 Smart Screen Effects Editor
The Smart Screen Effects Editor allows users to quickly build effects within the normal work flow of the console while still having access to the main live displays. Effect Tracks are created for every selected parameter but they are hidden to remove screen clutter. Some advance operations are removed to speed up programming of simple effects.
Two pages are available in the Smart Screen Editor:
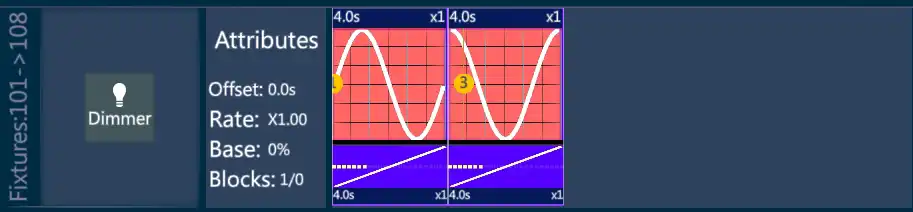
Attributes - Used for building Effect Events.
Grouping - Used for setting fixture Blocks Of (Fixture Grouping in Vector) and Sub Blocks Of (Blocks on some console).
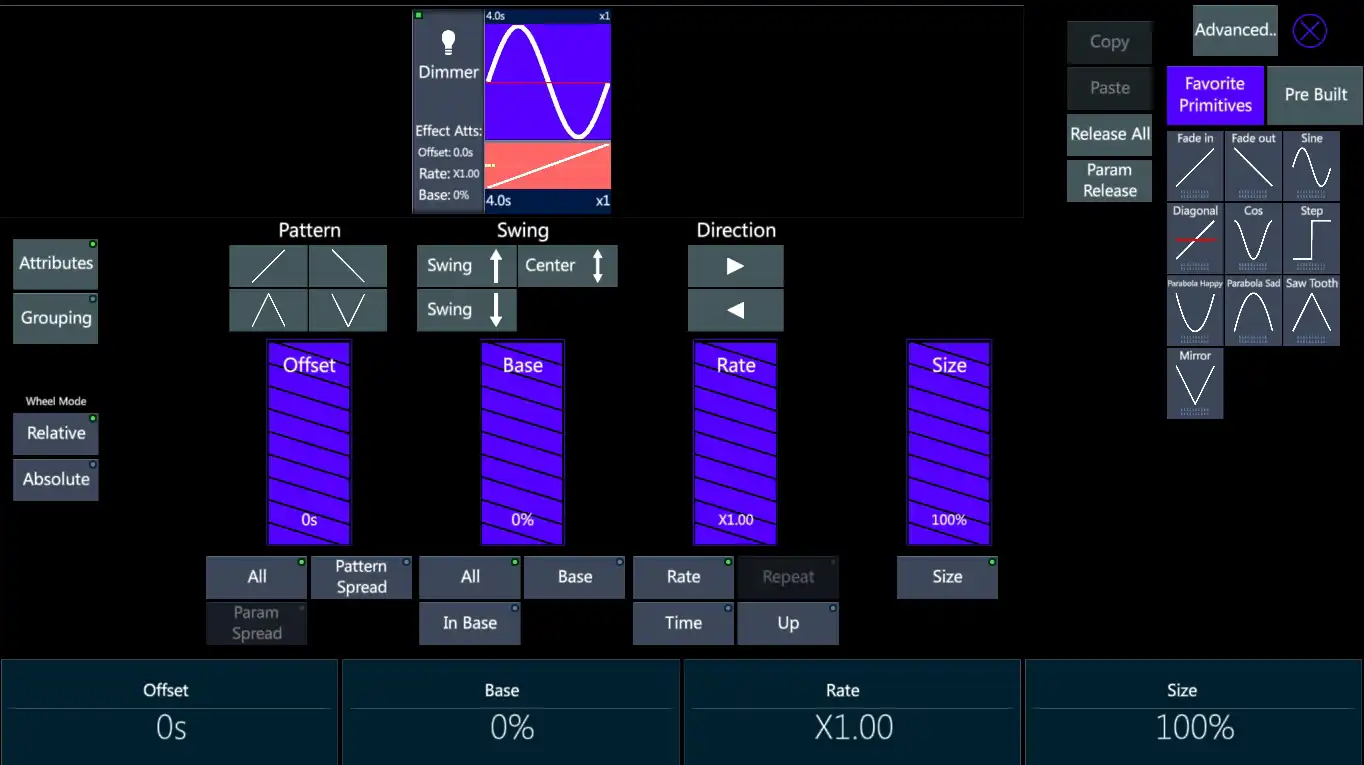
Smart Screen Attribute page
12.2.1 Building Effects Using the Small Screen Editor
To build an Effect in the Smart Screen Effects Editor:
Select the the fixtures to be used in the Effect.
Select the parameter/parameters to be in the Effect 8.3.2. What are Parameters
Press [EFFECT] - The Smart Screen Effect Editor will open in the {Attributes} display with a blank Effect Event.
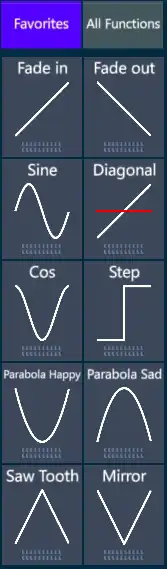
Tap the Pre Built tab and make a selection.
Or
Tap the Favorite Primitive tab and select a Primitive - the Function shown on the Primitive will be loaded with a default linear Pattern.
The Pattern may be changed by by tapping any of the following:
/ Fixtures move in a positive direction across the selection.
Fixture move in a negative direction across the selection.
/ Fixture mirror in a positive direction.
/ Fixture mirror in a negative direction.
Set the Offset {Pattern Spread} - Default is 100%.
100% = Selection is divided 100% transitioning across the Primitive.
0% = all fixtures transition in unison.
Set Swing (In Base) as needed 12.1. Effects Basics
Adjust Size and Base to set the Low and High ranges of the values
Set the Rate - x.xx Rate is a multiplier of the time value. Default Effect Time is 4 seconds to complete the cycle
Similar results to inverting the pattern functions may be achieved by reversing the selection direction with the {⟵ Negative}, {Positive ⟶ } keys
Smart Screen
Grouping:
For Grouping to be noticeable there must be an Pattern Offset Spread above 0%.
Tap the {Grouping} key - The Grouping page will open.
If the Offset Pattern Spread is not above 0%, tap the {Wave On} key. The Spread will be changes to 100%.
Set the {Blocks Of} [#] - This interleaves the Pattern into Groupings.
The Default for Blocks and Sub Block is 1/0 - No Groupings.
When {Blocks Of} is set to 1 or above, the Sub Blocks will move to 1 and Interleave Groups will be possible.
e.g. 2/1 would interleave a selection into Odds/Evens.
e.g. 3/1 would interleave a selection of 12 fixtures into [1+4+7+10] - [2+5+8+11] - [3+6+9+12]
Set the {Sub Blocks Of} - Combines fixture in a selection, to act like single fixtures.
- e.g. 12/2 would combine [1+2] - [3+4] - [5+6] - [7+8] - [9+10] - [11+12]
As a shortcut, Setting {Sub Block Of} back to 0 allows {Blocks Of} to combine fixtures instead of interleaving - 2/0 would combine [1+2] - [3+4] - [5+6] - [7+8] - [9+10] - [11+12]
The Advanced Effects Editor may be opened at any time by pressing [Vibe] Effects. All Effects running in the Smart Screen Effects Editor will be synchronized with the Advanced Editor
After programming an Effect, Close the editor using the  in the upper right corner.
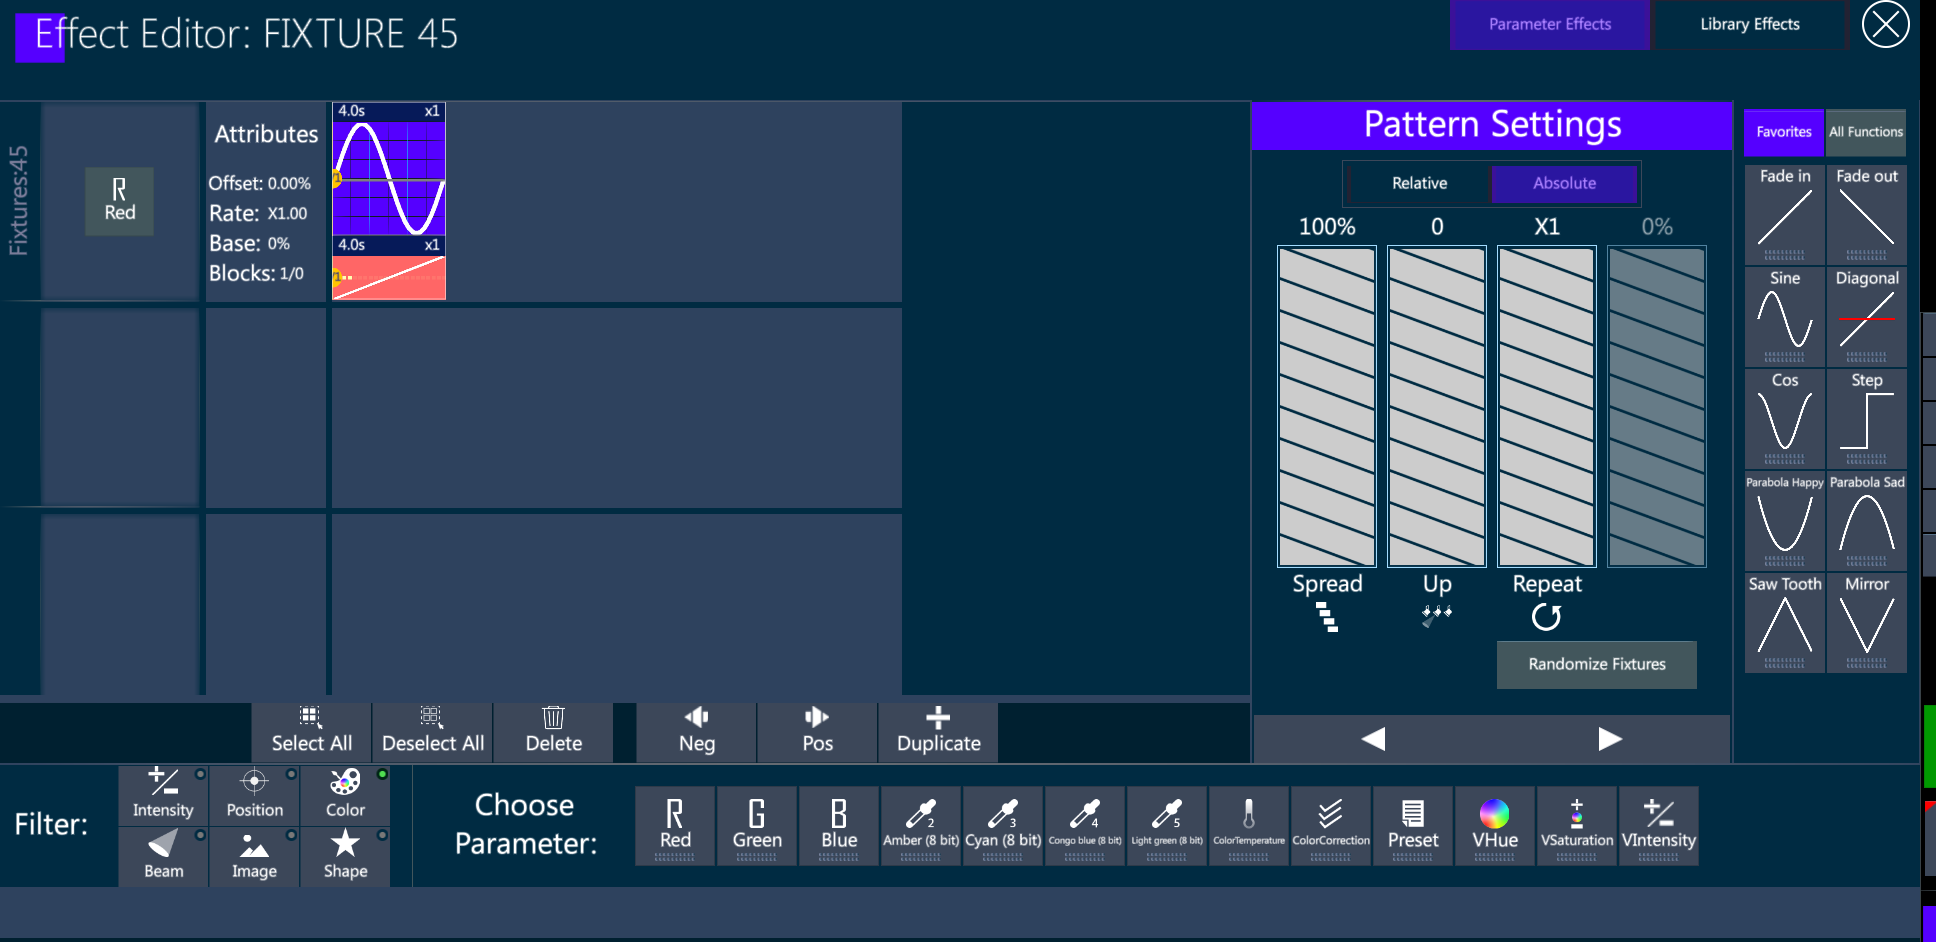
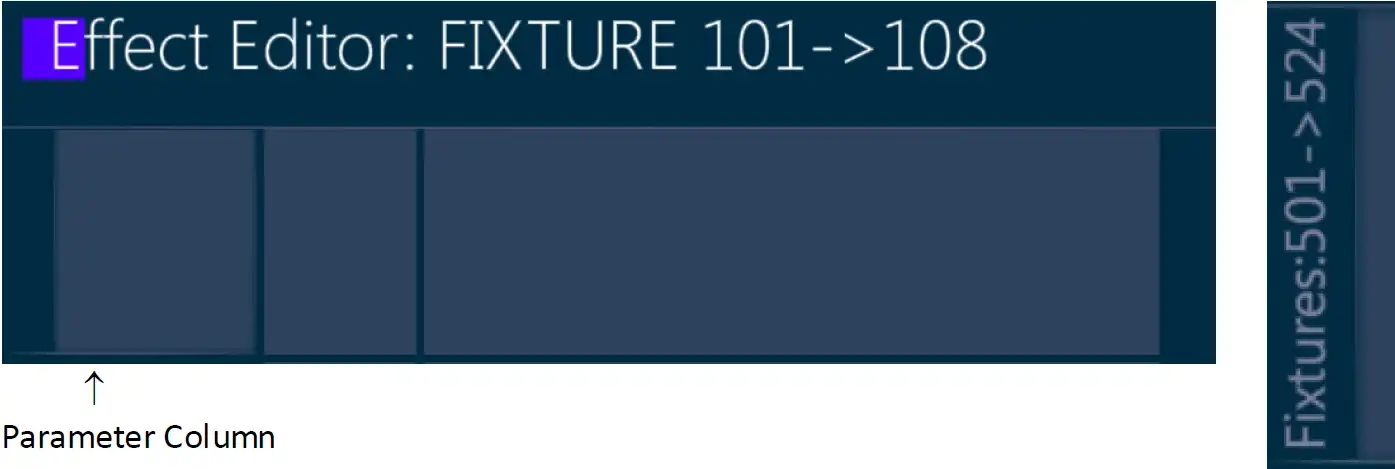
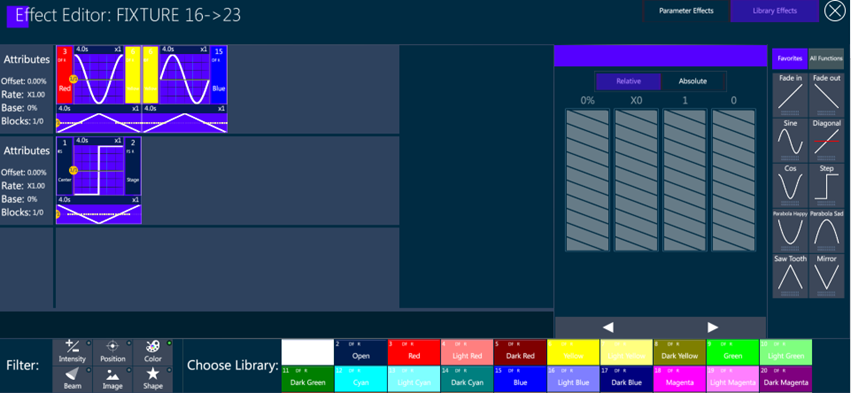
12.3 Advanced Effects Editor
Both Effect Editors write to the same Effect Engine. Either or both may be used to create effects. Whichever is opened at the time will be synchronized to the Effects Engine, but only one Effect Editor may open at a time.
Selecting multiple columns and rows:
- It is possible to make simultaneous changes to Primitive, Pattern, and Effect settings by toggling them on/off.
Advanced Effect Editor
The Advanced Effects Editor differs from the Smart Screen Effects Editor in the following ways:
Parameter selection is made in the Effects Editor not before entering it.
Effect Tracks are shown.
Multiple Parameters may be assigned to the same Effect Track.
- Multiple Effects Events may be assigned to the same Effect Track.
Effect sharing the same Effect Track can uses separate patterns or share patterns.
Pattern Size, Rate, and Base may be spread to create randomized looking effects.
Repeat - The number of times each Effect Event repeats before moving on the the next Effects Event, when they are sharing an Effects Track.
Building Effects in the Advanced Editor differs from the Smart Screen Editor in that a only a fixture selection is needed before entering the editor. Parameters are selected using the {Filters} and {Choose Parameter} . This takes a bit longer but is more flexible.

12.3.1 Build a basic Effect in the Advanced Effects Editor
Build a basic Effect in the Advanced Effects Editor:
Select the fixtures to be used in the Effect.
Press [VIBE]+[EFFECT] to open the Advanced Effect Editor.
Tap a parameter bank in the FIiters area.
Tap a parameter in the Choose Parameter area - the parameter background will turn purple.
Tap a blank space in the Parameter Column of an unassigned Effect Track
- the parameter will be assigned and the Attributes Column.
- Tap a Function from the Favorites tab or All Functions tab - The Function background will turn purple.
Tap a blank space in the Effect Event Column - an Effect Event will be created with a Primitive and Pattern .
Adjust Pattern and Primitive settings - See 12.1. Effects Basics
Close the Advanced editor using the
in the upper right corner.Store final Effect directly to a cue/scene or to the Effects Library.
Grouping: See 12.2.1. Building Effects Using the Small Screen Editor
Blocks by Groups: Groups may be substituted for individual fixtures using this option.
Select Groups in the order you wish the effect to use.
Build an effect as listed above.
Tap in the blank space beside the Effect Event, the blank space will highlight in blue and the Effect Settings will appear.
Toggle {Blocks By Groups on} - Make sure {Sub Blocks Of} is set to 0 or the groups will act as interleave instead of blocks.
Combining Parameters:
Tap a parameter bank in the FIiters area.
Tap a parameter in the Choose Parameter area - the parameter background will turn purple.
Tap a space in the Parameter Column already containing a parameter - the parameter will be merged into the parameter. column - All Primitives and Patterns will affect both parameters.
Stacking Effects Events:
Tap a Function from the Favorites tab or All Functions tab - The Function background will turn purple.
Tap the space to the right of an existing Effect Even - A new Effect Event will be stacked beside the existing one.
- Each Stacked Effect Event can have its own Primitive and Pattern.
Combining Effects Events:
- Drag and drop the primitive of an Effect Event over an adjacent primitive
- the primitives will now be combined but will share the pattern settings.
Duplicate an Effects Event:
Tap either the pattern or primitive are of an Effect Event - The background of the pattern or primitive will turn red and the Effects Toolbar will open under the Effects Tracks.
Tap {+ Duplicate} - A duplicate of the Effect Event will be added to the right of the source Effect Event.
Copy an Effect Track: Copies Effect Event settings to a new parameter (synchronize).
Tap a parameter bank in the FIiters area.
Tap a parameter in the Choose Parameter area - the parameter background will turn purple.
Tap a blank space in the Parameter Column below an assigned Effect Track - the parameter will be assigned.
Press the empty area to the right of the source Effect Event - The blank area will turn light blue and the Effects Toolbar will open under the Effects Tracks.
Tap {Copy} - The source Effect Event’s settings will be copied.
Tap in the blank area to the right of the new parameter - The area will turn blue and the Effects Toolbar will open under the Effects Tracks.
Tap {Paste} - The source Effect Event settings will be pasted to the new parameter.
Delete an Effect Event:
Tap either the pattern or primitive of the event to be deleted - the background will turn red.
Tap {Delete} on the Effects Toolbar below the Effect Tracks.
Release a parameter from an effect: Effect Parameters may be released using Edit Cue or Update pop-up.
- Using Edit Cue:
Cue must be active on a controller or it will be loaded to the Master Controller and bump its current Qlist out.
[QLIST] [#] [CUE] [#] [EDIT] - Cue values will be placed in the Editor and the [UPDATE] key will flash red.
Press [VIBE]+[EFFECT] - The Advanced Effect Editor will open.
Select the fixtures requiring parameters to be released.
Tap the parameter or parameters in the parameter column to select the parameters - the parameters will turn purple.
Tap {Release} on the Effects Toolbar - Parameters will disappear from the Effect Editor - stage values will be returned to their recorded base values or home values if they had no programmed base values.
Press [UPDATE] to complete the edit and restore control to the source controller.
- Using Update pop-up: Cue being edited must be active on a controller.
Select the fixtures requiring parameters to be released.
Press the the parameter’s push wheel, or tap the wheel display above the wheel, to select the parameter.
Press [VIBE]+[EFFECT] - opens Advanced Editor.
Tap the parameter or parameters in the parameter column to select the parameters - the parameters will turn purple.
Tap {Release} on the Effects Toolbar - Parameters will disappear from the Effect Editor - Stage values will be returned to their recorded base values or home values if they had no programmed base values.
Press [UPDATE] - The Update pop-up will open.
Make sure the proper cue is selected in the Cue column.
Tap
 or press [ENTER] - Completes the update operation.
12.3.2 Building Effects Using the Advanced Effects Editor
12.3.1. Building Effects Using the Advanced Effects Editor
Build a basic Effect in the Advanced Effects Editor:
Select the fixtures to be used in the Effect.
Press [VIBE]+[EFFECT] to open the Advanced Effect Editor.
Tap a parameter bank in the FIiters area.
Tap a parameter in the Choose Parameter area - the parameter background will turn purple.
Tap a blank space in the Parameter Column of an unassigned Effect Track
- the parameter will be assigned and the Attributes Column.
- Tap a Function from the Favorites tab or All Functions tab - The Function background will turn purple.
Tap a blank space in the Effect Event Column - an Effect Event will be created with a Primitive and Pattern .
Adjust Pattern and Primitive settings - See 12.1. Effects Basics
Close the Advanced editor using the
in the upper right corner.
10 Store final Effect directly to a cue/scene or to the Effects Library.
Grouping:
See 12.2.1. Building Effects Using the Small Screen Editor
Blocks by Groups: - Groups may be substituted for individual fixtures using this option.
Select Groups in the order you wish the effect to use.
Build an effect as listed above.
Tap in the blank space beside the Effect Event, the blank space will highlight in blue and the Effect Settings will appear.
Toggle {Blocks By Groups on} - Make sure {Sub Blocks Of} is set to 0 or the groups will act as interleave instead of blocks.
Combining Parameters:
Tap a parameter bank in the FIiters area.
Tap a parameter in the Choose Parameter area - the parameter background will turn purple.
Tap a space in the Parameter Column already containing a parameter - the parameter will be merged into the parameter. column - All Primitives and Patterns will affect both parameters.
Stacking Effects Events:
Tap a Function from the Favorites tab or All Functions tab - The Function background will turn purple.
Tap the space to the right of an existing Effect Even - A new Effect Event will be stacked beside the existing one.
- Each Stacked Effect Event can have its own Primitive and Pattern.
Combining Effects Events:
- Drag and drop the primitive of an Effect Event over an adjacent primitive
- the primitives will now be combined but will share the pattern settings.
Duplicate an Effects Event:
Tap either the pattern or primitive are of an Effect Event - The background of the pattern or primitive will turn red and the Effects Toolbar will open under the Effects Tracks.
Tap {+ Duplicate} - A duplicate of the Effect Event will be added to the right of the source Effect Event.
Copy an Effect Track: Copies Effect Event settings to a new parameter (synchronize).
Tap a parameter bank in the FIiters area.
Tap a parameter in the Choose Parameter area - the parameter background will turn purple.
Tap a blank space in the Parameter Column below an assigned Effect Track - the parameter will be assigned.
Press the empty area to the right of the source Effect Event - The blank area will turn light blue and the Effects Toolbar will open under the Effects Tracks.
Tap {Copy} - The source Effect Event’s settings will be copied.
Tap in the blank area to the right of the new parameter - The area will turn blue and the Effects Toolbar will open under the Effects Tracks.
Tap {Paste} - The source Effect Event settings will be pasted to the new parameter.
Delete an Effect Event:
Tap either the pattern or primitive of the event to be deleted - the background will turn red.
Tap {Delete} on the Effects Toolbar below the Effect Tracks.
Release a parameter from an effect: Effect Parameters may be released using Edit Cue or Update pop-up.
- Using Edit Cue:
Cue must be active on a controller or it will be loaded to the Master Controller and bump its current Qlist out.
[QLIST] [#] [CUE] [#] [EDIT] - Cue values will be placed in the Editor and the [UPDATE] key will flash red.
Press [VIBE]+[EFFECT] - The Advanced Effect Editor will open.
Select the fixtures requiring parameters to be released.
Tap the parameter or parameters in the parameter column to select the parameters - the parameters will turn purple.
Tap {Release} on the Effects Toolbar - Parameters will disappear from the Effect Editor - stage values will be returned to their recorded base values or home values if they had no programmed base values.
Press [UPDATE] to complete the edit and restore control to the source controller.
- Using Update pop-up: Cue being edited must be active on a controller.
Select the fixtures requiring parameters to be released.
Press the the parameter’s push wheel, or tap the wheel display above the wheel, to select the parameter.
Press [VIBE]+[EFFECT] - opens Advanced Editor.
Tap the parameter or parameters in the parameter column to select the parameters - the parameters will turn purple.
Tap {Release} on the Effects Toolbar - Parameters will disappear from the Effect Editor - Stage values will be returned to their recorded base values or home values if they had no programmed base values.
Press [UPDATE] - The Update pop-up will open.
Make sure the proper cue is selected in the Cue column.
Tap
or press [ENTER] - Completes the update operation.
12.4 Library Effects
It is possible to create effects between libraries.
To create a library effect
Select the fixtures
Press the Effect button to open the Effect window
Press Advanced to open the Advanced Effect window
Choose Library Effects
Filter the bank and choose a library
Tap the line to add the starting library
Choose another library
Tap the right side of the effect to add the ending library
Assign fade curves and pattern curves to the effect
An effect between libraries can be stored in the effect library and managed as a normal effect, but it keeps the library references. Editing any of the reference libraries will automatically update the library effect (same as Cues and Scenes stored with library references).