Chapter 13 Playback Controllers
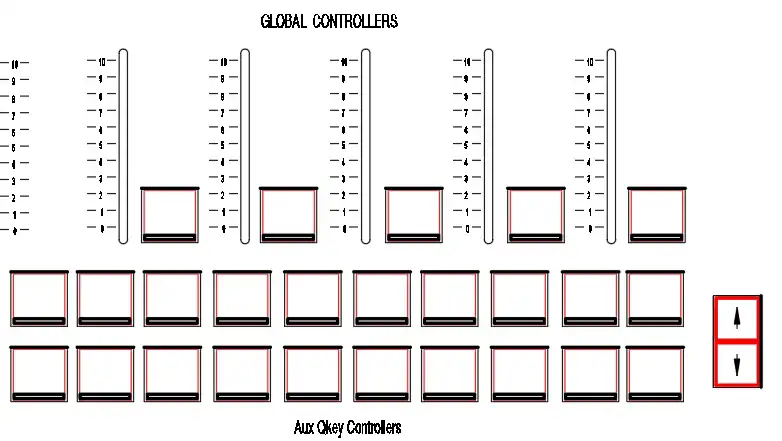
Cues and Scenes are played back using the 15 Motorized Slider Controllers, non-motorized A/B Dipless Crossfader , 15 Qkey Controllers, 20 Auxiliary Qkey Controllers, and 5 non-motorized Global Slider Controllers.
The following is covered in this chapter:
- 13.1. Controller Priority Logic
- 13.2. Controller Overview
- 13.3. Master Controller
- 13.4. GOTO and LOAD
- 13.5. Configuring Controllers
- 13.6. Controller Color Codes
- 13.7. Working With controllers
- 13.8. Controller Release and Free
- 13.9. Controller Qlist Properties
- 13.10. Controller Modes
- 13.11. Rate and Teach Keys
- 13.12. Playback Master
- 13.13. Move Controllers
13.1 Controller Priority Logic
Controller Priority:
Vibe keeps an LTP priority list of which controllers own parameters and the order in which they were asserted. Every time a controller is turned on, its parameters are asserted and the controller moves to the top of the list. Parameters that are still on active controllers but are currently overridden are said to be “robbed”. When the controller that owns the parameter is released from the stage, the last active controller to own the robbed parameter is now moved back to the top of the list and reasserted the parameter to the stage.
This feature is very useful for “On the Fly” programming where a main Qlist may be temporarily overridden by Qkeys or Controllers and quickly restored when they are released.
The Editor is always the highest propriety and will override any values from controllers until they are released or The Editor is reset.
Priority Groups:
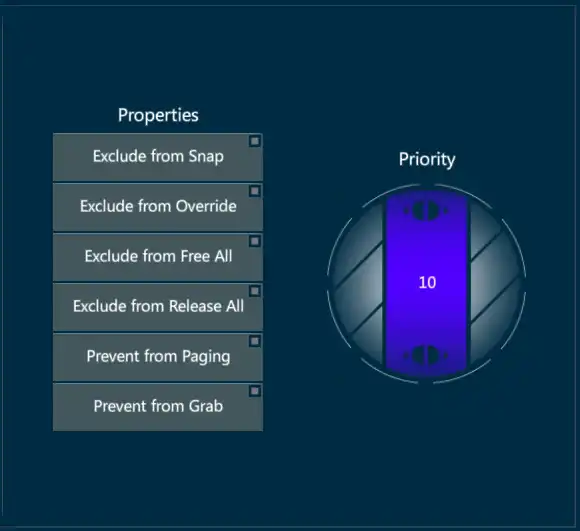
Controllers assigned the same Priority Group number will be LTP amongst themselves.
Controllers assigned higher Propriety Group numbers cannot be overridden (“robbed”) by controllers with lower numbers.
Assigning Controllers to priority Groups: 1. Tap the top area of a controller display, the Settings pop-up will open. 2. Select the {Controller Settings} Tab.
OR
- Press [SETTINGS] [HERE] to any controller button, the Settings pop-up will open.
- Select the {Controller Settings} Tab.
- Rotate the virtual wheel to the desired Priority Group number or tap the center of the wheel until it turns red and type a Priority Group number from 0 - 999.
13.2 Controller Overview
Controllers are used to playback or execute a number of objects:
Cues
Scenes
Group Submasters
Libraries
Macros
Snaps
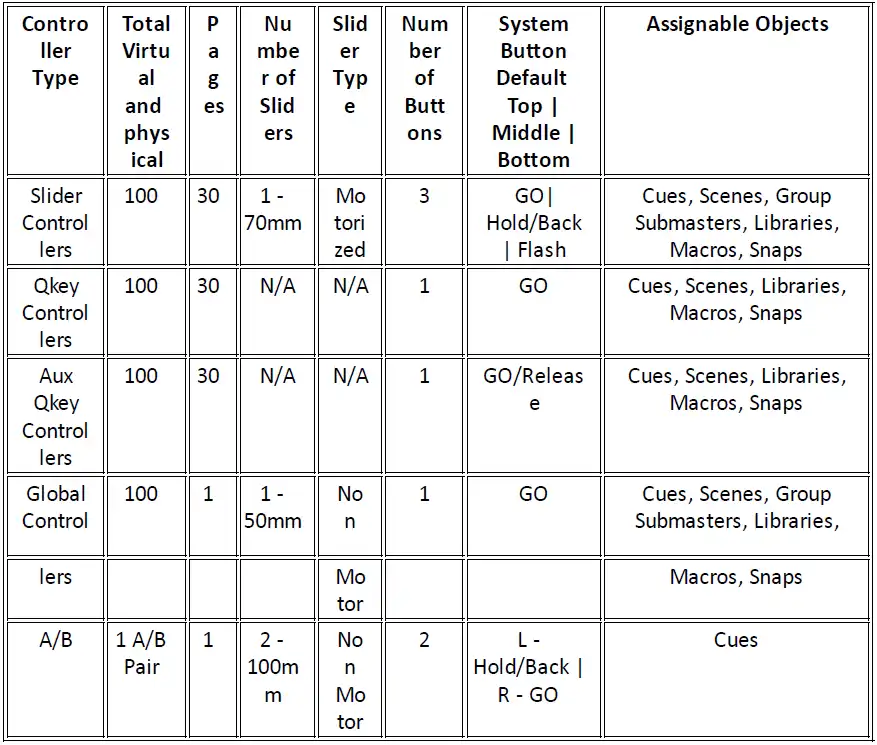
Vibe has five controller types:
Three button Motorized Slider Controllers
Single button Qkey Controllers (or pressable knob)
Single Auxiliary Qkey Controllers
Non-Motorized Global Slider Controllers
A/B “theatre style” A/B dipless crossfader pair
QKeys and AuxKeys can also have a virtual button, a virtual fader, or a virtual set of fader and button.
Vibe software makes no distinction between physical and virtual controllers. This allows the system hardware to be scaled. Below is a list of total quantities of physical and virtual controllers that are supported.
Controller quantities and numbering: Physical and Virtual
30 pages of 100 Motorized Sliders - Numbered 1.1 ⟶ 30.100
30 pages of 100 Qkeys - Numbered 1.101 ⟶ 30.200
30 pages of 100 Auxiliary Qkeys - Numbered 1.201 ⟶ 30.300
100 Non-motorized Global Sliders - Numbered 301 ⟶ 400
1 Non-motorized A/B dipless crossfader - Numbered 401
Controllers are numbered from right to left to facilitate continuous numbering with physical and virtual controller wings.
Compound Controllers:
- Controllers may be extended in width and height to make larger compound controllers. This is useful in creating additional crossfader pairs or adding controls for rate and effects. There is no limit as to how wide a controller may be, but for practical purposes, a limit of 6 wide is suggested.
If Playback slider controllers and Qkey buttons are linked to the same object, it could be comfortable to synchronize the paging of Sliders and Qkeys. This is possible to do by pressing SHIFT button together with the Up/Down paging buttonsof either Playbacks or Qkeys.
A/B Cross Faders:
An A/B Cross Fader Pair is provided for manual “Theater Style” playback of cues.
By default, the fader on the left will control dimmer parameters fading in.
By default, the fader on the right will control all other values including the dimmer that is fading out.
Parameter values that match will not dip even if the A and B are at different levels.
13.3 Master Controller
Master Controller:
- Any single Controller may be linked to the Master Controller by Pressing [SELECT] [HERE] to any of the buttons of the controller.
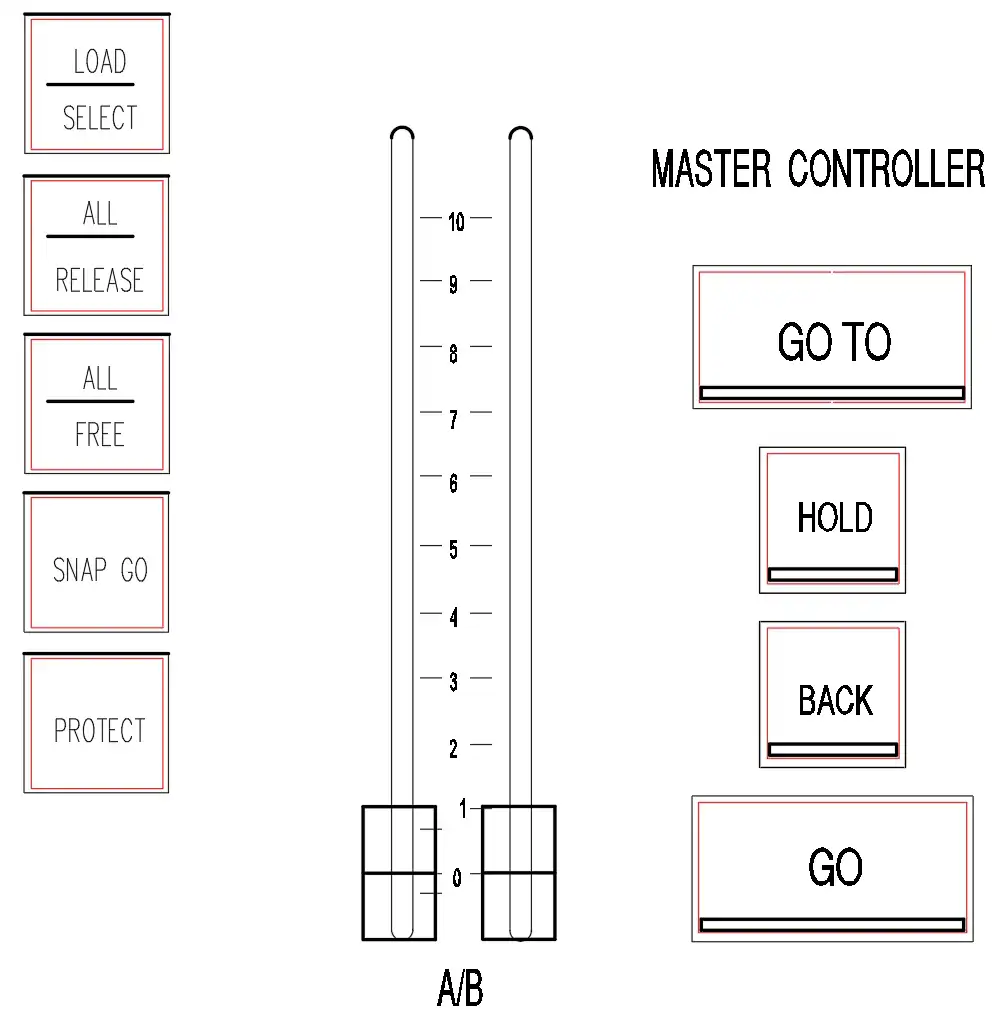
[GO] - Initiates a forward transition from one cue to another using Cue Time.
[BACK] - Initiates a transition to the previous cue using system Default Back Time.
[HOLD] - Pauses a cue in transition. Pressing [HOLD] again resumes the transition. Pressing [GO] will resume the transition as well. Pressing [BACK] will fade to the previous cue.
The A/B is only linked to the Master Controller if the [SELECT] is assigned to A/B..
13.4 GOTO and LOAD
GOTO and LOAD are used to crossfade to cues out of sequence. By default, GOTO immediately transitions to the specified cue in the system GOTO Time. LOAD preloads controllers. The next [GO] will transition to the preloaded cue in Cue Time.
GOTO Commands: GOTO a cue on the Master Controller using system GOTO Time:
- [CUE] [#] [GOTO]
GOTO a cue on the Master Controller using a specified Time:
- [CUE] [#] [TIME] - Enter time value [GOTO]
GOTO a cue on the Master Controller using system Cue Time:
- [CUE] [#] [TIME] [GOTO]
GOTO a cue on the Master Controller using Goto Cue pop-up:
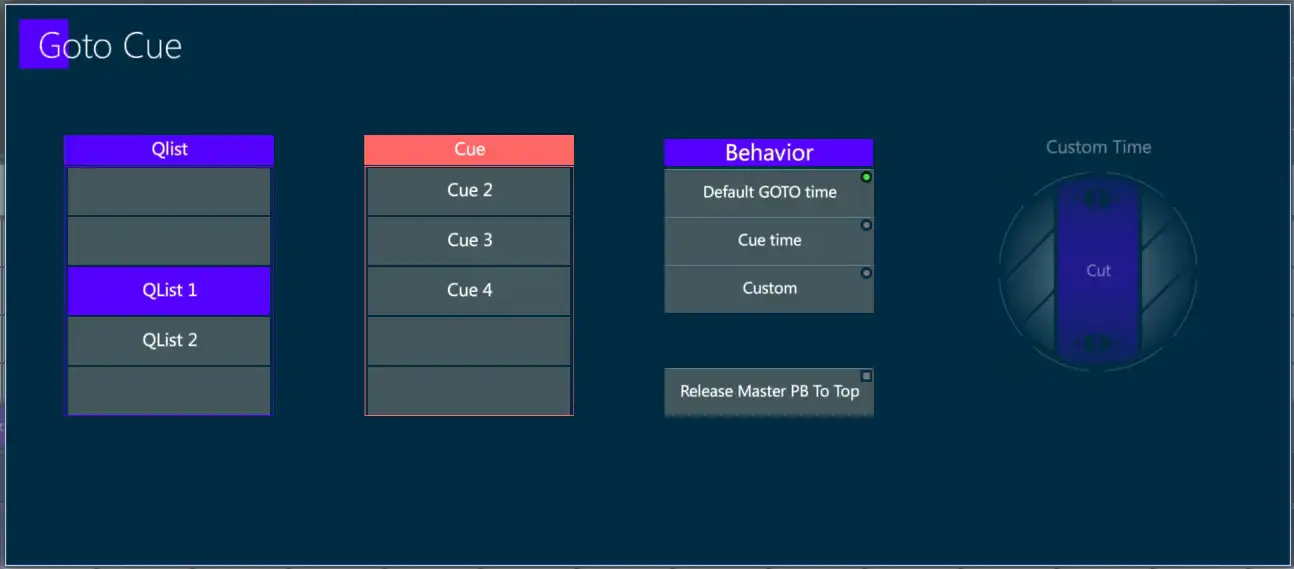
Press [GOTO] - Goto Cue pop-up will open.
Select {Qlist} if not the current Qlist on the Master Controller.
Select the {Cue}.
Select behavior.
{Default GOTO time} - Uses system default GOTO Time.
{Cue Time} - Uses Cue’s recorded time.
{Custom} - Set GOTO time using the Custom Time wheel or tap centre of the wheel until it turns red and set time value from the keypad.
{Release Master PB on Top} - Releases the Master Controller.
- Press the
 or press [ENTER] to close the pop-up and execute the GOTO.
If a Qlist other than the one that is currently on the Master Controller is selected, that Qlist will replace the current one..
GOTO a cue NOT on the Master Controller:
- [QLIST] [#] [CUE] [#] [GO] (Controller must have a GO button assigned).
GOTO Cue Zero - Cue Zero is essential {Release Master PB to Top}.
[CUE] [0] [GOTO] It is also possible to go out of sequence directly to a Cue on the Master Controller (in cue time):
[CUE] [#] [GO]
Load Commands: Load a cue on the Master Controller - Method 1.
[CUE] [#] [LOAD] [HERE] - To Controller assigned as [SELECT]
Press [GO] - On Controller assigned as [SELECT]
Load a cue on the Master Controller - Method 2.
[CUE] [#] [LOAD] [LOAD]
Press [GO] - Using Master Controller GO or GO of controller assigned as [SELECT]
LOAD a cue NOT on the Master Controller:
[QLIST] [#] [CUE] [#] [LOAD] [HERE] - Qlist and Cue will be preloaded.
Press [GO] - Controller will execute loaded cue.
If a Qlist other than the one that is currently on the Controller is specified, that Qlist will replace the current one with the specified cue pending.
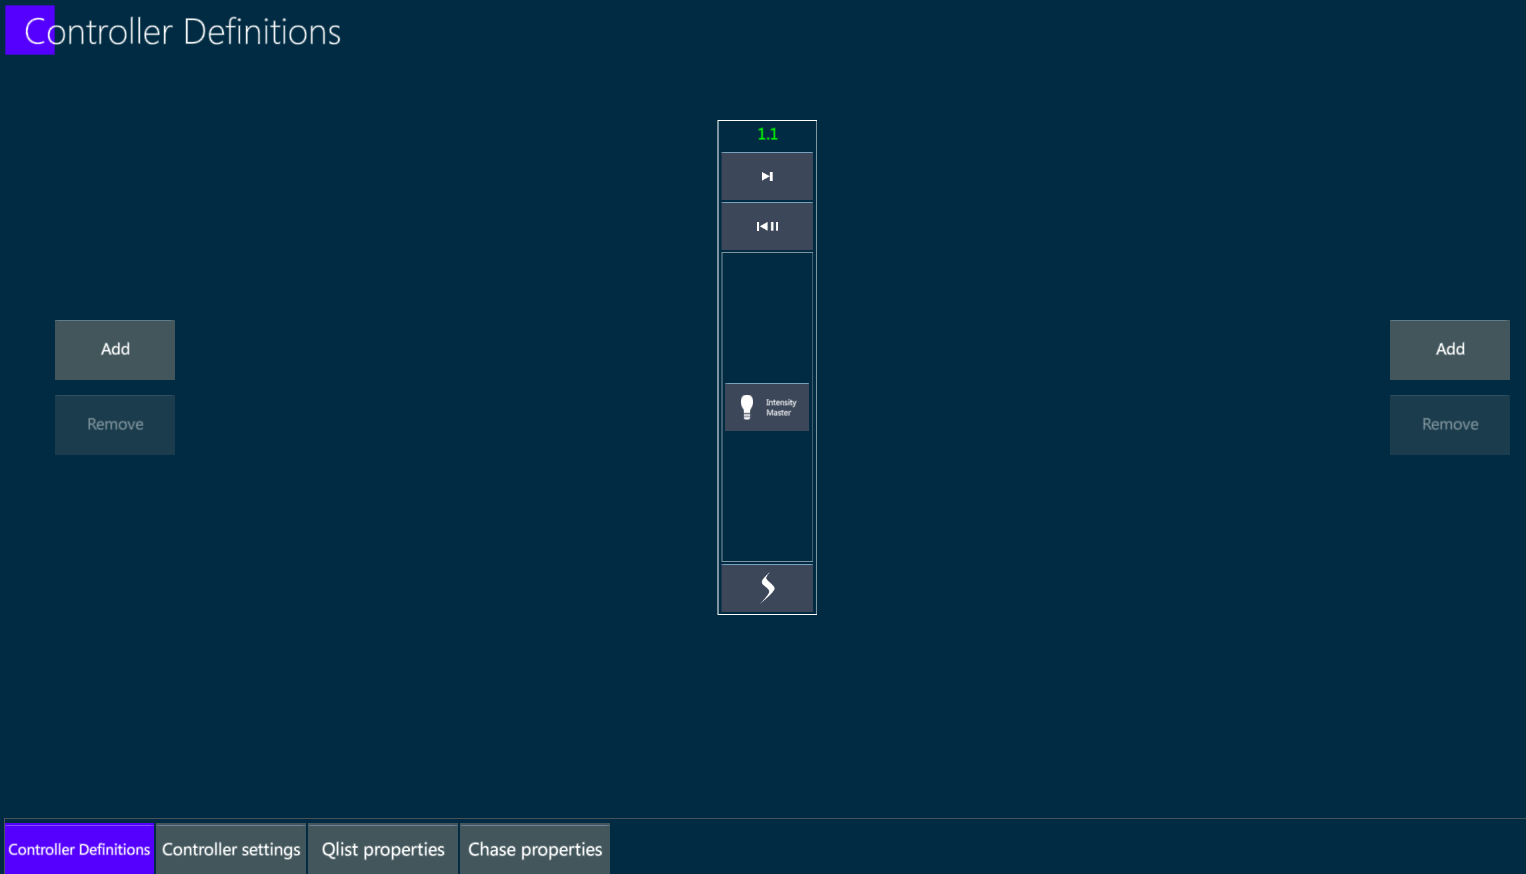
13.5 Configuring Controllers
Controller buttons and sliders may be customized to allow maximum flexibility. When Qlists and Scenes are initially assigned to Controllers, the buttons are configured as per the System Settings defaults for Controller and Controller Action. Defaults are accessed by tapping the System Status area at the far right side of the controller display.
Assigning Buttons and Slider Behavior:
- Press [SETTINGS] [HERE] to any button of the controller that has an object assigned to it - The Slider Definitions pop-up will appear with the {Controller Definitions} tab selected.
Alternatively, tap any of the controller {function labels} on the controller display on the monitor above the Scene Slider.
If a Qlist other than the one that is currently on the Master Controller is selected, that Qlist will replace the current one.
Tap one of the three assignable {Buttons} or the {Slider} button in the centre - A context sensitive drop down menu based on the object assigned and the specific button selected will appear.
Choose a Control behavior from the menu.
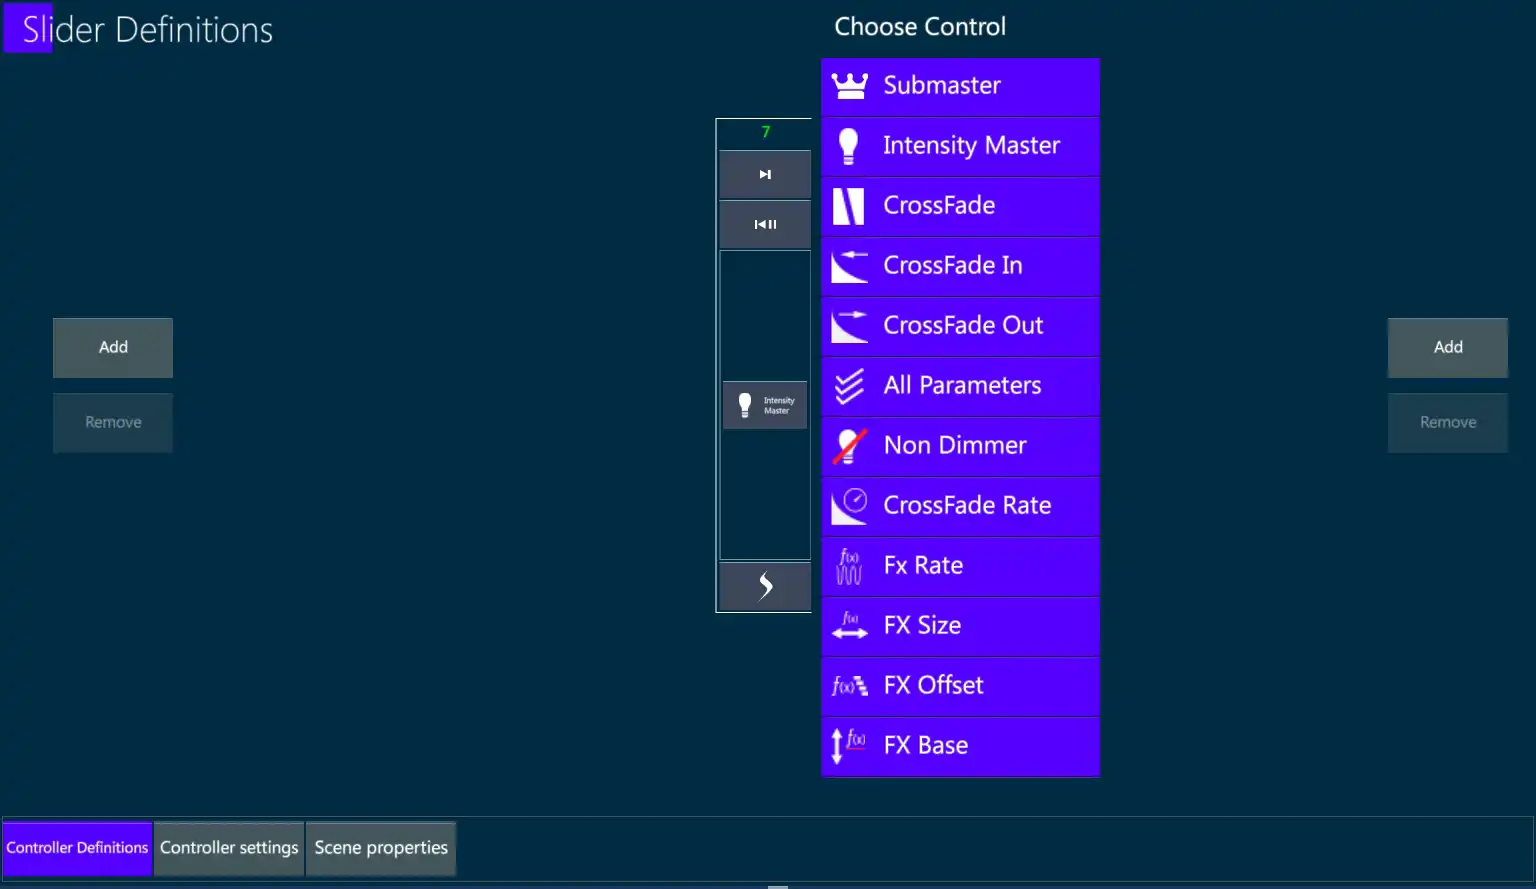
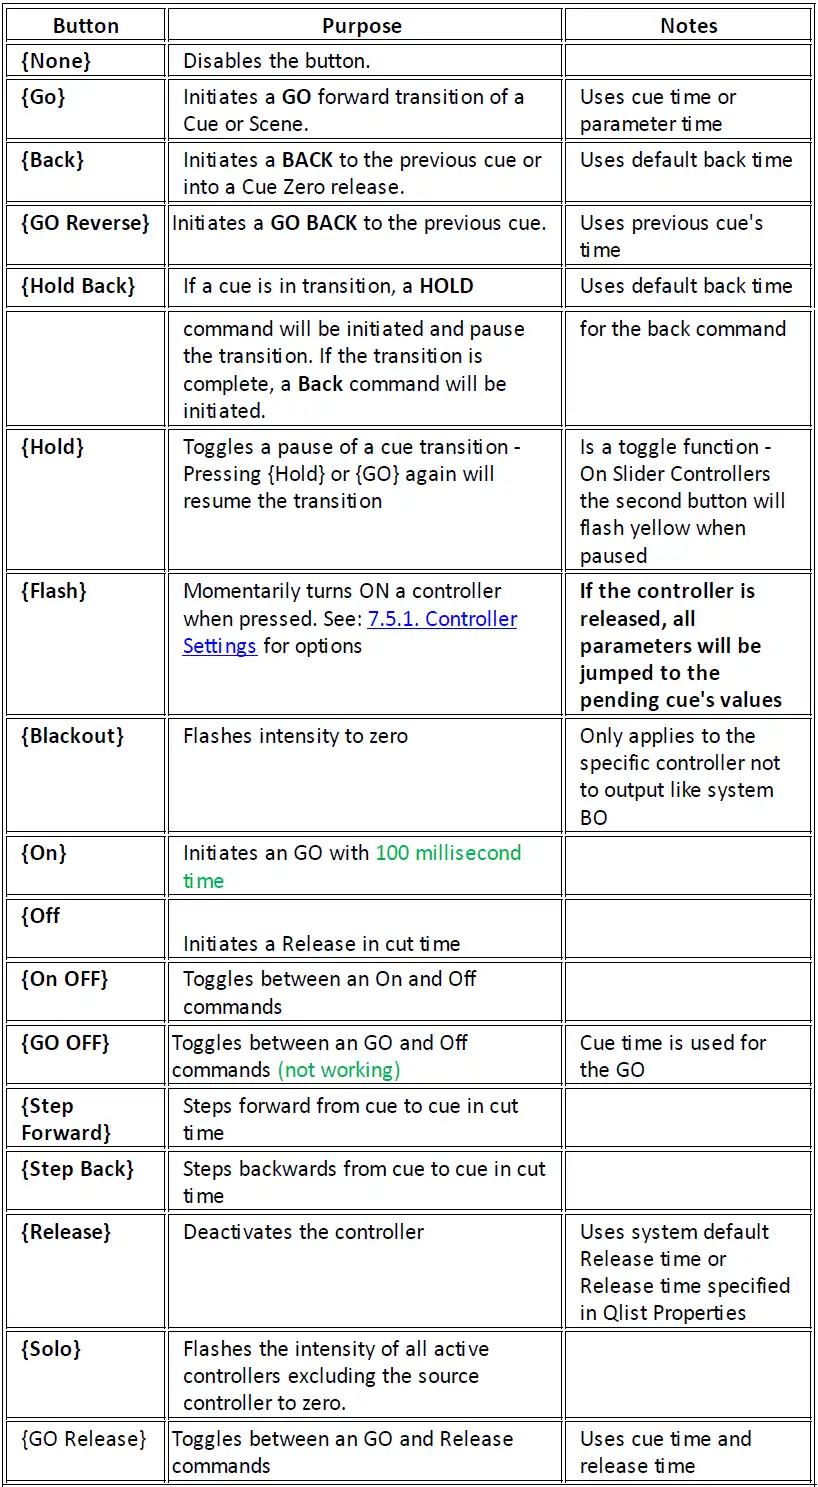
Assignable Button Behavior:
Assignable Slider Behavior:
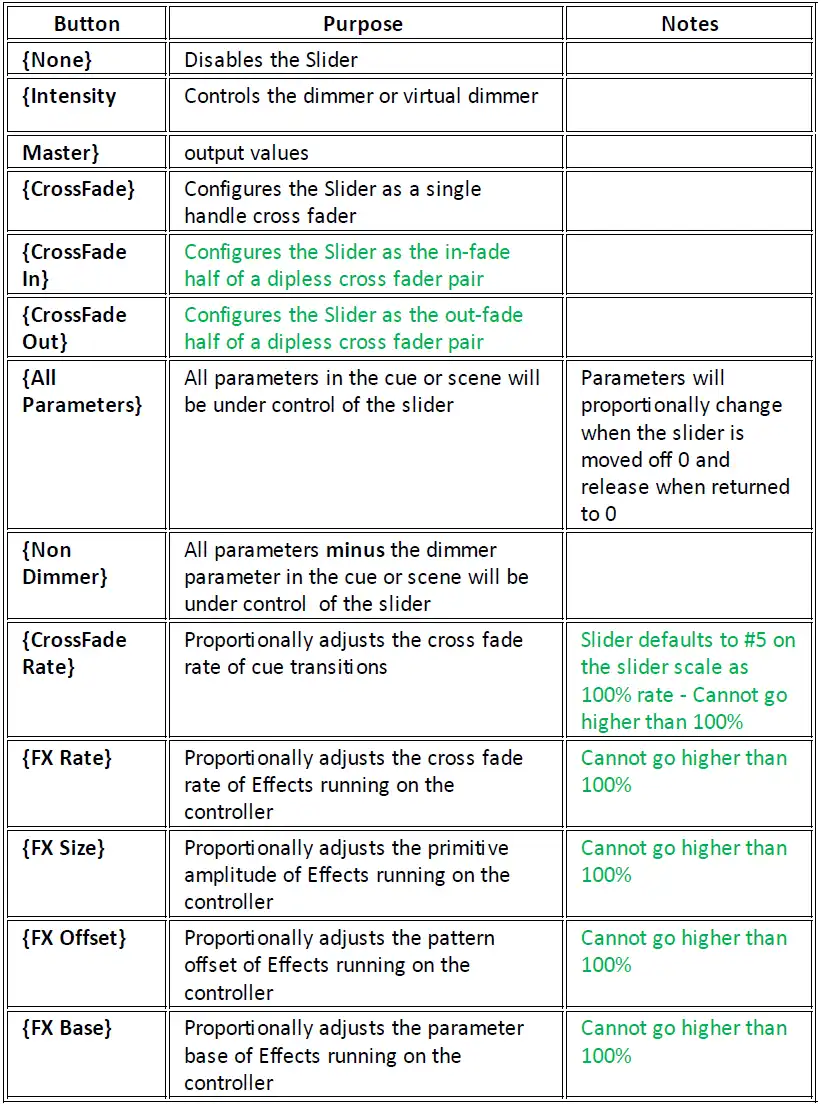
Default settings for controllers assigned Qlists, Scenes, and Submasters may be set in the Defaults section of the System Settings Pop-up. See 6.5.1. Controller Settings.
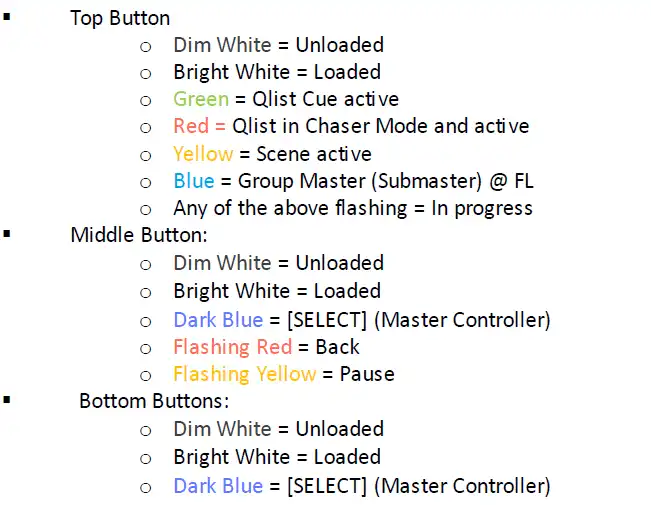
13.6 Controller Color Codes
Controller Live Display color coding If [SELECT] Master Controller:
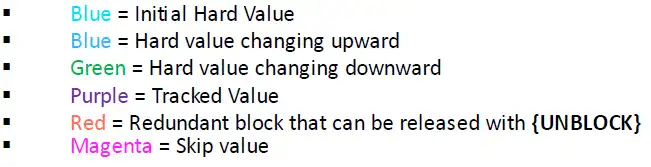
If from a non-[Select] Controller:

Controller Display and Backlit Controller Key’s color coding:
13.7 Working With controllers
Controller types: - Detailed
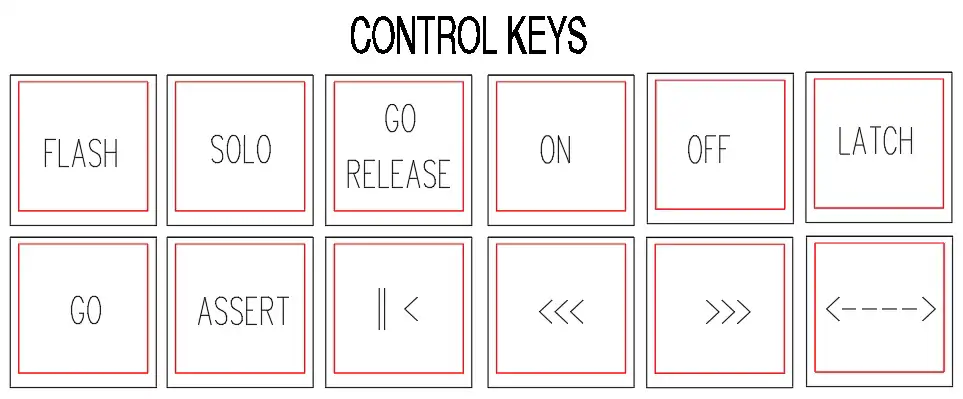
Control Keys: Provide “On the Fly” access to button functions not directly assigned to controllers. Apply a Controller Key:
Press a {Control Key}
Press any destination [Controller Button] to apply the Control Key’s function
In most cases, double press of the Control Keys locks them on until pressed again.
Control Key Functions:
- FLASH - Momentarily turns on a Controller.
👉 Most useful when locked on with double press.
SOLO - Turns off intensity parameters on all controllers excluding the destination controller.
GO/RELEASE - First press initiates a GO, second press initiates a RELEASE.
👉 Most useful when locked on with double press.
ON - Instantly turns on a controller.
OFF - Instantly turns off a controller.
Latch - Currently unimplemented.
GO - Initiates a GO command.
ASSERT - Takes back control of parameters that have been “robbed” by other controllers.
HOLD/BACK - If a controller is running, pause the controller. If a controller is static, initiate a BACK command.
<<< (Step Back) - Steps backwards through a Qlist ignoring time 👉 [VIBE]
+ [BACK] will also step backwards through the list.
>>> (Step Forward) - Steps forward through a Qlist ignoring time 👉 [VIBE] + [GO] will also step forward through the list.
<<<–>>> - Reverses sequence direction (mainly used with loops and chasers).
Assign a Qlist to a Controller:
[QLIST] [#]
[HERE] to any button of the controller that will be the start point of the range.
Blank Qlists may be assigned to any controller.
Assign a range of Qlist:
[QLIST] [#] → [QLIST] [#]
[HERE] to any button of the controller that will be the start point of the range.
Assign a Cue to a controller:
[QLIST] [#]
[CUE] [#]
[HERE] Press any of the controller’s buttons - The Qlist and Cue will be assigned to the Controller and default controller configuration and settings will be applied. See: 6.5.2. Controller Actions
Release and unload Controllers:
13.8 Controller Release and Free
Vibe has two types of release functions, Editor Release and Controller Release. The following deals with Controller Release.
Off - Instantly turns off a controller
- [OFF] [HERE] to any controller button.
Release - Turns off a controller using release time.
- [RELEASE] [HERE] to any controller button.
Release All - Turns off all controllers using release time.
- [VIBE] + [RELEASE]
Release Time -
By default controllers use the Default Release Time set in System Settings Timing. See: 6.2. Timing
Release time may also be set on a Qlist basis using the Qlist Properties Pop-up. See: 6.5.3. Qlist Properties
Free - Unloads a controller. It does not delete the loaded object.
- [FREE] [HERE] to any controller button.
Free All - Unloads all controllers.
- [VIBE] + [FREE]
13.9 Controller Qlist Properties
By default, the first incident of a Qlist being assigned to a controller will take its Qlist properties from the user default Qlist Properties. For Qlist Properties details, see: 6.5.3. Qlist Properties
Each new incident of assigning the same Qlist to additional controllers will initially copy the Qlist properties from the first assignment.
If changes are made to individual controller Qlist properties, those changes stay with the controller and are not copied or updated to other controller Qlist properties.
If it is desirable to update what will be copied to future assignments of the Qlist, toggle {Save to Qlist} On. Changes made to the current Qlist properties will now be passed along.
Qlist properties may be restored to their user defaults by tapping the {Restore Defaults} key.
13.10 Controller Modes
The Controller Mode keys are located at the far left of the console beside the motorized faders. The motorized faders may be assigned to any one of 4 modes. These modes allow for a quick modification to various rate and effect parameters. Controller modes are outside of the editor and are designed for “On the Fly” usage.
Controller Modes allow the following to be adjusted:
[FADERS] - Normal behavior for the fader as assigned in Controller Definitions
[RATE] - The Rate of the fades, loops, effects, and chasers on the controller will be proportionally adjusted. Motorized faders will move to an optimized position of 32% allowing for proportional adjustment of a controller’s rate.
[SIZE] - Proportionally adjusts the size of effects running on the controller.
[OFFSET] - Adjusts the spread of the fixtures in running effects
[PROTECT] - When implemented, must be held down before any of the fader modes may be changed.
13.11 Rate and Teach Keys
The Rate function allows users to adjust controller rates or effects parameters in “real time”. This is very helpful in fine tuning chases and effects to synchronize with music, or to improvise performances “on the fly”. The Rate Screen operates outside of the editor and is non destructive. Changes made in the Rate Screen may not be stored in cues but may be stored and recalled in [Snaps].
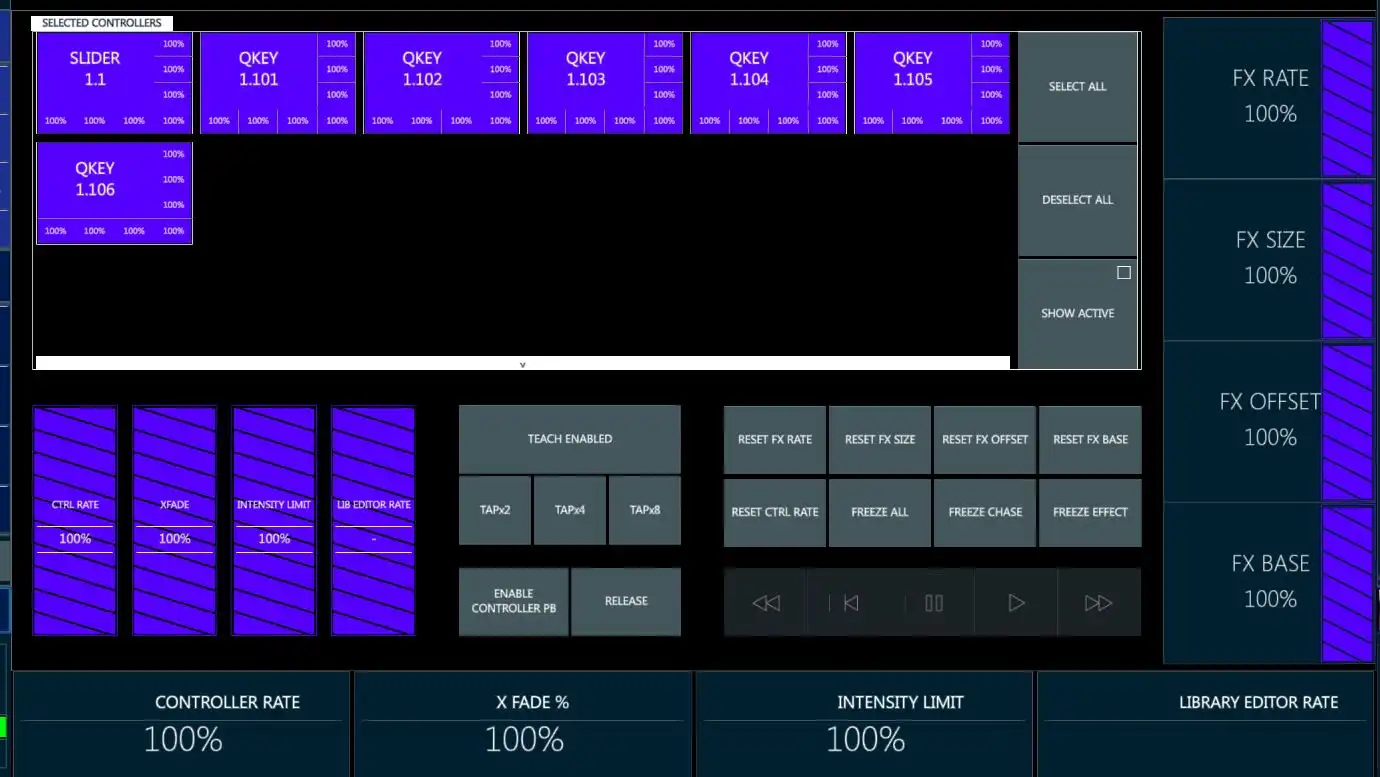
Using the Rate Screen:
Large encoder wheels:
Press the [Rate Key] - When opened, all loaded controllers will appear in the “Selected Controllers” section of the display. Initially all loaded controllers will be globally affected by the wheels and features in the Rate Screen.
Pressing any [Key] of a controller will deselect all other controllers except the controller that was selected. Additional controllers may be toggled on or off as desired and they will appear in the selected Controllers display.
{Select All} will reselect all loaded controllers for rate control.
{Deselect All} will release all selected controllers from rate control
{Show Active} will release all controllers in the “Selected Controllers” section that are not currently under the control of the rate wheels.
Wheel 1 - {Controller Rate} speeds up or slows down the cross fade rate of the controller. This may be used for cue transitions, chases, or effects. Range: 0% (Stopped) ⟶ 3000% (effectively cut time)
Wheel 2 - {X Fade %} adjusts the “fade vs jump percent of a chaser. Range: 0% (full jump) ⟶ 100% (full cross fade)
Wheel 3 - {Intensity Limit} proportionally limits the intensity output of a controller. Range 0% (no intensity output) ⟶ 100% {Intensity controller full}
Wheel 4 - {Library Editor Rate} currently unimplemented (adjusts the speed that Libraries are faded into the editor) Small encoder wheels: (top to bottom)
Small encoder wheels: (top to bottom)
Small Wheel 1 - {FX Rate} adjusts the rate of effects that are running on the selected controllers.
Small Wheel 2 - {FX Size} adjusts the size of effects that are running on the selected controllers.
Small Wheel 3 - {FX Offset} adjusts the offset (Spread) of effects that are running on the selected controllers.
Small Wheel 3 - {FX Base} adjusts the base values (start point) of parameters that are in running effects on the selected controllers.
Reset keys:
{Reset Ctrl Rate} - Sets all controller rates back to their default of 100%
{Reset FX Rate} - Sets controlled FX rates back to their stored values.
{Reset FX Size} - Resets controlled size of effects back to their stored values.
{Reset FX Offset} - Resets controlled offsets of effects back to their stored values.
{Reset FX Base} - Resets controlled effects base values back to their stored values.
Freeze toggle keys:
{Freeze All} - Pauses all running chases and effects until the {Freeze All} key is toggled again.
{Freeze Chase} - Pauses all running chases until the {Freeze Chase} key is toggled again.
{Freeze Effect - Pauses all running effects until the {Freeze Effect} key is toggled again.
Freeze only effects chases and effects at the playback level. To permanently release an effect from a cue see: 12.3.1. Building Effects Using the Advanced Effects Editor
Transport Bar:

When actively in the Rate Screen, physical controller keys are mapped to the rate interface and may not be used to activate Qlists, cues, or scenes. As an alternative, the transport bar may be used. To use the transport bar:
Tap {Enable Controller PB} to activate the Transport Bar.
Select the controllers to control with the bar by toggling any of the controller’s physical control keys
Use the transport Bar buttons to:
{<<} Step Back
{|<} Back
{||} Hold (Pause)
{>} GO
{>>} Step Forward
- {Release} may be tapped at any time to deactivate the selected controllers using release time.
Teach keys: Currently unimplemented
{Teach Enabled} - Enables the [Teach Key] for sampling and adjusting tap rate of chasers and effects in “real time”.
{Tap X} keys set the sample rate for the teach function (number of presses to be averaged).
When implemented, Teach time may also be set from the Rate Screen using the transport bar buttons.
13.12 Playback Master
A Playback Master is a controller that masters other controllers.
LED and theme color for the playback master object is blue.
Any key command on the master will be triggered on the controlled Playbacks (GO, BACK, etc.).
Any fader behavior movement becomes a master to the other sliders (rate, intensity, etc.).
Playback Masters can also be stored in snaps.
To Set Up a Master PB
Press [PLAYBACK]
Tap [MASTER] from the toolbar
Select the playbacks to be mastered by pressing any of their keys
Press [STORE]
Press any key of the Controller you wish to be the Master.
13.13 Move Controllers
Implemented MOVE function on controllers.
Use the Move button to rearrange the controllers.
A controller can be moved to any other controller, even if it’s a different type.
The controller will be moved with all its settings and state, including intensity value etc.
Attention: moving a Slider controller with intensity <> 100% to a QKey controller will make it not possible to change the intensity of this object since there is no fader for QKey controller.
To Move Controllers
[MOVE, Controller selection (occupied controllers), Empty controller]
[MOVE, Controller selection (occupied controllers), @, Any controller]
[PLAYBACK, #, MOVE, PLAYBACK, #, PASTE]