Chapter 17 Network
This chapter deals with configuring DMX over Ethernet and other frequently used protocols such as RDM, OSC and CITP.
The following is covered in this chapter:
17.1 Console Network
Vibe has two user accessible Ethernet networks:
- Data Network - Accessible via the two EtherCON connectors on the rear panel.
◾ Used for Art-Net, sACN, Compulite VC protocol nodes and Master/Slave backup.
- General Networks - Accessible via the two RJ45 connectors on the rear panel.
◾ Used for Network storage of show files and remote diagnostics.
Each network device must have its own unique static IP address in the form of four triplets xxx.xxx.xxx.xxx, to identify it on the network. In Vibe, this can be set in the System Settings popup. It is not necessary to have three digits in each segment of the IP but there must be at least one digit in each segment. Vibe ships with a default Subnet Mask of 255.0.0.0 which means that it is only important that the first triplets of the IP (the start address) must match on all devices in the network. Devices on the same network must not have identical IP addresses.
Common Start IP addresses:
2.x.x.x - Default for Art-Net networks.
10.x.x.x - Default for most ETC networks and alternate for Art-Net network.
192.x.x.x -Default for most MA consoles.
Subnet Mask - Identifies the network itself and in conjunction with the IP address can be used to properly route network devices.
255.0.0.0. - Compulite Default. Only the first triplet must match.
255.255.0.0 - Common in configurations with different systems on the same network. The first and second triplets must match.
255.255.255.0 - Common in configurations with many different systems on the same network. The first, second and third triplets must match. Not suggested for networks having more Compulite consoles connected.
Compulite uses the third triplet as a console identifier in some of the products.
The Vibe can be used in networks using a DHCP server but cannot act as a DHCP server.
Switches:
Vibe has two internal switches so single direct device to device connections are possible without a cross cable.
When more than one device must be connected to the Vibe a good quality gigabit switch should be used.
Many systems have gone down due to bad Ethernet cabling and cheap switches. It is recommended that EtherCON connectors are used where possible in conjunction with professional grade switches designed for lighting and audio applications..
17.1.1 Network Settings
Open the {NETWORK SETTINGS} from Vibe Menu > Settings or tap the Network Settings button - The Network popup will open.
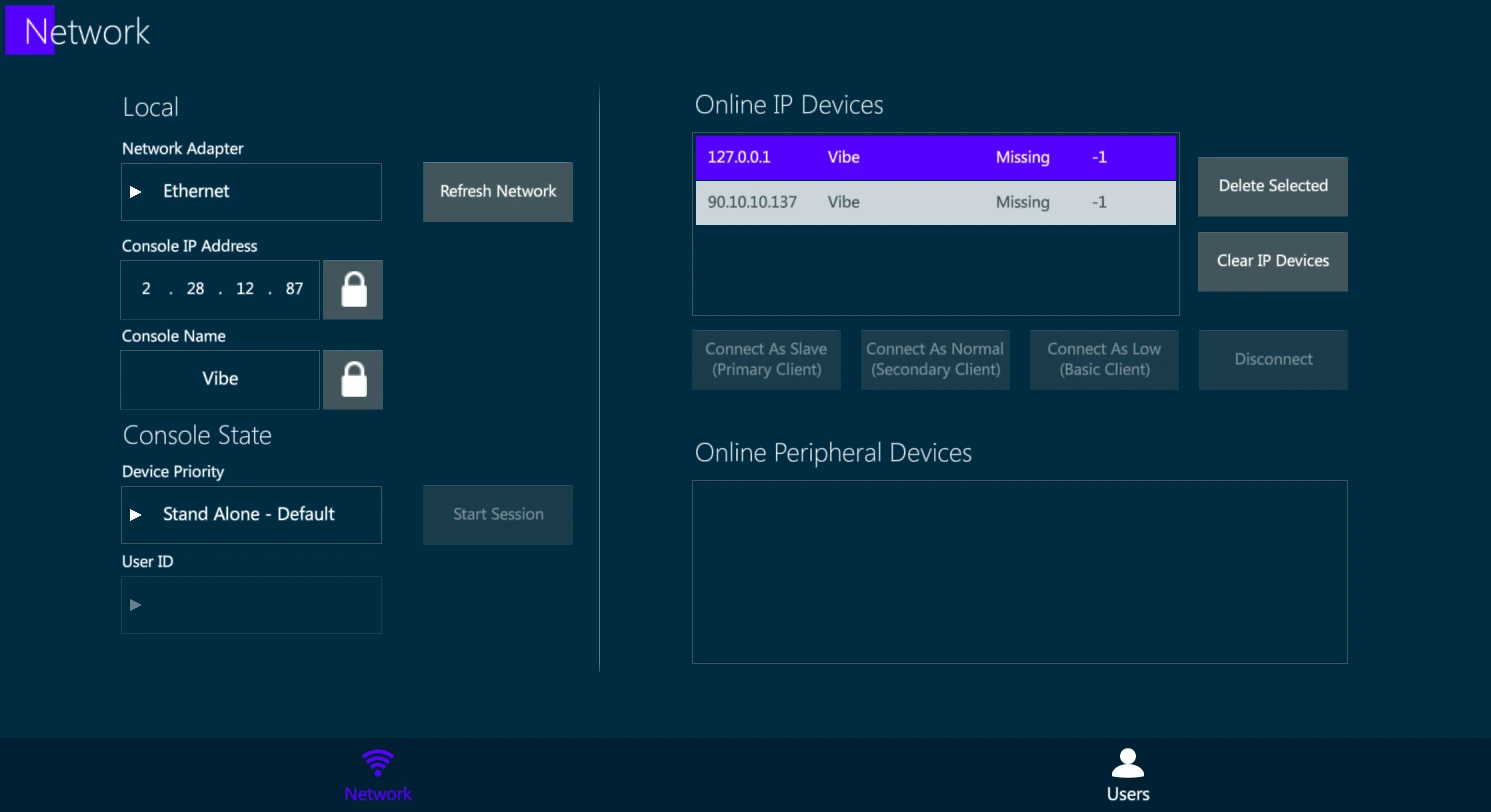
Local:
Option to set the local information of the console such as IP and name.
Unlock the boxes to edit the fields.
Console State:
There are 2 possible individual states:
Stand Alone (Default) – Console is not in a session but networking for outputs, remotes and external connections are active.
Local (Offline) – Same as Stand Alone but disables the DMX over Ethernet.
User ID:
- Not implemented yet..
Start Session:
- The console becomes a Master, meaning it’s hosting a session where Backup consoles can be connected.
Online IP Devices:
- Displays all Valid IP based devices active on the network.
Delete Selected:
- Remove the selected devices from the list.
Clear IP Devices:
- Clear the whole IP device list.
Connect As … / Disconnect:
- Related to starting or ending a session with a master console.
17.2 Compulite ePorts
Compulite manufactures the ePort brand of DMX over Ethernet nodes.

Supported Protocols:
ePort 41 - Prior to Sept 2016 (check serial number with Compulite to confirm)
◾ Compulite VC protocol
◾ Art-Net v2
ePort-41 - Current
◾ sACN pre-release and release versions
◾ Art-Net 3
◾ Compulite VC protocol
ePort-8 and ePort-2
◾ sACN pre-release and release versions
◾ Art-Net 3
◾ Compulite VC protocol
For more product information, see ePort Documents.
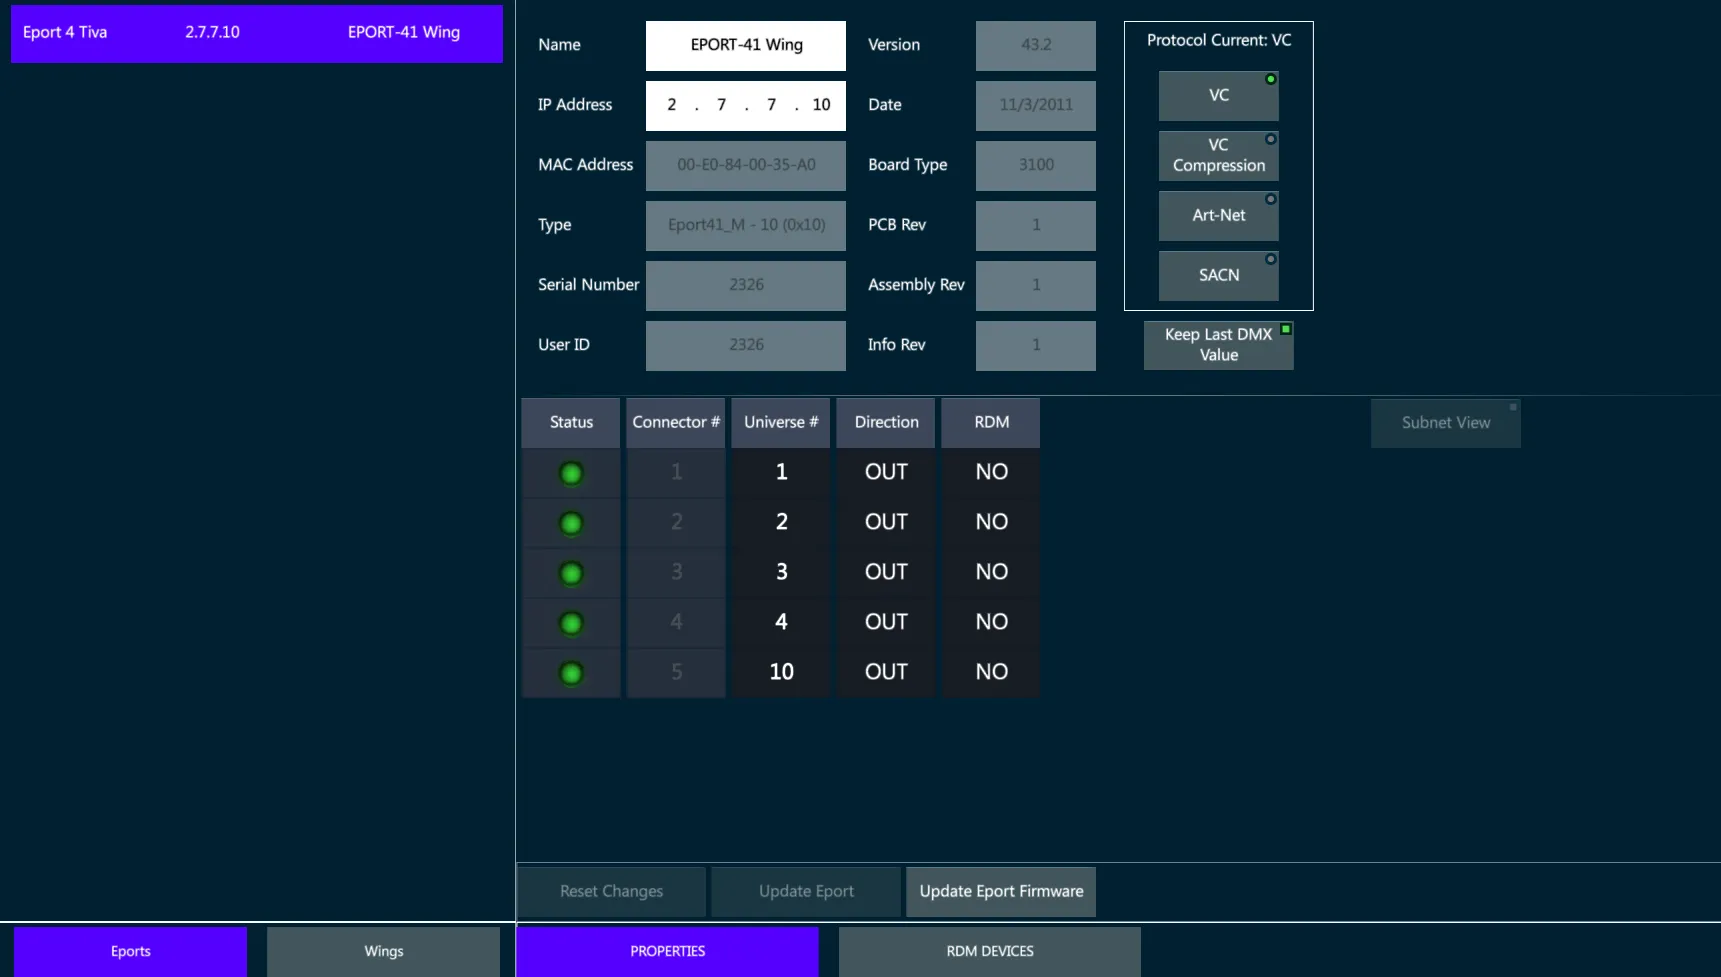
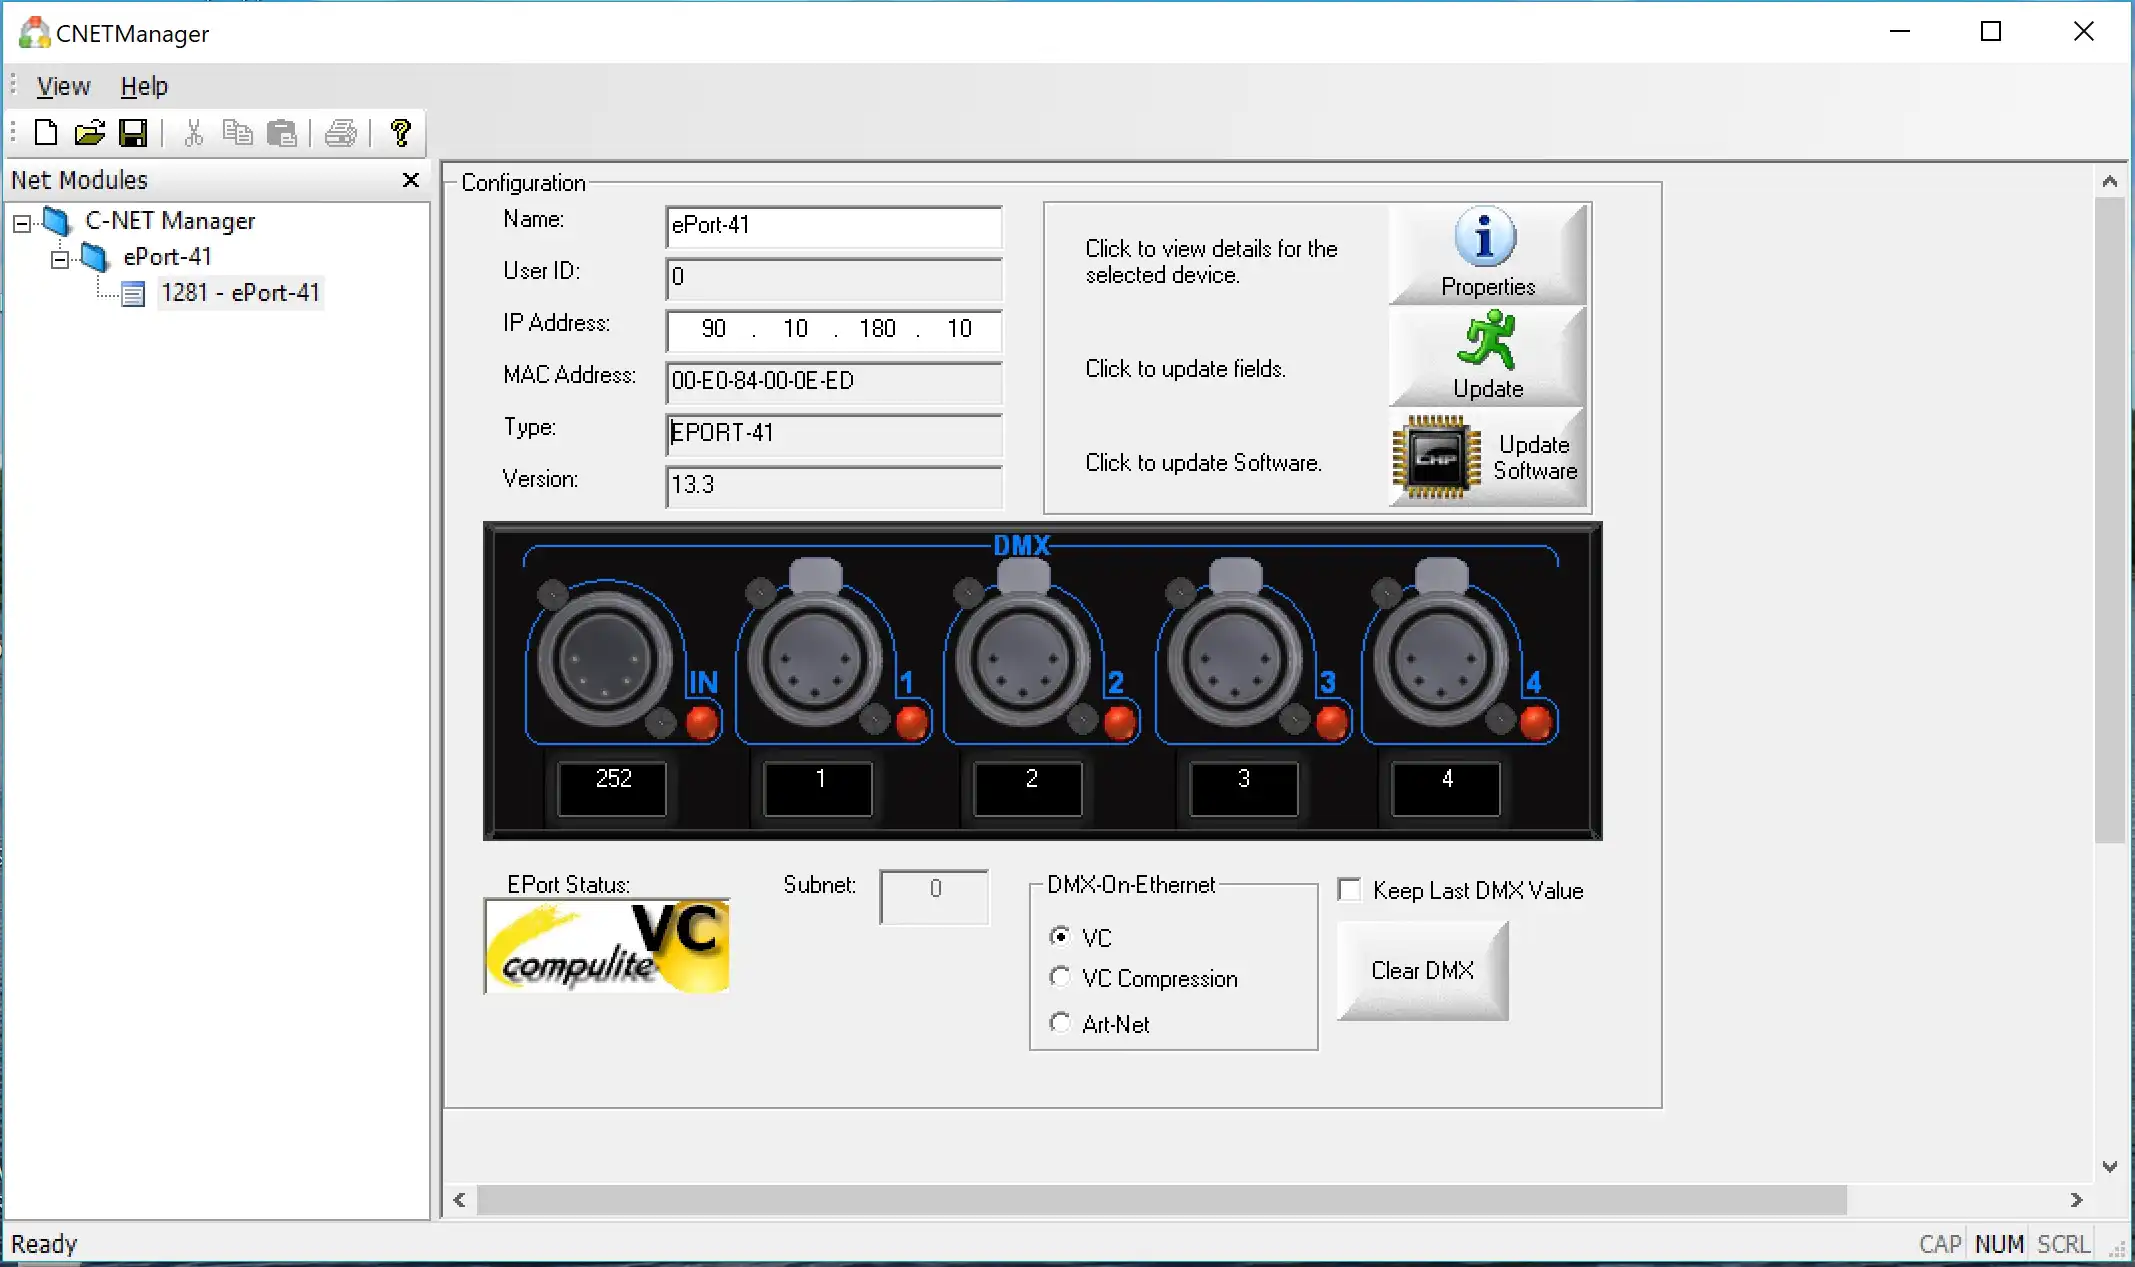
Any ePort can be connected and configured directly from Vibe’s External Devices View or by using the CNET Manager software, available on Compulite website www.compulite.com
Vibe External Devices View
C-Net Manager software
Configure ePorts:
Make sure that the Vibe IP and the ePort IP are in the same range.
Assign universes to each physical port by typing the universe number in the box below the icon of the physical connector.
Select the DMX-ON-Ethernet protocol in the protocol list.
If Art-Net is selected make sure the Art-Net Subnet is also set. In most cases this will be set to 0 which allows the first 16 universes. It must be incremented by one with each new range of 16 universes.
- Tap {Update} to apply all the changes.
17.3 ArtNet and sACN
Vibe supports transmission of 256 universes on DMX over Ethernet using the industry standards of Art-Net versions 1 ⟶ 3, ad sACN (ANSI E1.31-2016 standard).
Enable Art-Net or sACN output:
- Open the {DMX SETTINGS} from Vibe Menu > Settings or tap the DMX Settings button - The DMX Properties popup will open.
Under the Protocol heading, tap {Art-Net} or {sACN} - The selection will turn red.
Under Broadcast Options (VC, Art-Net, sACN) tap {Out} - The status indicator light will turn green. The console will now be outputting the selected protocol on the EtherCON Data ports.
Vibe is capable of transmitting more than one protocol at a time on the same Ethernet port.
To save bandwidth it is also possible to enable only the universes for each protocol that are required.
Vibe has separate universe patches for VCs, Art-Net, and sACN. By default, universes are patched 1 to 1 for each protocol. It is possible to reroute universe output destinations.
The Vibe is licensed for 64, 96, 128, or 255 console source universes but these universes may be freely rerouted to any destination universe from 0 ⟶ 256 as long as the total amount of universes does not exceed the purchased license.
Reroute Console Universes:
Under the Source Universe header, scroll the list to the source console universe number you wish to route. Once tapped, the selection will turn red. A universe number may also be typed from the keypad.
Under the Destination Universe header, tap one of the cells in the destination universe grid. The source universe number will now be routed through the destination universe number.
Additional functions:
Clear a destination universe - Tap {Universe #} in the destination grid. Tap {Clear}.
Clear all destination universes - Select the protocol to clear. Tap {Clear All}.
Reset default route for a single destination universe - Tap {Universe #} Tap {Config}.
Reset all defaults for the selected protocol - Tap {Config All}.
Art-Net Subnet View:
- Art-Net is designed in blocks of 16 universes. The blocks starts at subnet 0 and increments by 1 every 16 universes. The subnet number and fixture number in the subnet can be viewed by toggling {Subnet View}.
Unicast Option for Art-Net and VC
It is possible to set specific IPs to send the output to. If there is a port configured to a specific IP it will not be sent broadcast. Ports that are not defined as unicast will be still sent as broadcast. Each port can be configured to multiple IPs. Few ports can be sent to the same IP.
Configure Unicast:
Tap on the protocol in DMX Settings popup.
Toggle to Unicast Settings to open the unicast popup.
Tap Add to add a new IP line or Delete to remove an existing IP
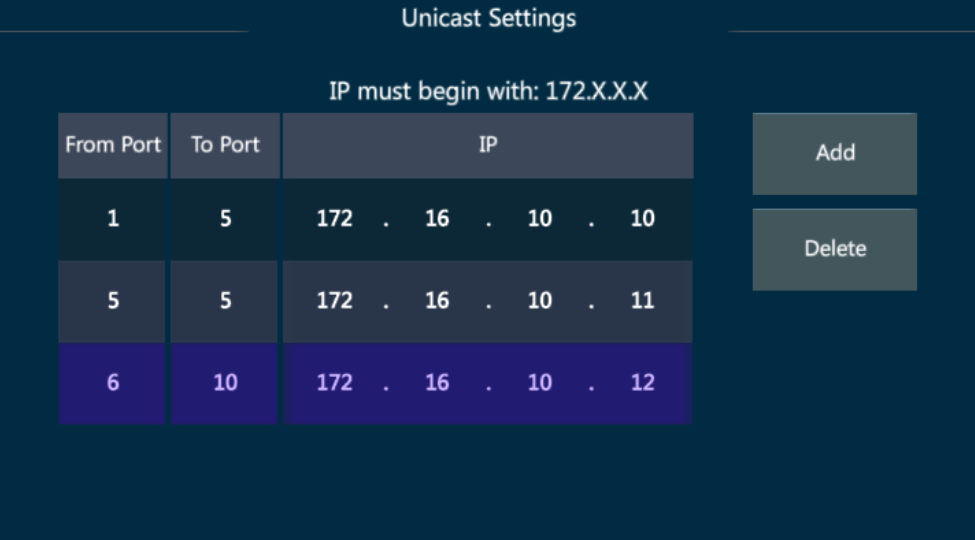
On the first line – ports 1 ⟶ 5 will be sent to IP 172.16.10.10
On the second line – port 5 will be sent also to IP 172.16.10.11
On the third line – ports 6 ⟶ 10 will be sent to IP 172.16.10.12
17.4 RDM
RDM is fully supported on the 8 physical DMX output ports and Compulite VC protocol.
View RDM information:
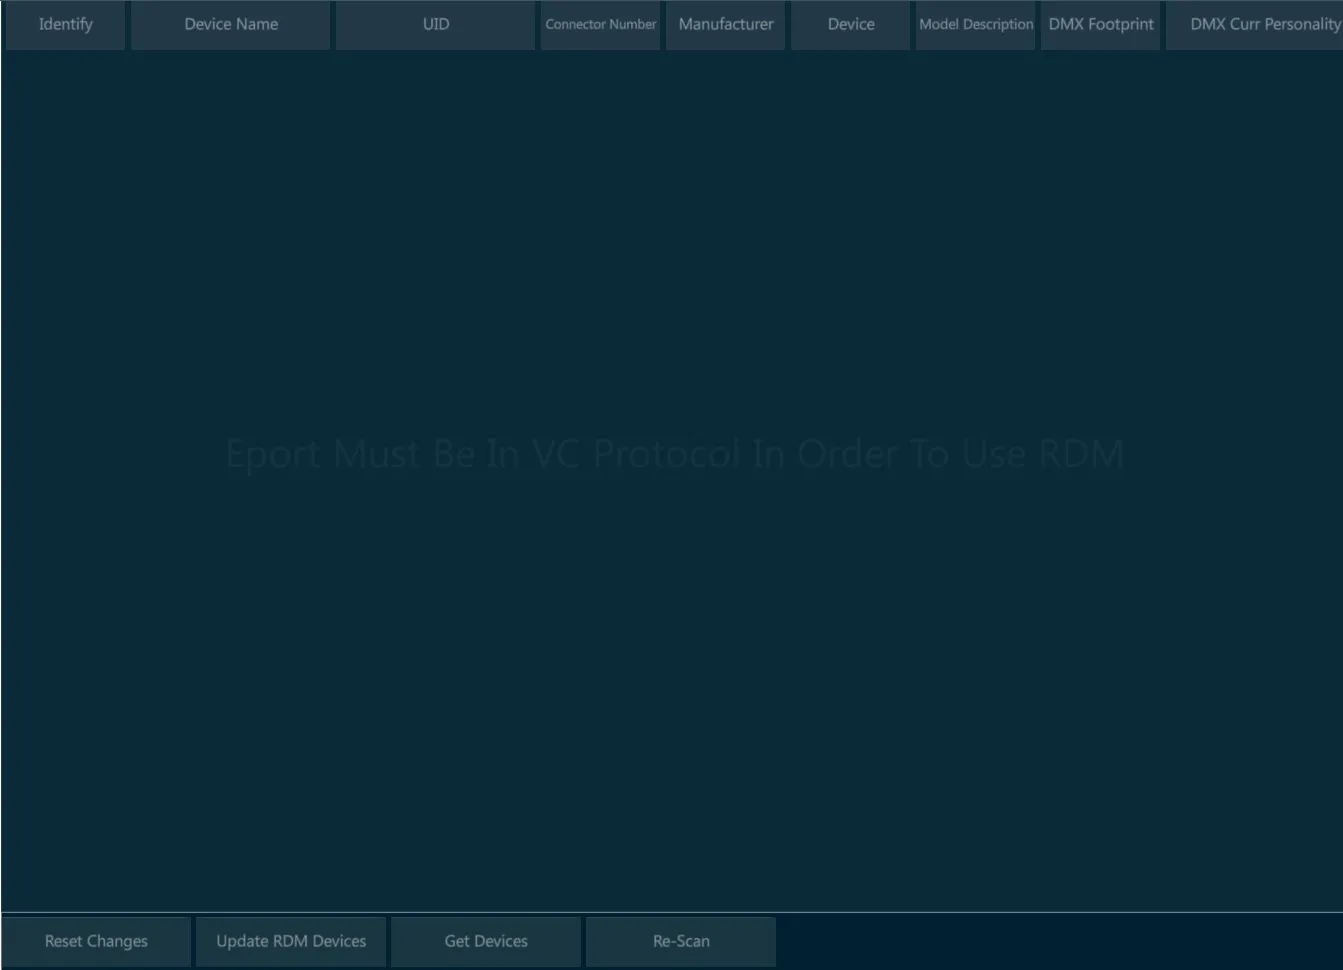
Open the External Devices View.
Tap the RDM Devices tab.
Tap {Get Devices} on the view’s menu - The system will scan and display RDM compliant devices.
If new devices are added, press {Re Scan}.
17.5 OSC
OSC (Open Sound Control) is a protocol for networking with sound synthesizers, computers, and other multimedia devices for purposes such as musical performance or show control.
OSC enables a text string based exchange of commands and triggers between different devices via a network connection, that is used to establish the synchronization between different systems.
Connections with OSC can use TCP or UDP protocol for direct communication over the network.
OSC Input
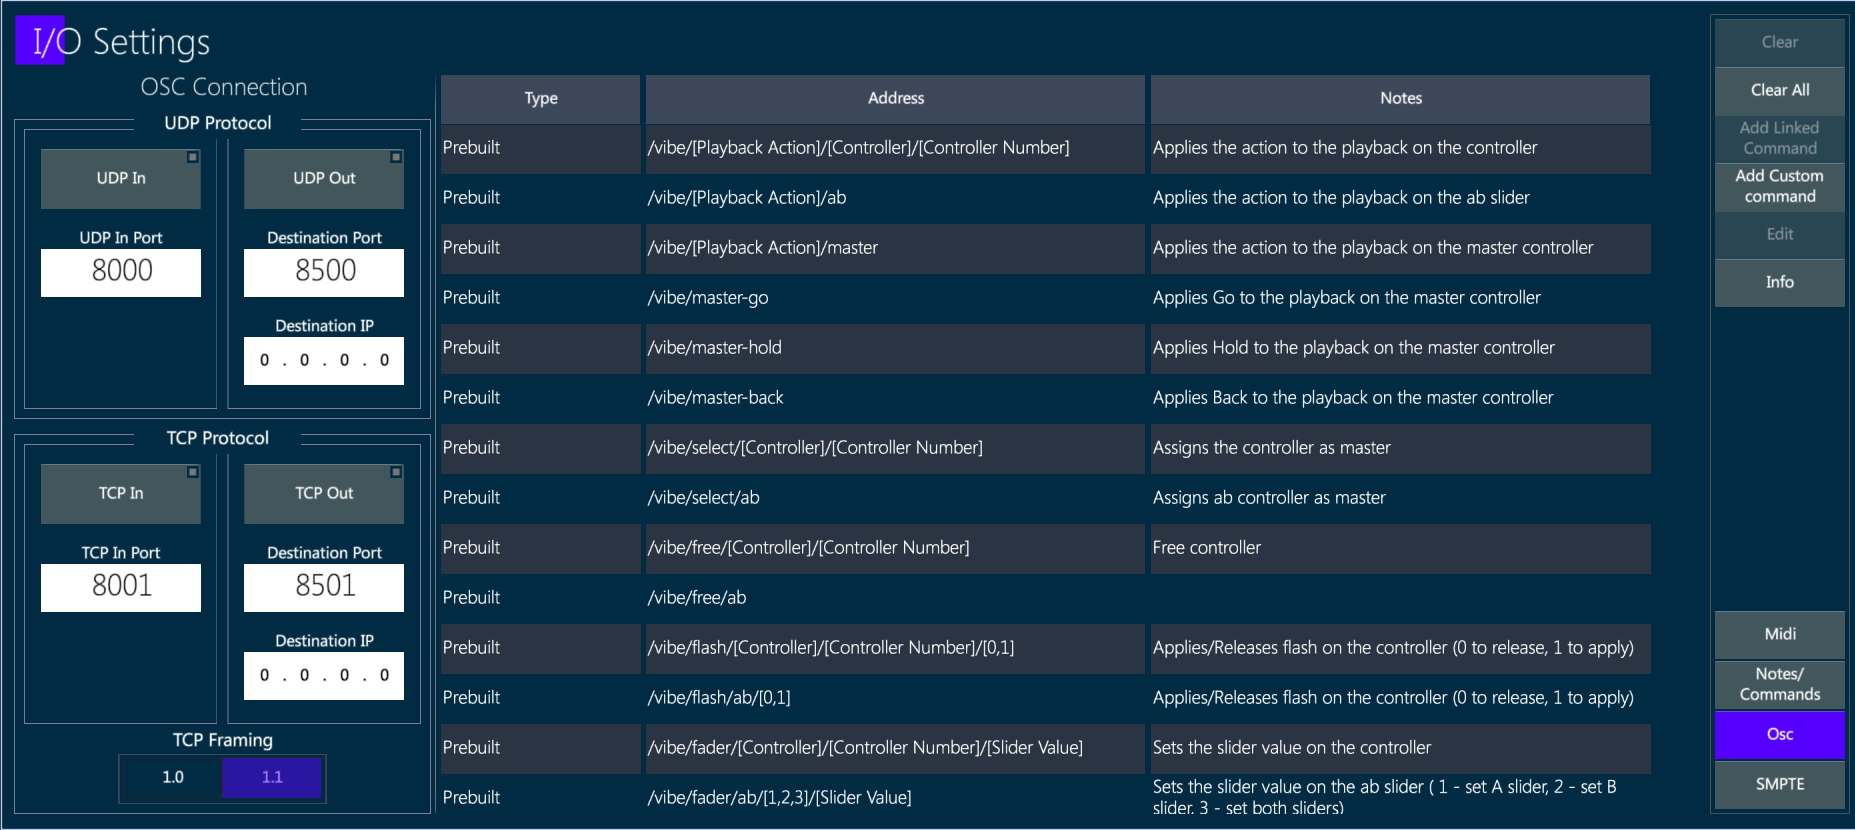
Vibe supports the OSC input protocol using TCP, UDP, or both.
In the I/O Settings popup, on the OSC tab, there is the list of supported OSC strings as well as OSC ports and protocols.
Custom OSC strings can also be created by the user.
OSC Output
Vibe supports the OSC output protocol using TCP, UDP, or both.
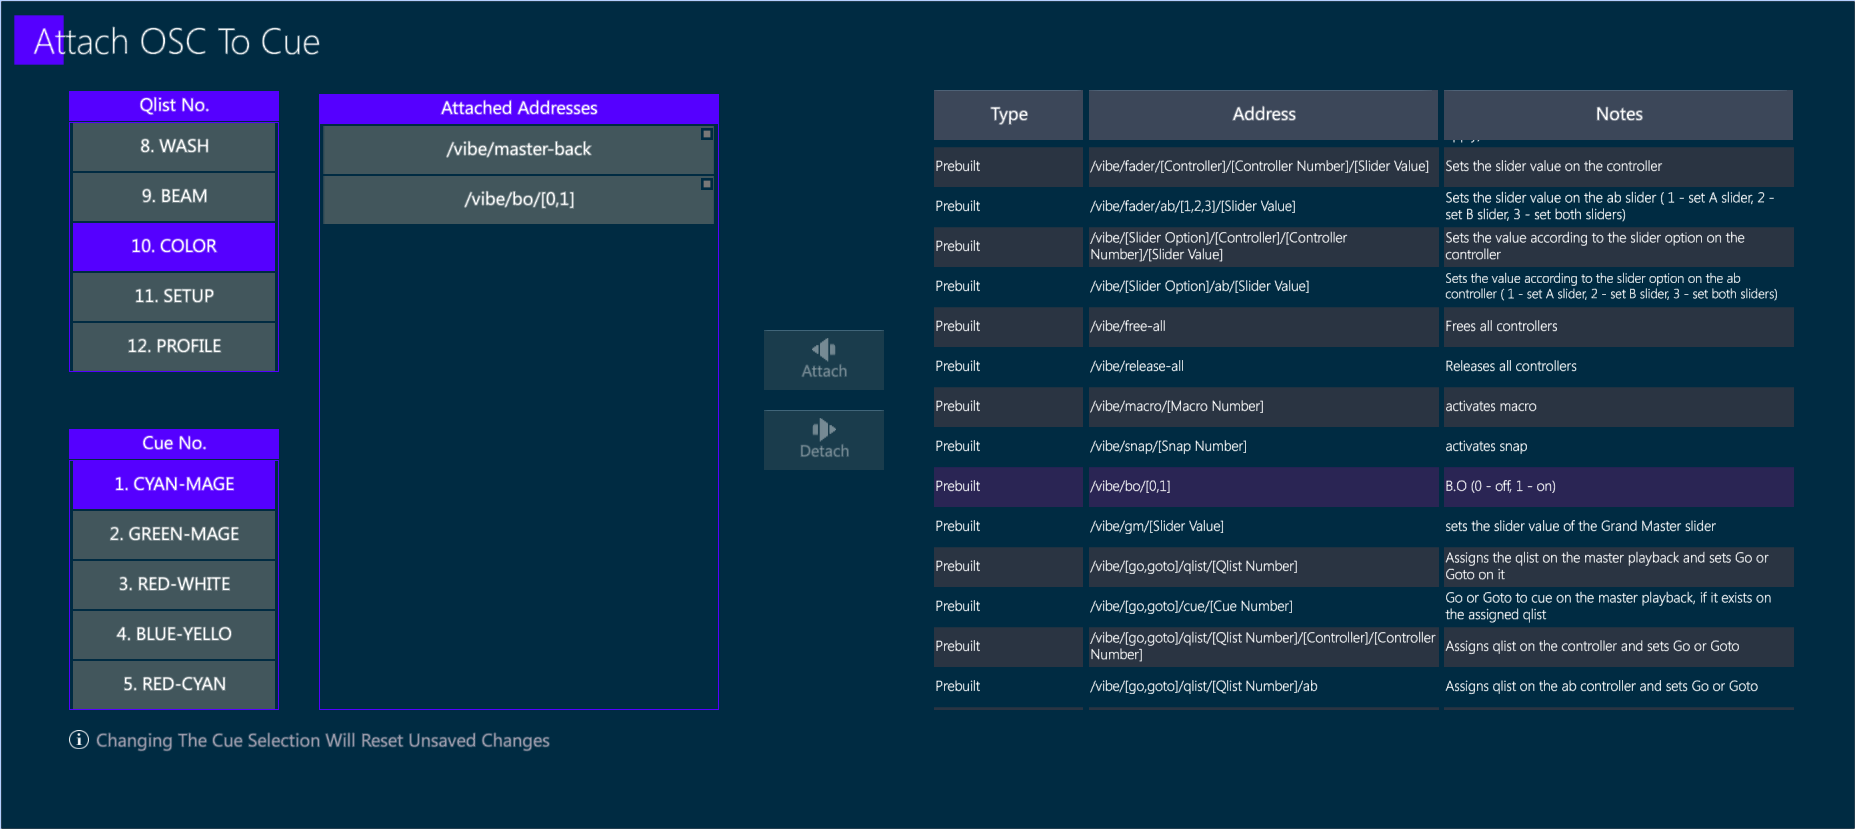
The OSC view shows the existing commands, allowing the user to create and edit custom commands and to send immediate commands and use keyboard arrows to re-send commands from the cache.
OSC commands can be attached to Cues with the syntax: [QLIST], [#], [CUE], [#], [ATTACH_OSC] (toolbar).
17.6 CITP
The CITP (Controller Interface Transport Protocol) is a network protocol used between lighting control consoles, visualizers and media servers.
The protocol allows to transport information, browse media and thumbnails, stream media among different devices.
CITP Settings popup gathers all the CITP capabilities of the Vibe together.
To open the CITP Popup:
Tap Vibe menu button
In Settings, tap CITP Settings
or
- Tap [CITP Settings] button.
In the popup there are 4 tabs:
General
Media Servers
Visualizers
Consoles
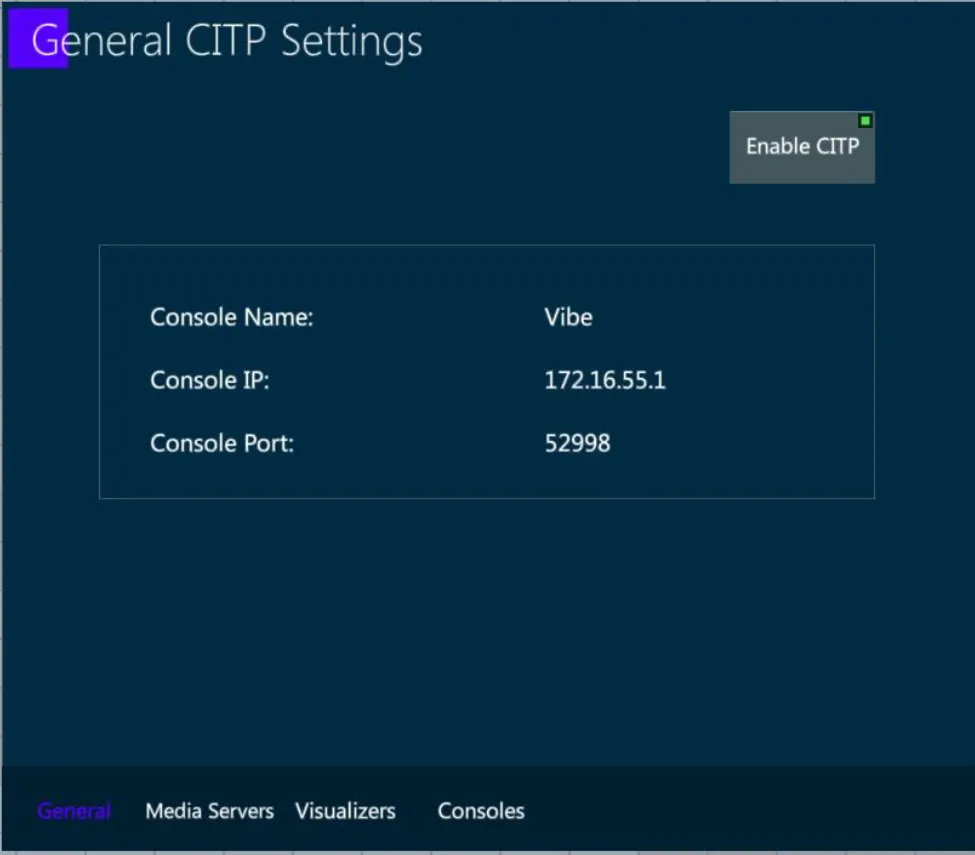
17.6.1 General
This tab shows the general information about the console and gives the option to enable/disable CITP communication from/to the console.
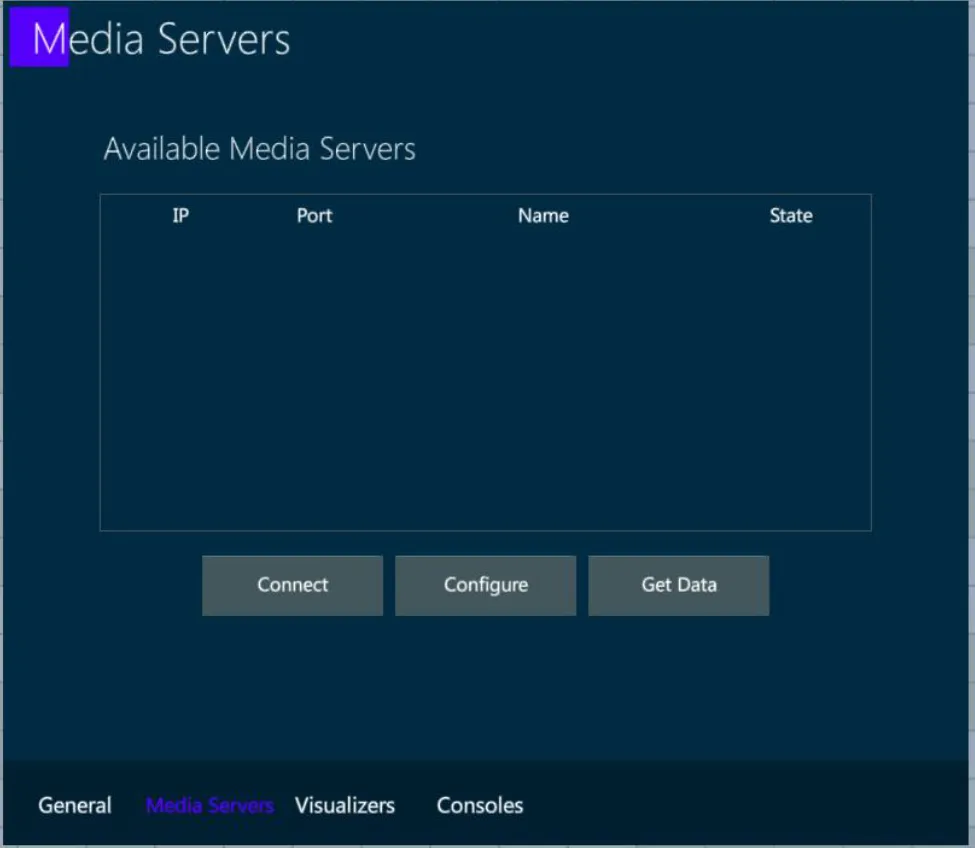
17.6.2 Media Servers
This tab shows a list of the detected Media Servers on the network. In order to connect to a media server and start a session, select a media server from the list and press Connect.
In order to link a media server to a specific fixture, select a connected media server from the list and tap Configure. A popup will appear where you can choose which fixtures you want to link.
In order to get all the available data from a media server, select a connected and linked media server from the list, and tap Get Data. All available data such as thumbnails, effects etc. will be synced from the media server to the fixtures on your show.
17.6.3 Visualizers
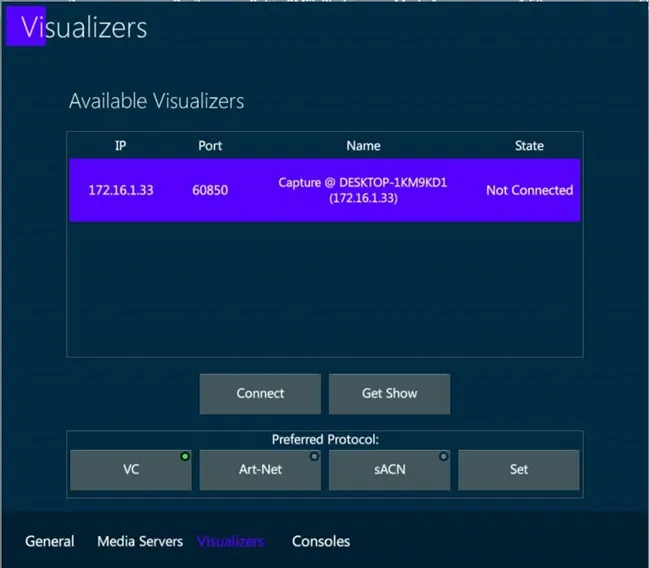
This tab shows a list of the detected Visualizers on the network that are using CITP.
To connect to a visualizer and start a session, select it from the list and tap Connect.
To get the patch from a connected visualizer, select it from the list and tap Get Show.
👉 This action will clear the current show data, get the devices, fixtures, numbers, patch, XYZ information from the visualizer and automatically create them on your show.
Auto Patch from Capture
It is possible to sync the show from Capture. In order to do that, set the Capture CITP settings to use Standard Multicast and select the relevant IP address.
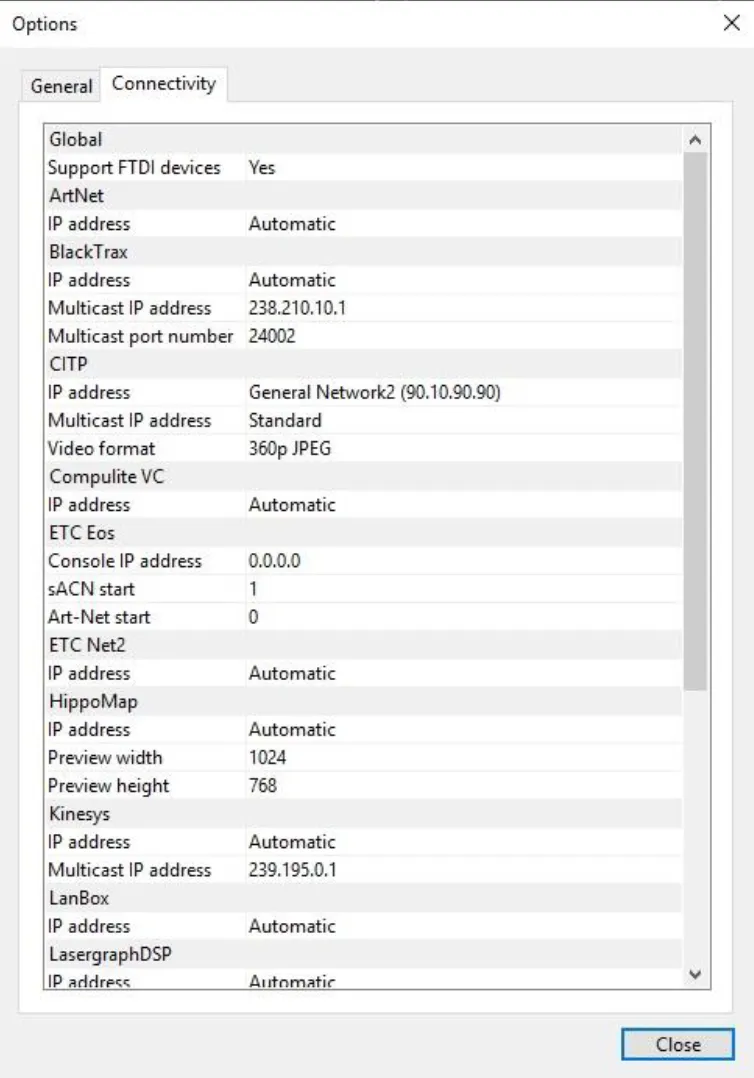
In addition, make sure Vibe and Capture are on the same subnet.
After finishing preparing the show on Capture, go to Vibe, open the CITP popup, enable CITP and connect to Capture from the Visualizers tab. Then Get Data from Capture and Vibe will be ready to go.
