Chapter 7 Library
👉 Store Vibe Libraries to get presets of param values and create Effects to manage dynamic values.
This chapter deals with filtering Editor parameters when storing objects, creating libraries by banks, managing the effect engines and curves to create dynamic effects.
Chapter index:
7.1 Bank Libraries
Libraries are the basic way to store show data on the system.
The use of libraries is not mandatory, as most of the playback operations can be performed without storing any, but is highly recommended in order to make the programming flow better organized and much faster and easier, both during the setup and the editing of the show file.
All kinds of libraries can be scrolled and selected through their specific softkey view or through the Context view.
Vibe has two types of Libraries: Object Libraries and Bank Libraries.
- Object Libraries are pools of system object types, such as:
Groups (used to manage fixture selection)
Qlists (used to store sequences of Cues)
Scenes (used to store stage looks)
Snaps (used to manage controllers’ configuration)
Filters (used to store Bank Libraries and Cues)
Macros (used to store sequences of commands)
An extensive description of each object can be found into its dedicated chapter.
- Bank Libraries are pools of parameter values divided by banks of parameters, such as:
Intensity (dimmer, strobe, shutter, …)
Position (pan, tilt, move speed, …)
Color (red, cyan, CTC, color wheel, …)
Beam (focus, zoom, iris, frost, prism, …)
Image (gobo wheel, animation, pattern, …)
Shape (blade depth, blade angle, blade rotation…)
Custom (unfiltered; stores every parameter in the Editor)
Effect (effects running on parameters in the Editor)
Bank Libraries are often called Presets or Palettes on other consoles.
Bank libraries are referenced by stored objects such as Scenes and Cues, so any modification will affect all the objects that have a reference to the edited library.
Video contents, managed on the Media Bank, don’t have a specific library because Media Server’s parameters are also assigned to the previous Banks. They may be stored on the bank libraries, filtering the parameters contained in that library, either on the Custom libraries.
7.1.1 Operations
Store directly to a Softkey:
[Fixture] [#] [+ ⟶ -] Select parameter {Bank} on Smart Screen.
Use keypad, Smart Screen pickers, and/or adjust parameter wheels, to set values.
Press [STORE] - The Library {Store Options} tab will appear on top right corner of the softkeys, use the Library {Store Options} popup at the bottom on the Smart Screen to make changes.
👉 If no option changes are required just directly tap the appropriate Library SK without tapping the Library {Store Options}.
- Tap destination Library softkey.
Store a Library with the keypad syntax:
Press [Fixture] [#] [+ ⟶ -] - Select parameter {Bank } on Smart Screen.
Use Smart Screen pickers, and/or adjust parameter wheels, or type value to set values.
Press [LIBRARY] - Library {Store Options} popup will open at the bottom of the Smart Screen and {Banks} will appear on the Editor Toolbar.

- Tap a parameter {Bank} key on the Editor Toolbar.

A shortcut for Bank selection is to specify a number directly after pressing [LIBRARY] key:
1 = Intensity
2 = Position
3 = Color
4 = Beam
5 = Image
6 = Shape
7 = Custom
8 = Effect
After typing the first number, the bank name will appear on the command line.
The next number typed will be the library number.
Enter the destination library number via the keypad.
Make {Library Store Options} changes, if required.
Press [STORE] to complete the sequence.
Edit a Library using [UPDATE]:
Make a change to parameter value outputting to the stage from a library referenced in an active cue or scene.
Press [UPDATE] - The Update popup will open.
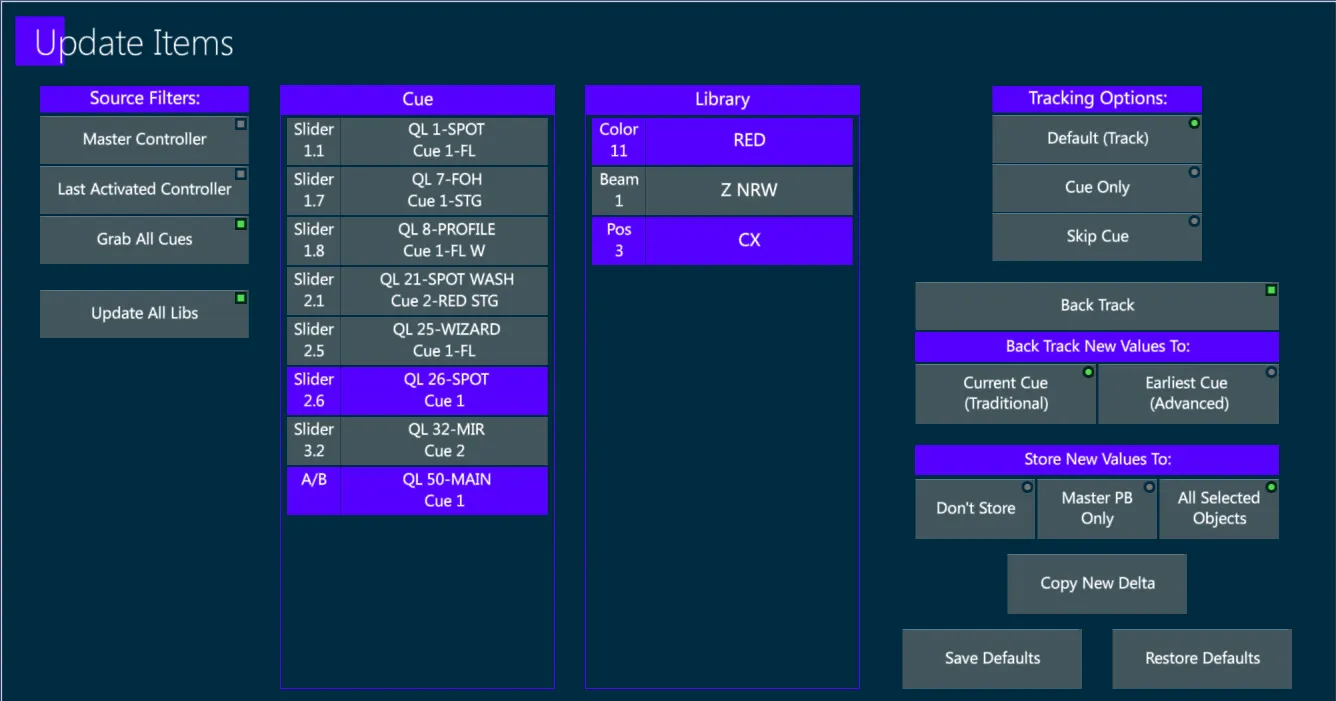
Two columns will appear: the left column shows Cues available for updating and the right column shows Libraries available for updating. The target library or libraries should be selected.
Selected libraries may be freely deselected in the Update popup. If all Libraries are deselected, updates will become “hard” values in the source cue instead of the source libraries being updated.
Tap Apply or press [ENTER] to close the popup and complete the update.
Edit a Library using Softkey syntax:
Make a change to parameter value outputting to the stage from a library referenced in an active cue or scene.
Press [STORE] and tap source {Library SK}.
The {Cancel, Update, Overwrite, Release} popup will appear on the large screen.
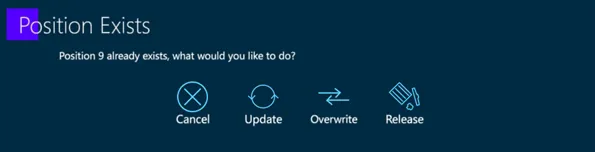
- Tap {Overwrite} to replace all fixtures with those in the Editor, {Update} to merge the editor into the library, or {Release} to remove the selected fixtures from the Library.
👉 Releasing fixtures is only valid if the library is Fixture Specific or Device + Fixture in the case where specific fixtures have modified recorded values.
👉 Alternatively the sequence [LIBRARY] {Bank} from the Editor Toolbar [#] [STORE] to an existing library will work the same as above.
Edit Library settings:
Library Settings may be changed at any time after they are created using the Library Settings popup.
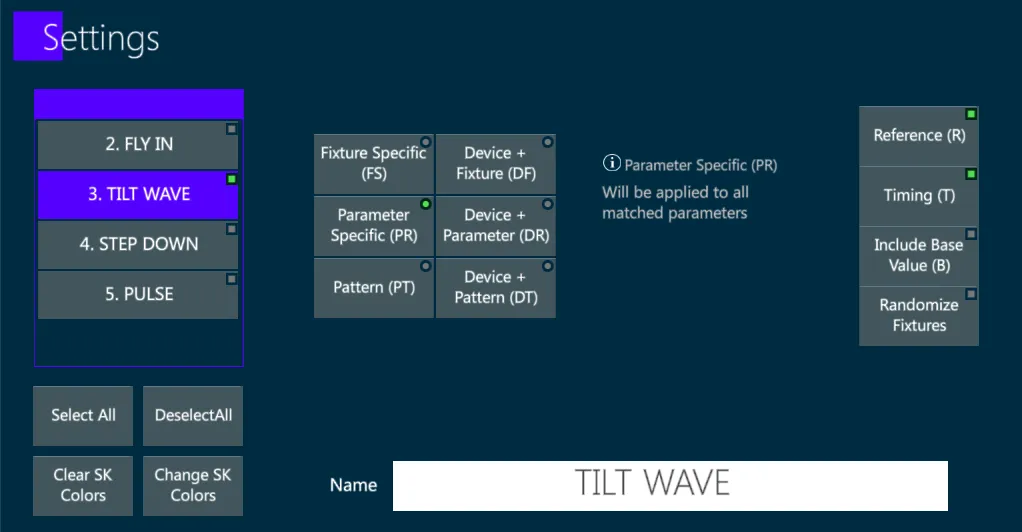
To open the Library Settings popup:
- Tap the Library {SK} you wish to modify and press [SETTINGS]. (This is invalid with Snaps and Macros as it will trigger them)
OR
Press [LIBRARY] tap {Bank} on the Editor Toolbar Press [#] [SETTINGS]
If Reference is selected, modifying the library will modify the values of ALL cues that reference it.
If Timing is selected, any parameter cell times in the Editor will be stored with the library.
Rename a Library:
Text labels may be assigned as library names at any time there is NOT an active selection in the Editor. Any of the following methods are valid:
Directly after storing a Library, start typing on the keyboard. The Text Entry popup will appear.
Tap a Library {SK}, start typing on the keyboard. The Text Entry popup will appear.
Press [TEXT] tap a Library {SK}. The Text Entry popup will appear.
Press [Library] tap {Bank} on the Editor Toolbar Press [#] [TEXT]. The Text Entry popup will appear.
Delete a Library:
Method 1: Tap the Libraries’ {SK} then press [DELETE]
Method 2: Keypad sequence for Bank Libraries: [LIBRARY] tap {Bank} on the Editor Toolbar [#] [DELETE]
Method 3: Keypad sequence for deleting Object Libraries: [Object] [#] [DELETE]
For most Delete functions, pressing [DELETE] [DELETE] will do the same as pressing [DELETE] and [ENTER] or Apply to complete the operation.
Library Softkey Menu:
The Long Click gesture on any softkey, including the libraries, opens a temporary Quick Actions menu where the user can directly select the most used functions:
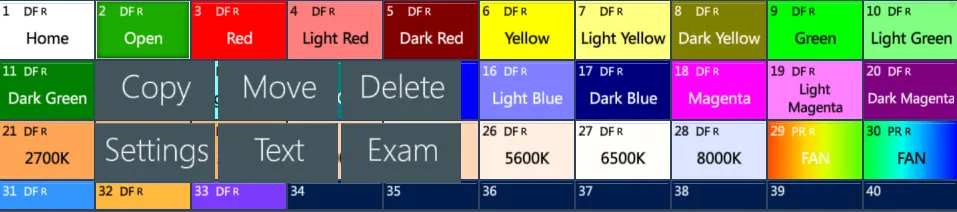
Copy: make a copy of the object, that may then be pasted on a different SK
Move: move the object to a different position, acting like a cut + paste command
Delete: open the delete object popup
Settings: open the object settings popup
Text: open the rename object popup
Exam: exam the object in the Exam View
7.1.2 Auto Param Grouping
By default Vibe uses the concept of “Automatic Parameter Grouping” when storing libraries.
Auto Parameter Grouping can be disabled by tapping the toggle button in the system settings popup.
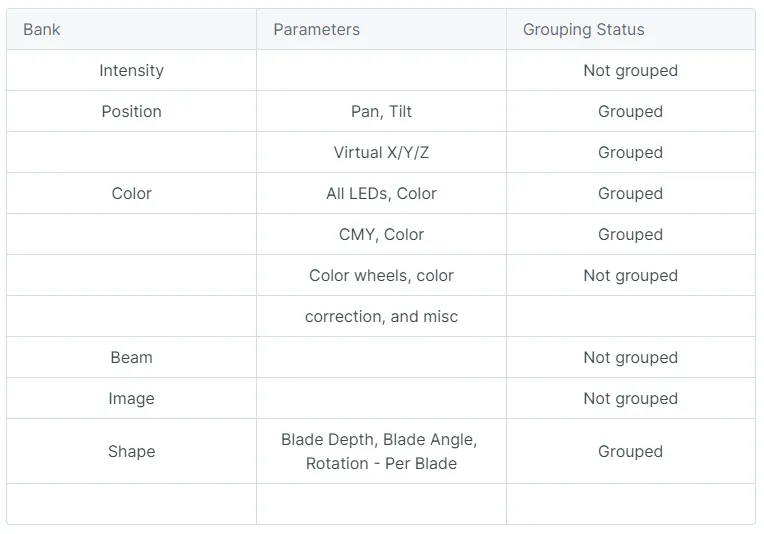
With Auto Param Grouping enabled: when a parameter is moved, all the parameters of the same library bank are grabbed into the editor with their current status, to guarantee that what is viewed on the stage is the same as what is stored in the library.
With Auto Param Grouping disabled: when a parameter is moved, only that parameter is grabbed into the editor with its current status.
Even if the Auto Param Grouping is enabled, Filters may be applied to modify what is stored in a Library.
7.1.3 Context
The Context view is a softkey view that helps reducing the amount of space on the screen where the libraries are shown.
Context adapts the visualization to the last selected object type or bank, for example by pressing Group it will show the Groups library, by pressing Color the Color library and by pressing Scene the Scenes library.
The Context view’s settings popup on the layout editing toolbar allows to filter the contents shown by the context view.
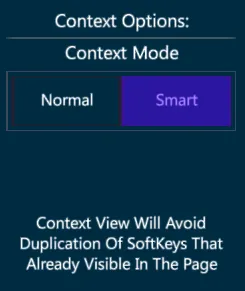
Context views can be filtered manually, by toggling the contents to enable and disable, or automatically, by setting the Smart option. Smart context setting will avoid to show the softkeys that are already shown by other softkey views on the same page.
7.2 Auto Generate
The option to Auto Generate Groups and Libraries permits a smart and fast creation of the most common fixture groups and parameter libraries.
The Auto Generate button is on the Editor Toolbar in Patch pages.

By selecting the options in the Auto Generate popup menu, the user can configure the quantity and numbering of the libraries to be automatically created.
The auto generated libraries can either overwrite or merge the already existing ones.
Libraries can be named using system names or library numbers, and customized for example using the device’s name.
Libraries can be numbered starting from a desired number or appended to the first available position.
Libraries of different fixture types can be spaced with the desired interleave.
Auto generated libraries are created when pressing the GENERATE button on the popup.
It is possible to check the preferred options on each bank page and then generate all of them in a single click, as well as to generate step by step for each device or for each bank.
7.2.1 Groups
Auto Generate Groups has the following options:
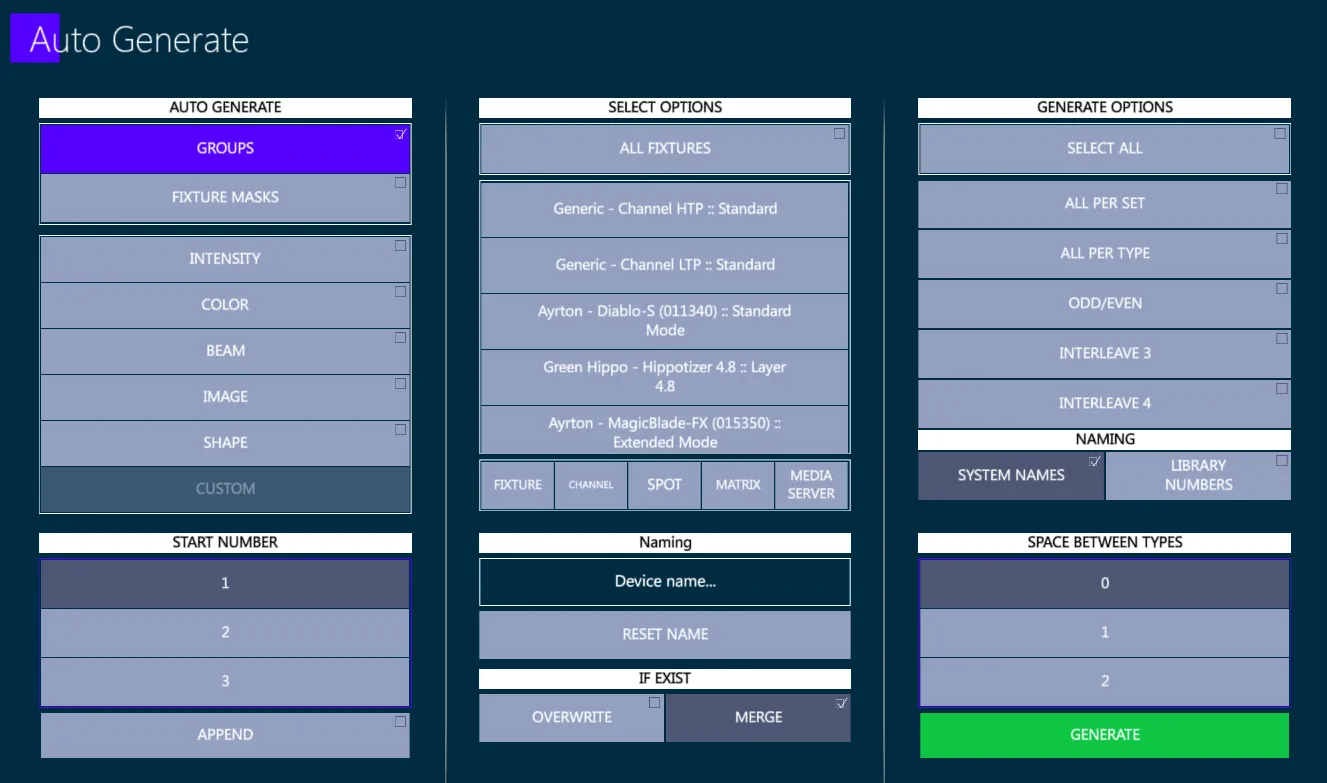
All per Set creates groups including the fixtures of the Set.
All per Type creates groups including the fixtures using each imported Device.
Odd/Even creates groups with fixtures splitted in halfs between odds and evens.
Interleave 3 creates groups using a 3 fixtures interleave.
Interleave 4 creates groups using a 3 fixtures interleave.
7.2.3 Intensity
Auto Generate Intensity Libraries has the following options:
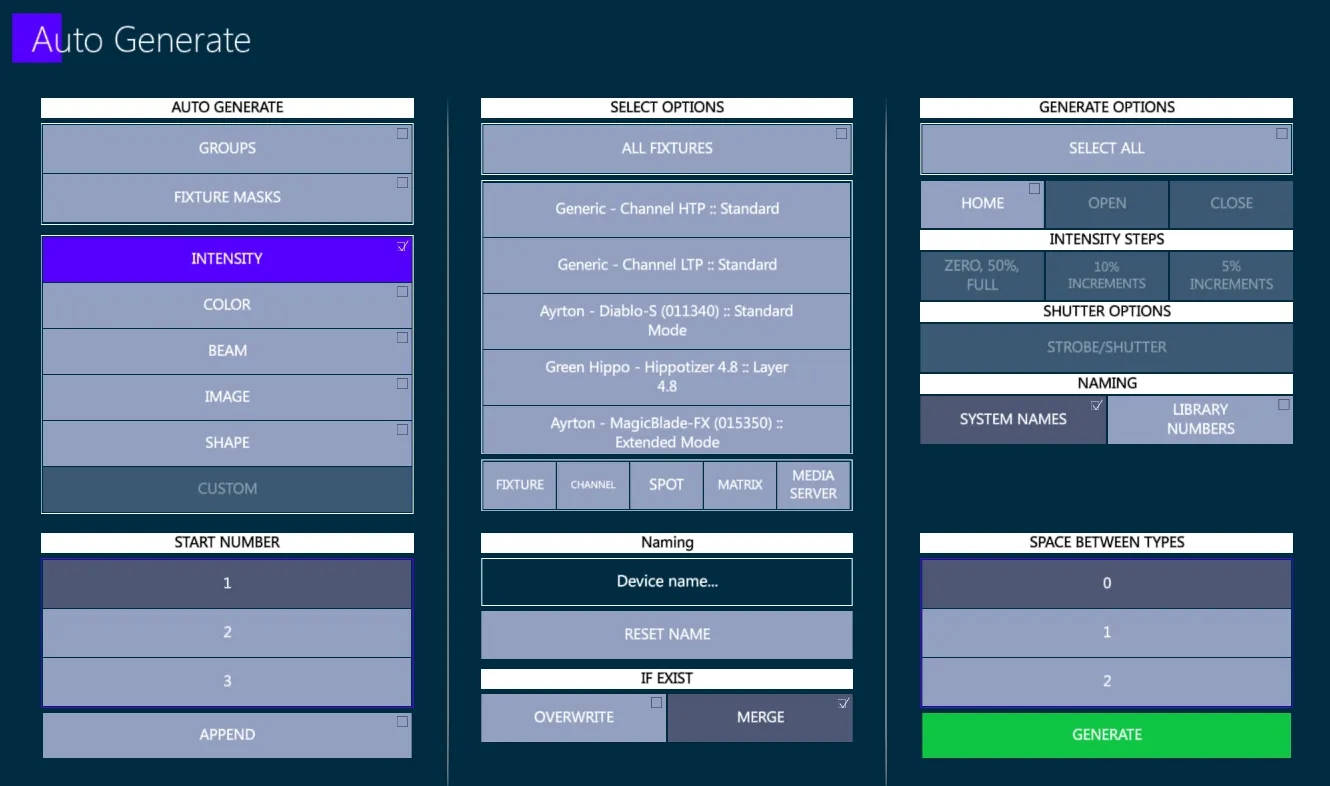
Intensity steps libraries may be splitted: in 3 (0%, 50%, 100%), in increments of 10%, in increments of 5%.
Shutter steps libraries are created according to the fixtures’ shutter and strobe parameter.
7.2.4 Position
Auto Generate Position Libraries is not supported, because commonly the position values are fixture specific and they are customized by the operator according to the show and stage setup.
7.2.5 Color
Auto Generate Color Libraries has the following options:
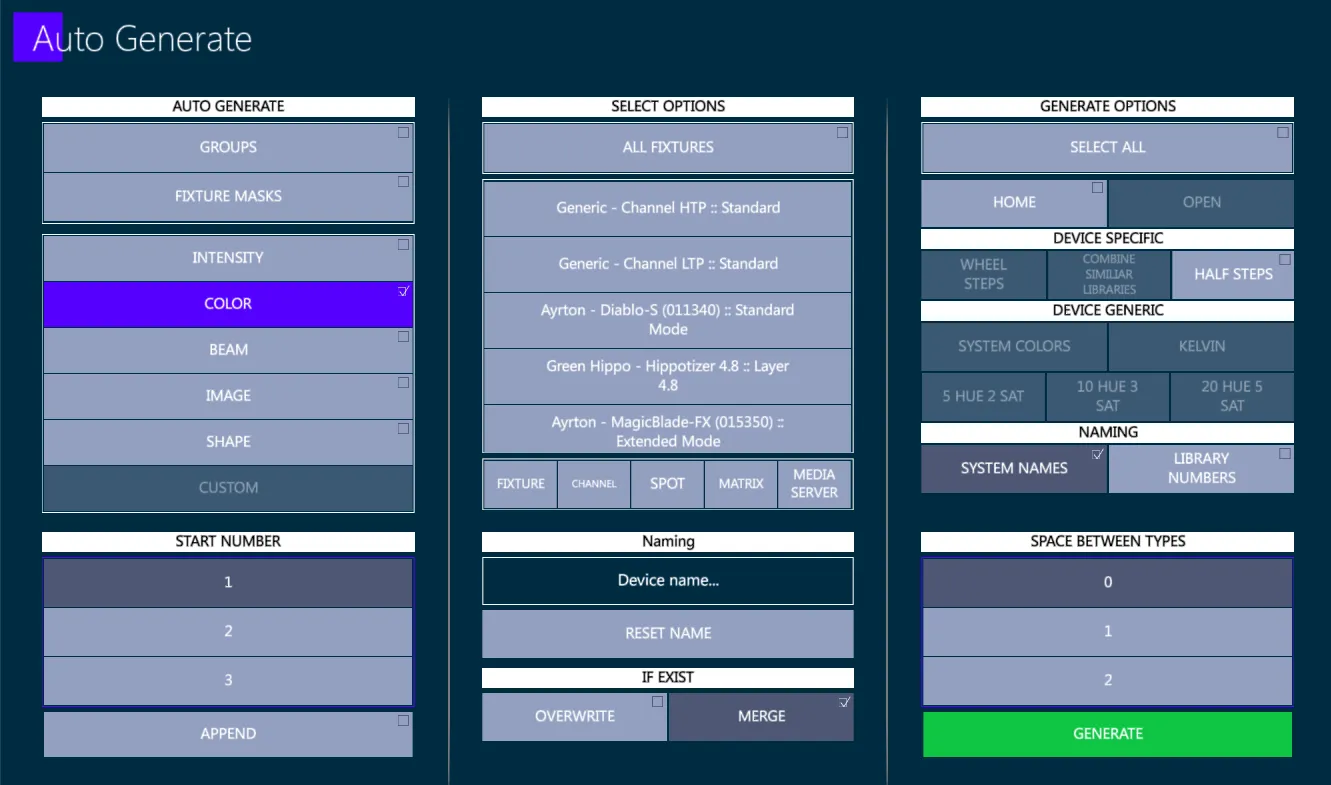
Color Wheels steps libraries are created according to the fixtures’ color wheel parameter(s).
Similar colors may be combined into the same library.
Half steps libraries may be created between two consecutive colors of the wheel.
System Colors creates libraries of the most used colors, defined by the system.
Kelvin creates libraries of the most used color temperatures, defined by the system.
Color libraries using the fixtures’ Color Mixing system may be splitted in steps based on their Hue and Saturation virtual parameters.
7.2.6 Beam
Auto Generate Beam Libraries has the following options:
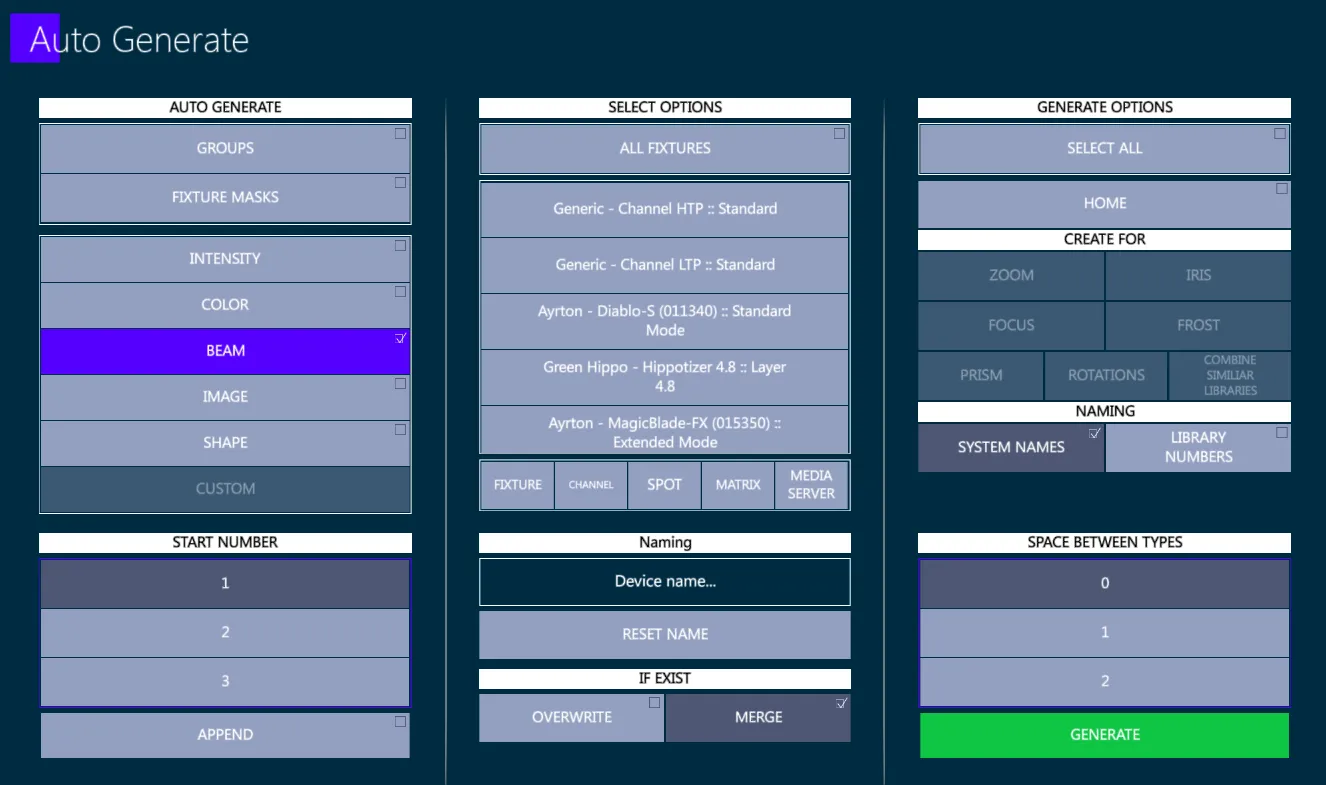
Zoom libraries are created for narrow, half and wide values (usually 0%, 50%, 100%, or viceversa).
Focus libraries are created for 0%, 50%, 100%.
Iris libraries are created for narrow, half and wide, and for eventual steps of the Iris parameter.
Frost libraries are created for 0%, 50%, 100%, and for eventual steps of the Frost parameter.
Prism steps libraries are created according to the fixtures’ prism wheel(s) parameter(s).
Similar prisms may be combined into the same library.
Prism Rotation libraries may be created with a clockwise (CW) and counterclockwise (CCW) direction.
7.2.7 Image
Auto Generate Image Libraries has the following options:
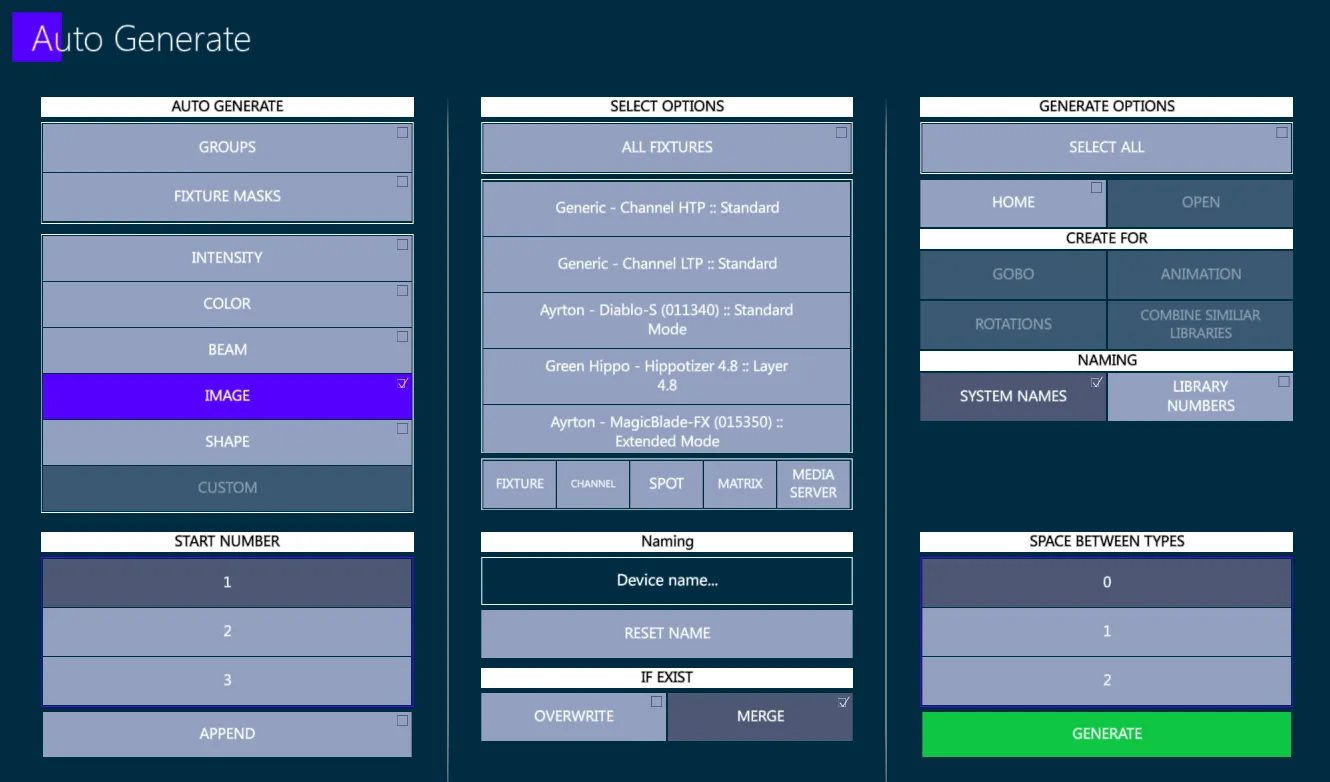
Gobo steps libraries are created according to the fixtures’ gobo wheel(s) parameter(s).
Similar gobos may be combined into the same library.
Gobo Rotation libraries may be created with a clockwise (CW) and counterclockwise (CCW) direction.
Animation steps libraries are created according to the fixtures’ animation or effect wheel(s) parameter(s).
Similar animations may be combined into the same library.
Animation Rotation libraries may be created with a clockwise (CW) and counterclockwise (CCW) direction.
7.2.8 Shape
Auto Generate Shape Libraries has the following options:
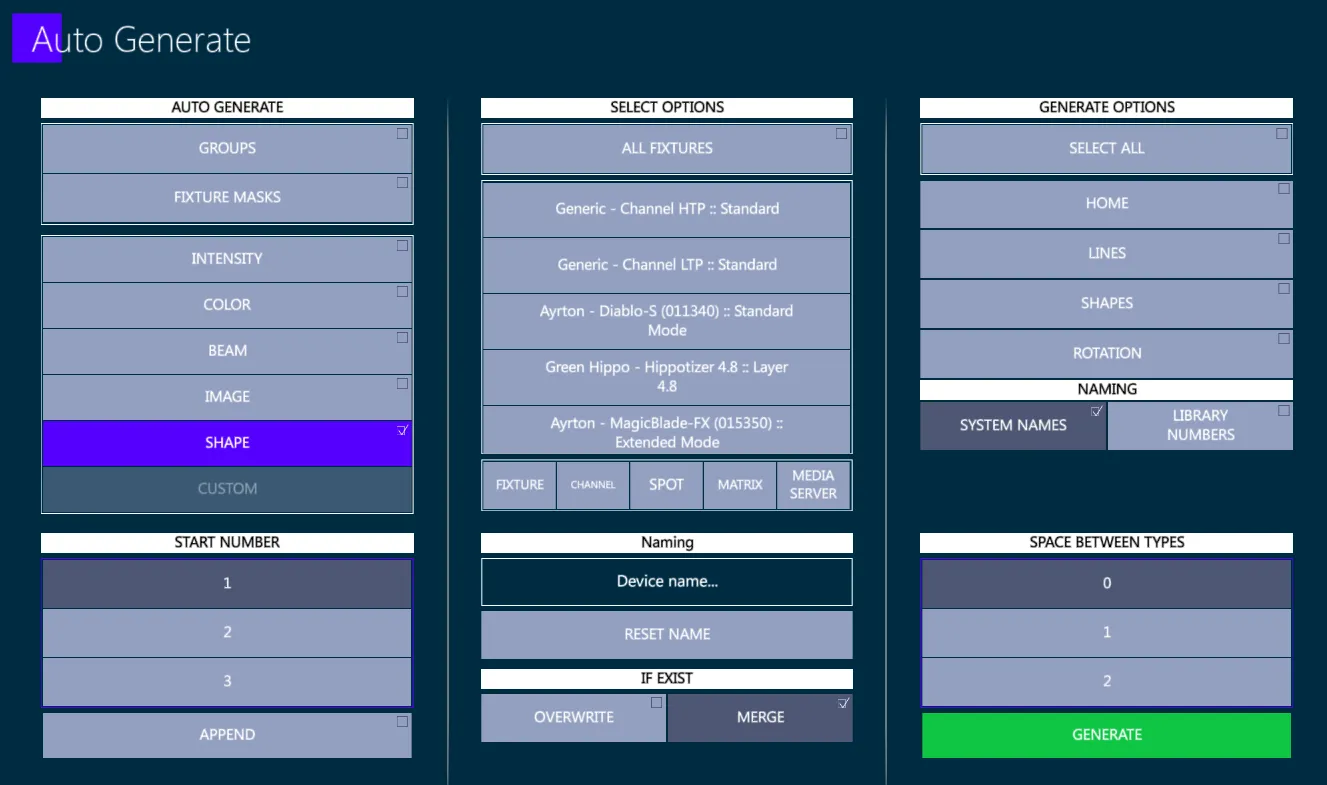
Shape libraries will be based on the fixtures’ blading (or shapers) system.
Shape libraries may be created for different common shapes, such as: horizontal and vertical lines, squares and triangles shapes, blade pack indexing Rotations.
7.3 Library Defaults
When storing Bank Libraries, filters are used to exclude parameters from unrelated banks. The Library filter defaults are set under the Filters popup, Library Defaults tab.
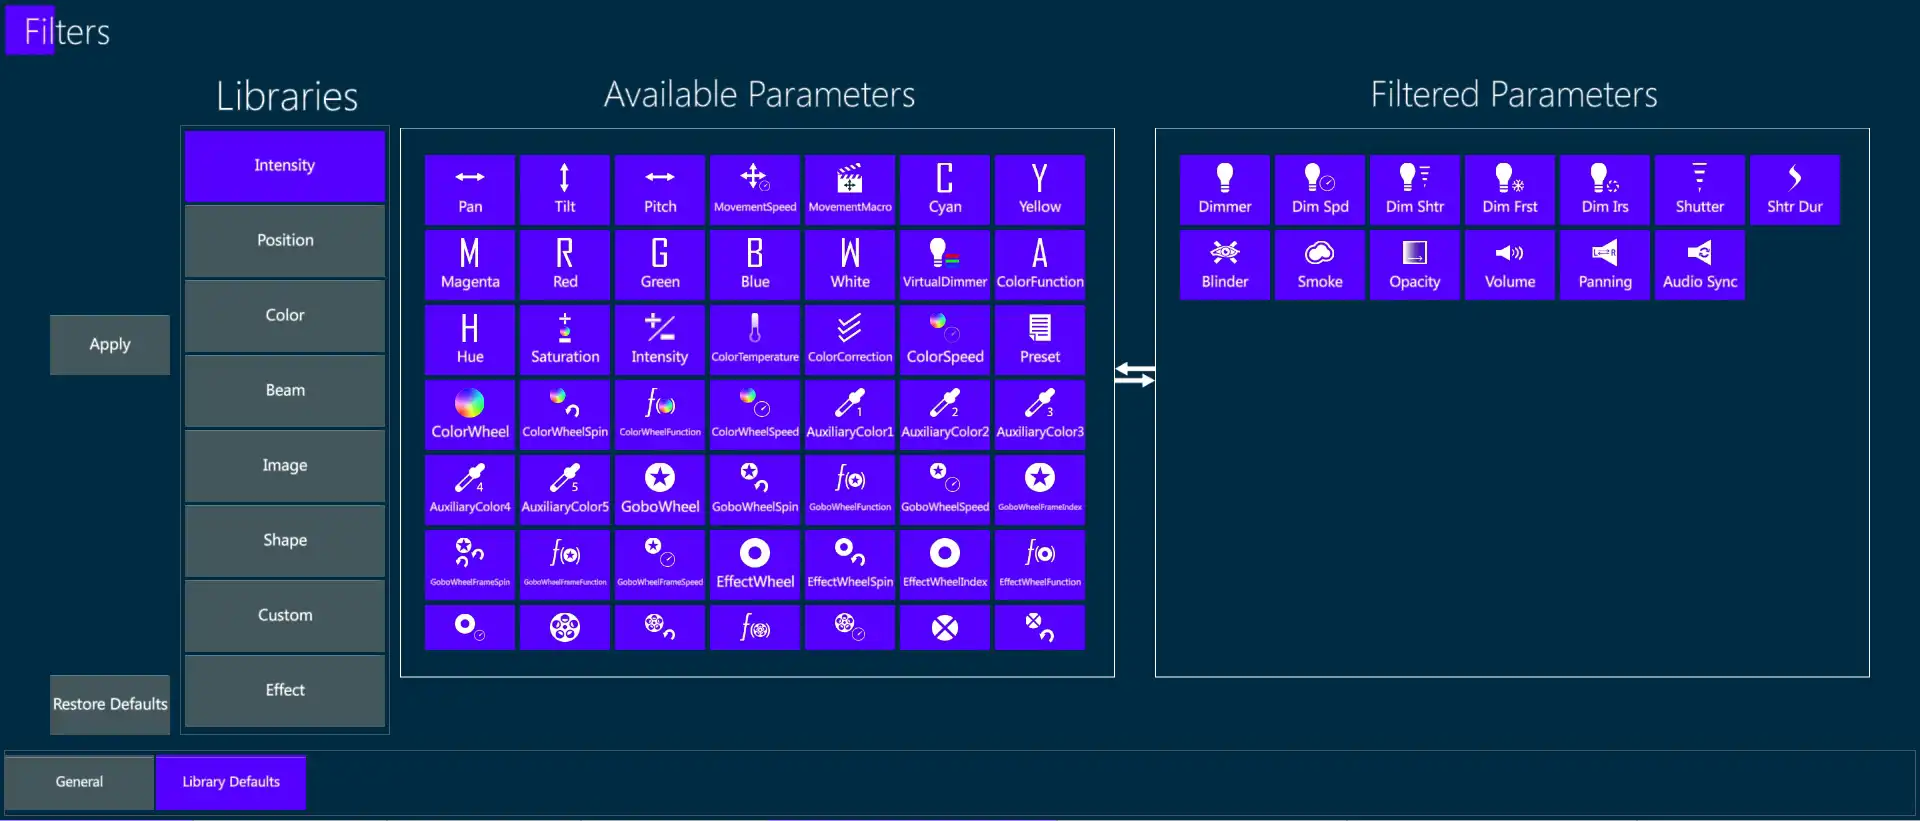
Change Defaults:
Press [VIBE] + [FILTERS] to open the Filters pop-up.
Make sure the Library Defaults tab in the lower left corner of the pop-up is selected.
Tap the {Library Bank} to be edited.
Tap a parameter in the Available Parameters box to move it to the Filtered Parameters box.
Press the {Apply} softkey to apply the filter and stay in the popup or press [ENTER] or the Apply icon to apply the filter and close the popup.
Restore Defaults: - Tapping {Restore Defaults} will reset Bank Libraries to their system defaults.
7.3.1 Behavior
Library behaviors are used to define which fixtures the library can be applied to.
Library Bank softkeys have default filters and behaviors based on the way they are commonly used.
Default library settings and behaviors can be changed in the System settings tab on the Defaults tab.
Vibe bank libraries have the following behaviors:
Fixture Specific (FS) – Values will be applied only to the specific stored fixtures.
Parameter Specific (PR) – Values will be applied to all matched parameters.
Pattern (PT) – Values will be applied to all matched parameters and will keep the pattern of values.
Device + Fixture (DF) – Values will be applied to the specific fixtures when possible and the rest will be the same as the first. The first fixture will be used as a reference for all other similar fixture types. If values are changed for specific fixtures they will be stored in the library as if they were fixture specific. If a fixture other than the first fixture is released from the library, its values will again be referenced from the first fixture. If the first fixture is released, the next fixture will become the reference.
Device + Parameter (DR) – Values will be applied to fixtures of the same device and having the same parameter type.
Device + Pattern (DT) – Values will be applied to fixtures of the same device and will keep the pattern of values.
7.3.2 Reference
When a library has the Reference option enabled, using that library will be referenced by the Cues and Scenes stored with the library active in the editor.
Editing a referenced library will affect all the objects that have reference to that library.
Enable or Disable library reference on the library settings or, as system default, in the system settings popup on the Defaults tab.
7.4 Filters
7.4.1 On the Fly
On the Fly Filters are used to filter editor parameters when storing libraries, cues and scenes.
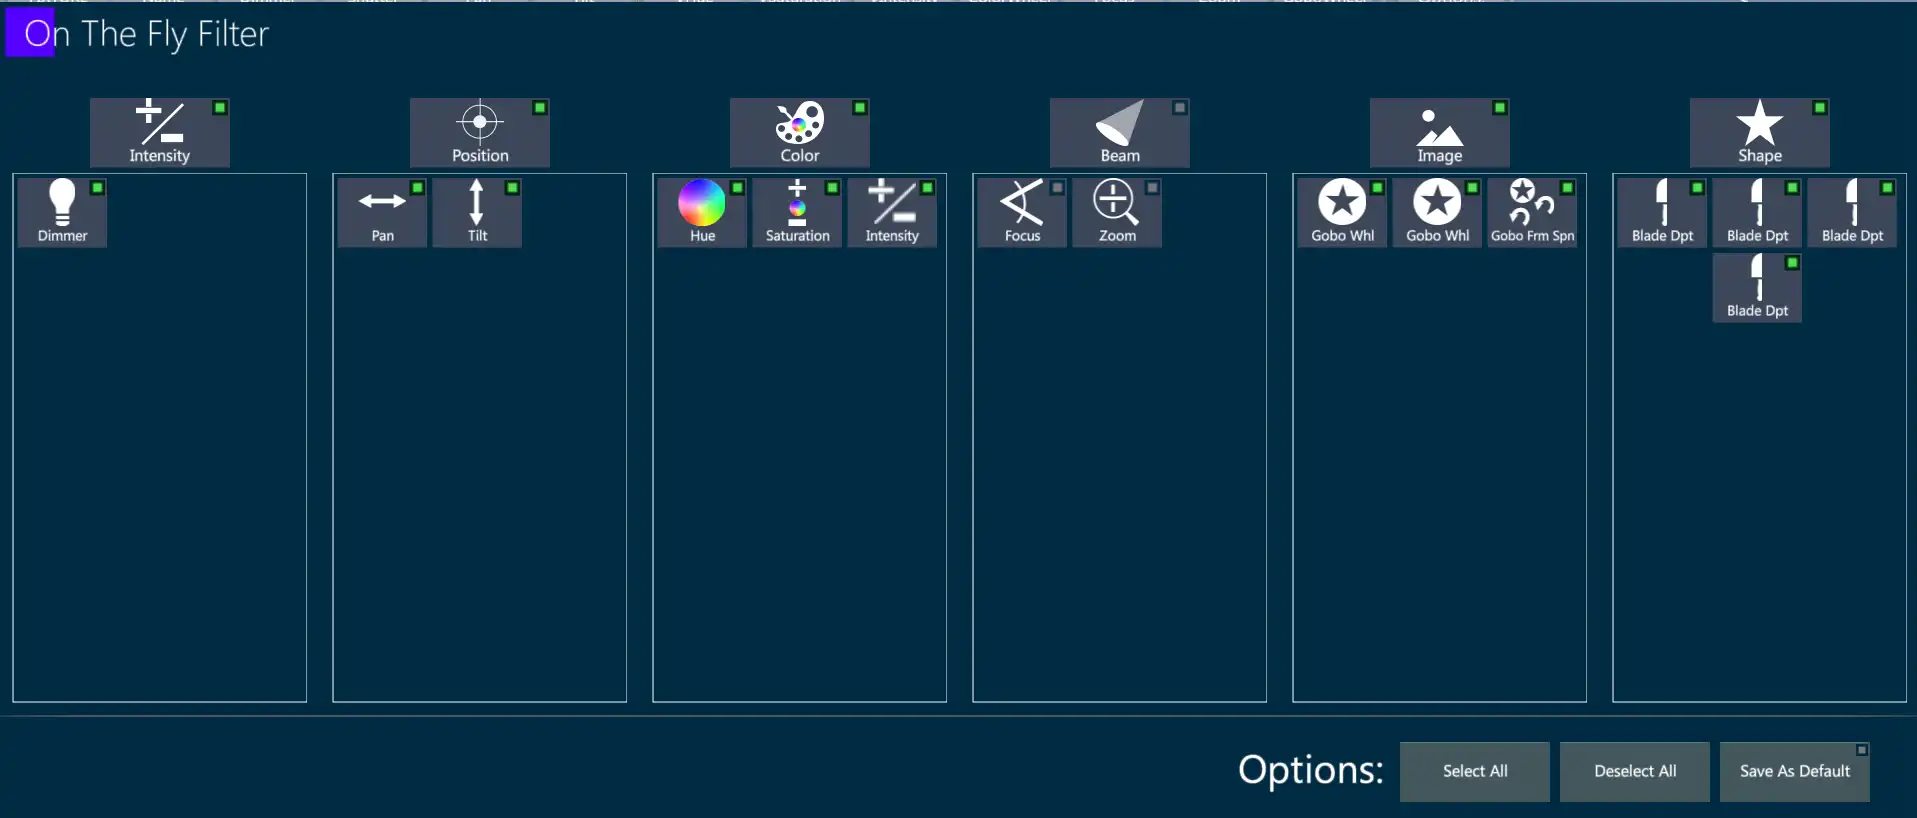
The Green box indicates parameters that will be included in the cue or scene.
Store using On The Fly Filters:
Set or load values into the Editor. [CUE] [#] [EDIT] is also valid.
Press [FILTERS] key.
The On The Fly Filter popup will open.
De-select banks and parameters that need to be filtered from the cue.
Press [ENTER] or Apply to apply the filter and close the popup.
Store library, cue or scene. Deselected banks and parameters will not be included.
Options:
{Select All} - Selects all banks and parameters
{Deselect All} - Deselects all banks and parameters
{Save as Default} - Not implemented yet.
7.4.2 Custom Filters
Custom Filters may be created “blind” without a fixture and parameter selection.
Filters are saved in the Filters Library and can be recalled by tapping the filter’s softkeys when storing.
Bank filters are prebuilt according to the parameter banks, but they may be edited as well.
Custom filters may be added and edited as preferred, and will be visualized in the filter softkeys and relevant popups.
Filters editing operations can be done in the Library Filters popup.
Default Library Filters
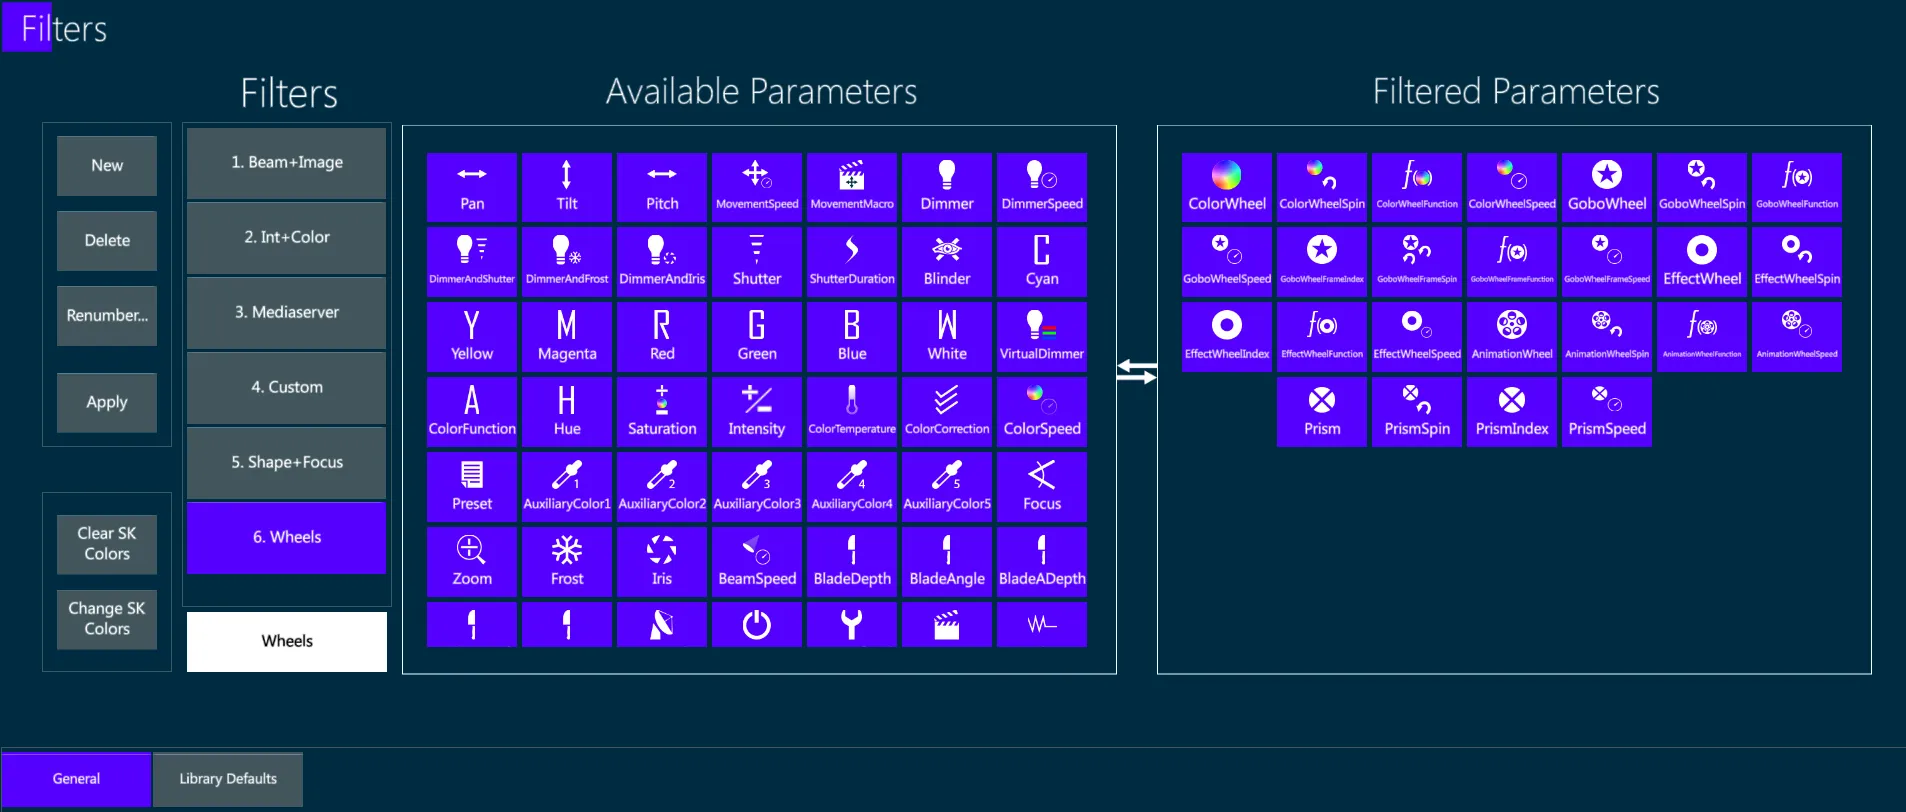
General Custom Filters
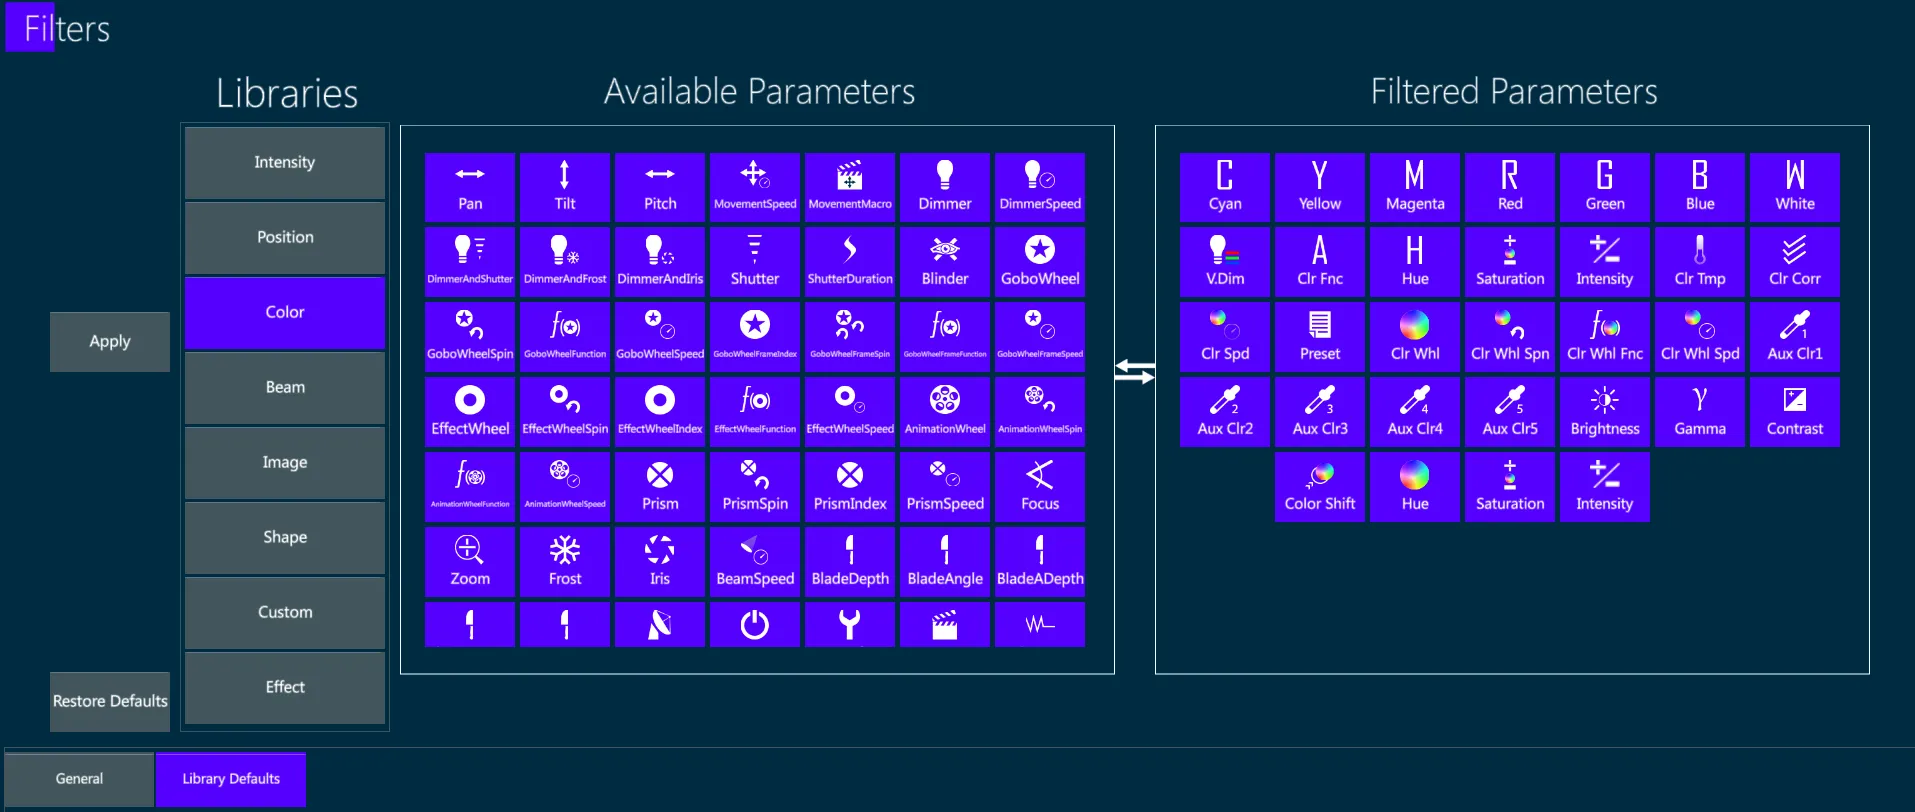
Parameters may be included or excluded by the Filter depending on how the filter is created.
Only the parameters in the Filtered Parameters right box will be stored.
All the parameters in the Available Parameters left box will be ignored.
Create a Custom Filter
Open the Filters popup by pressing [VIBE] + [FILTERS] or accessing the System Settings Default tab.
Select the General Tab of the popup.
Press {New}. A new filter will be created with the name {1. Filter 1}.
Accept the name or type a new name in the white data entry box at the bottom of the Filter’s column.
Tap in the Available Parameters box the parameters that you want to be included. The parameter will move from the Available Parameters box to the Filtered Parameters box.
Tap in the Filtered Parameters box the parameters that you want to be excluded. The parameter will move from the Filtered Parameters box to the Available Parameters box.
Press the {Apply} softkey to apply the filter and stay in the popup or press [ENTER] or the Apply icon to apply the filter and close the popup.
7.4.3 Filters Store Options
When storing Libraries or Cues, Filters may be applied to set which parameters have to be stored and which have to be ignored.
Filters may be applied in different ways:
with the programming syntax throught the FILTERS button,
by tapping on the filter softkey on the screen,
by tapping on the Filters key in the Store Options popup and selecting the desired filter.
Filters in Library Store Options:

Filters in Cue Store Options:

7.5 Curves
Effects are built from the following components:
Parameters - selected from the created fixtures’ available params.
Patterns - curves that affect the fixture selection’s order.
Primitives - curves that affect the parameter’s output values.
The same Curves database, containing pre-built curves and user-created custom curves, is used by different features on Vibe:
the Effect Engine to assign the curve to an effect
the Fan Mode to set pattern curves to the parameter fanning
the Address View to set specific curves to DMX addresses, such as dimmer curves
All the Curves are listed in the Curves View
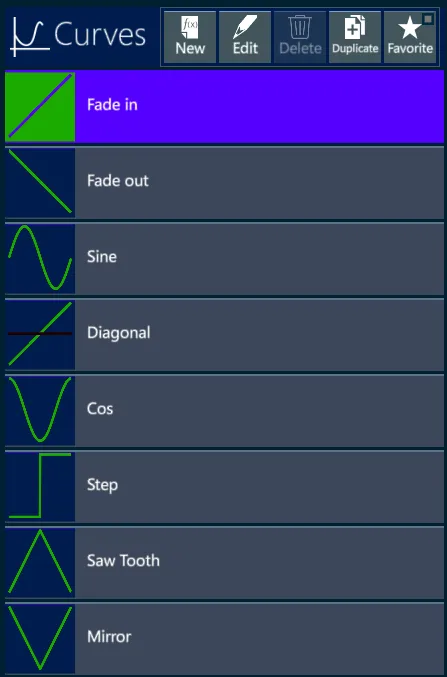
The Curves View header has options to manage the Curves:
New - to create a new curve
Edit - to modify an existing curve
Delete - to delete a custom curve; pre-built curves cannot be deleted
Duplicate - to make a copy of an existing curve
Favourite - to assign the Favourite tag to the curve, setting it in higher position on the list
A Curve creation or editing will open the Curve Editor popup.
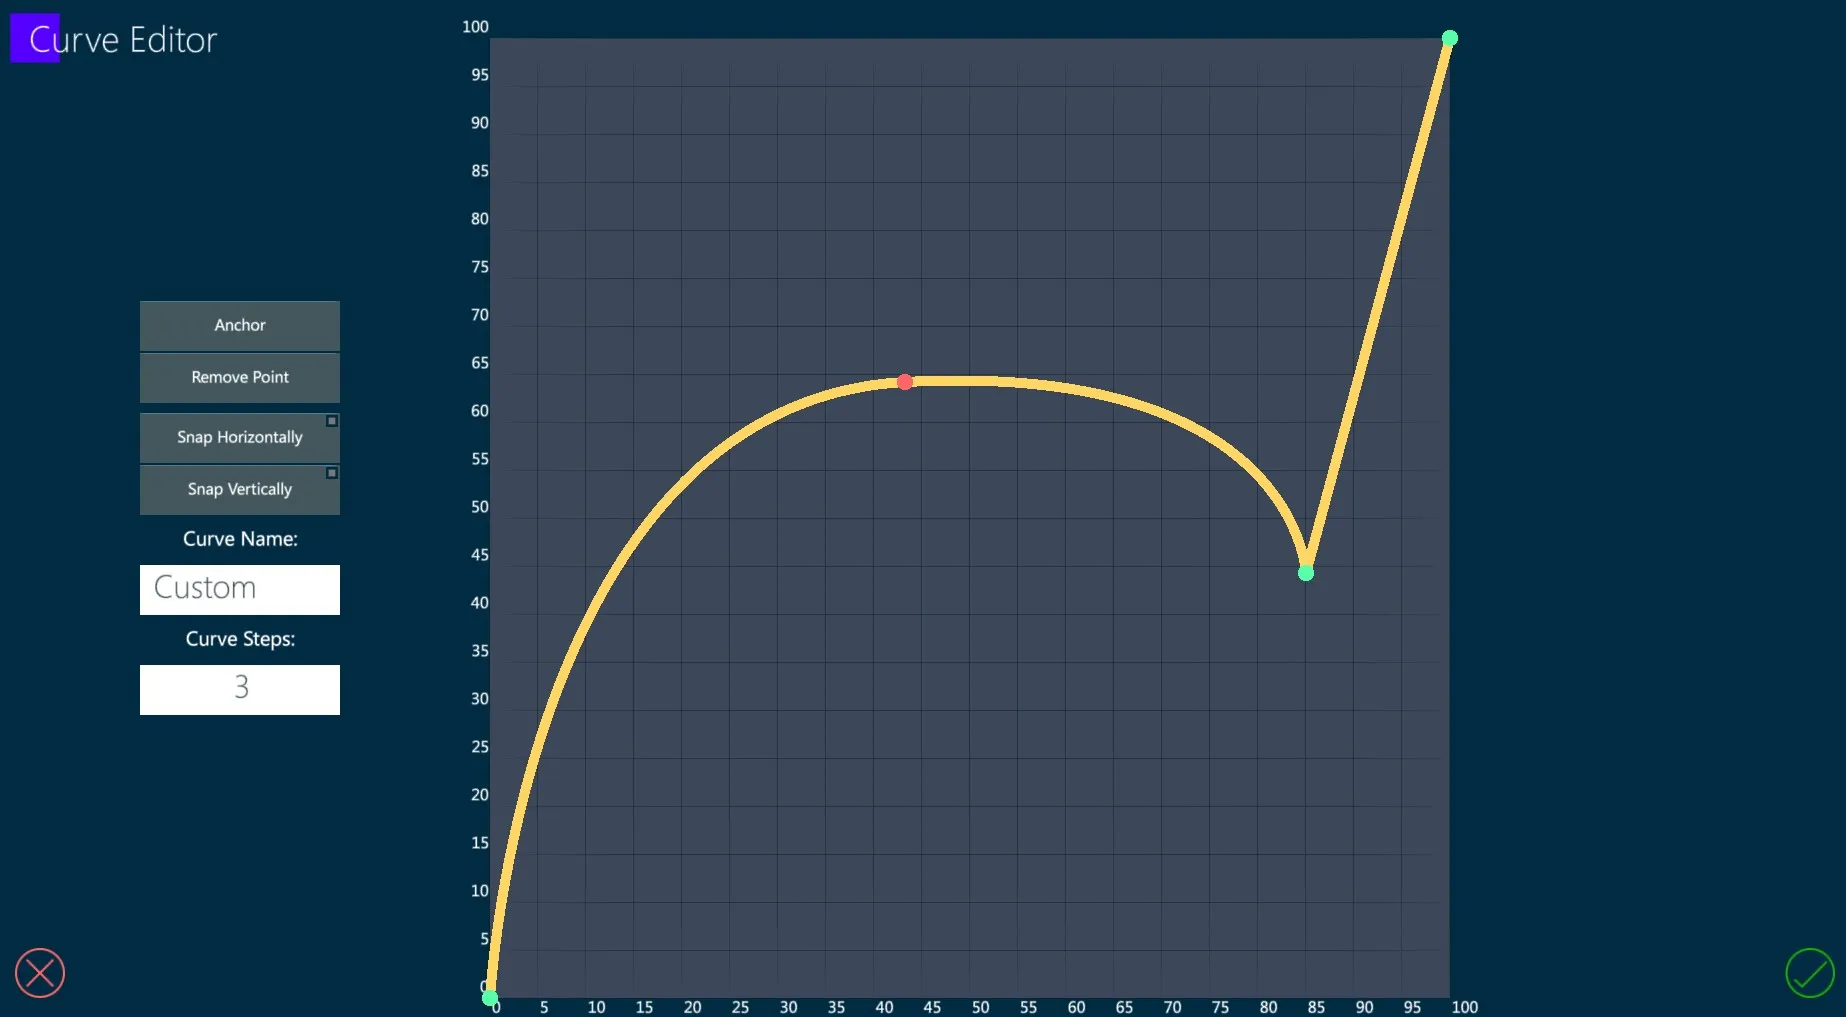
Tap the graphic to add anchor points.
Tap the {Remove Point} button to remove anchor points.
Tap an anchor point to select and move it on the grid.
Tap the {Anchor/Control} button to switch between straight and curved lines between the points.
A curved line can be made on both directions and be spread with the red linked buttons.
{Snap Horizontally} and {Snap Vertically} buttons fix the anchor points to the grid’s rows and columns.
The Name box is to write a name for the curve.
The Steps box is to set the amount of steps to split the curve.
👉 Curve Steps are used for Effect building: when the effect time is assigned by using BPMs (Beats Per Minute), the beats will be counted based on the Curve’s Steps. For example a Step Curve is based on 2 steps, one for the ON andone for the OFF value.
Tap Apply to store the Curve or Cancel to discard it.
7.6 Effects
Effects are a combination of Parameters, Patterns and Primitives.
Vibe has 2 Effect Engines that provide up to 4 ways of effect building.
A Basic Effect Engine opens on the Smart Screen and allows the creation of:
Pre-built effects
Smart effects
To access the Basic Engine press the [EFFECT] button with an active fixture selection and optionally a param selection.
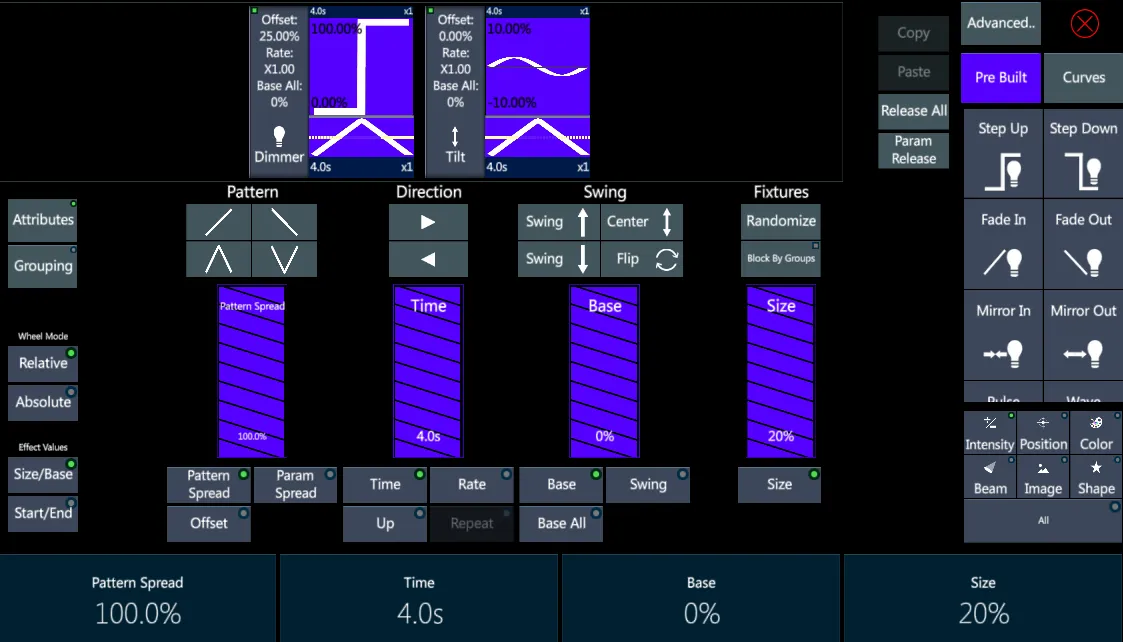
An Advanced Effect Engine opens on the Wide Screen and allows the creation of:
Advanced effects
Library effects
To access the Advanced Engine press the [VIBE] + [EFFECT] buttons with an active fixture selection and optionally a param selection.
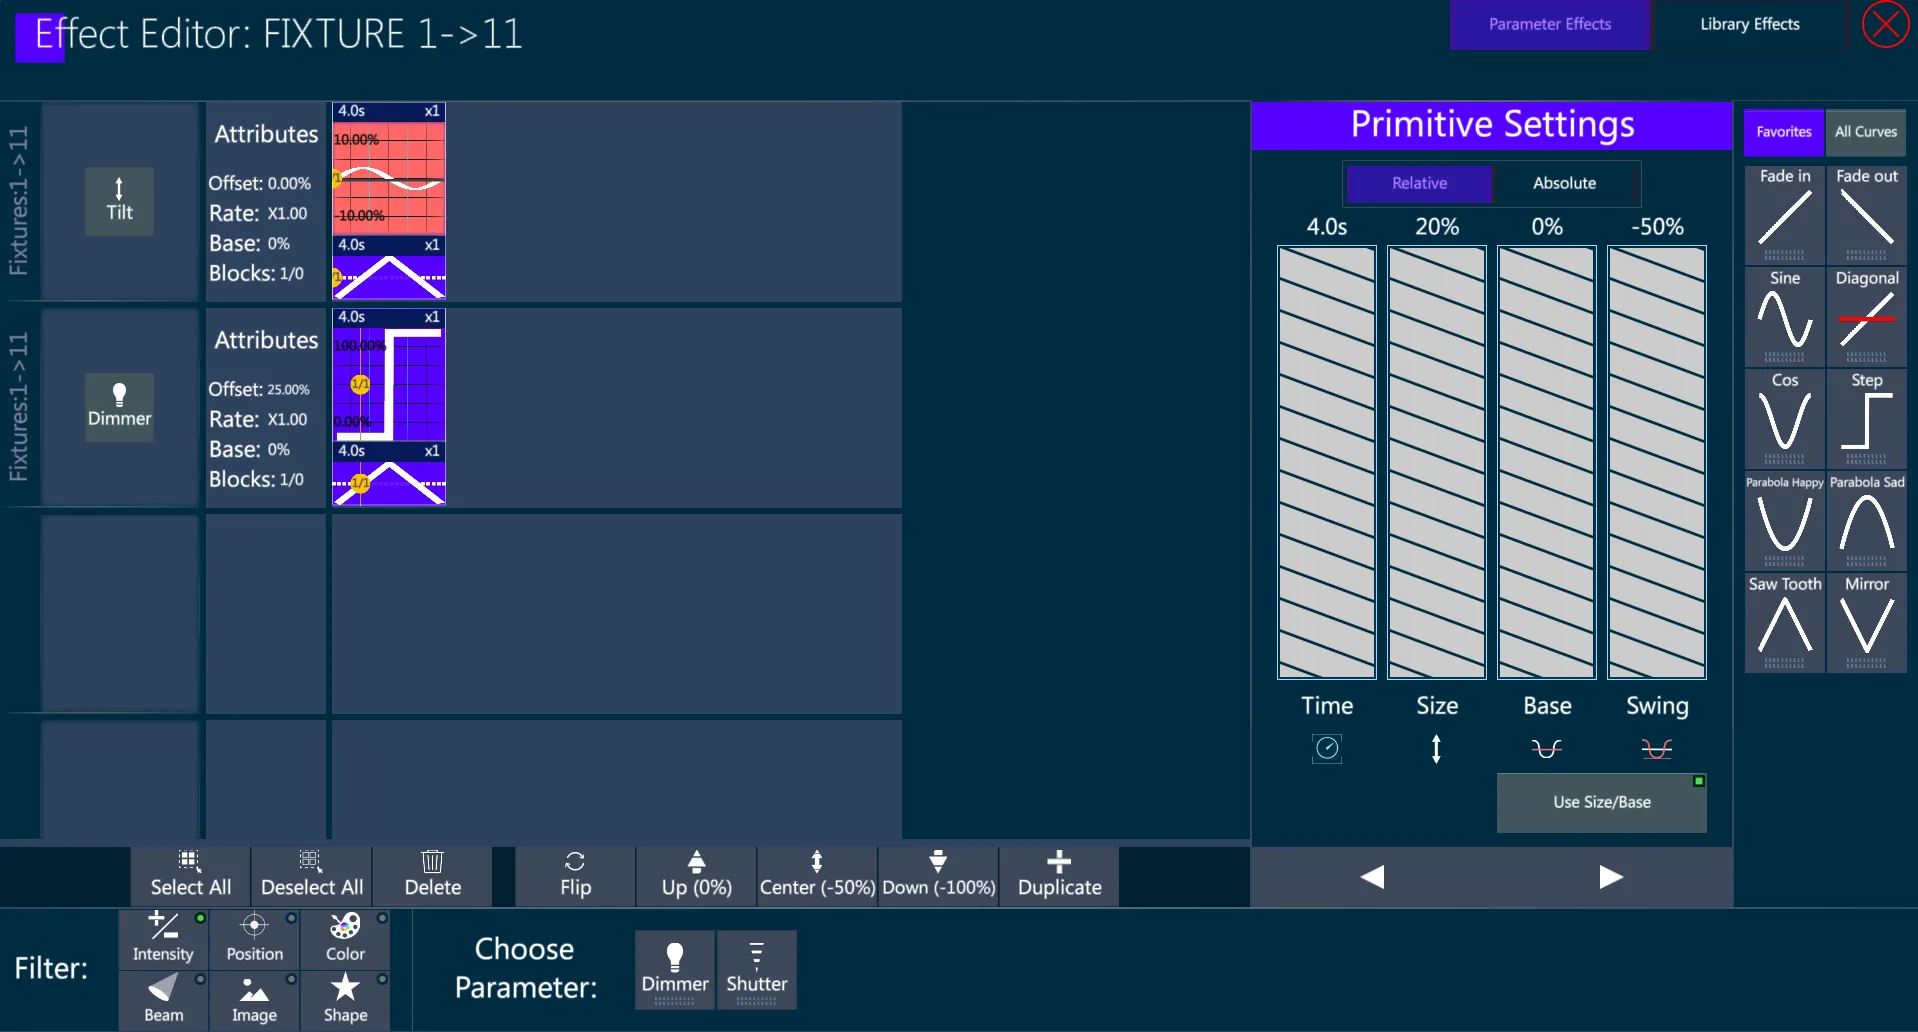
Once a Fixture Selection is active, the effect editors can be opened even without a parameter selection, as that can be done afterwards, directly on the effect views.
This is not valid for the Basic Effects, that will be based on the Params selected at the moment that the [EFFECT] button is pressed.
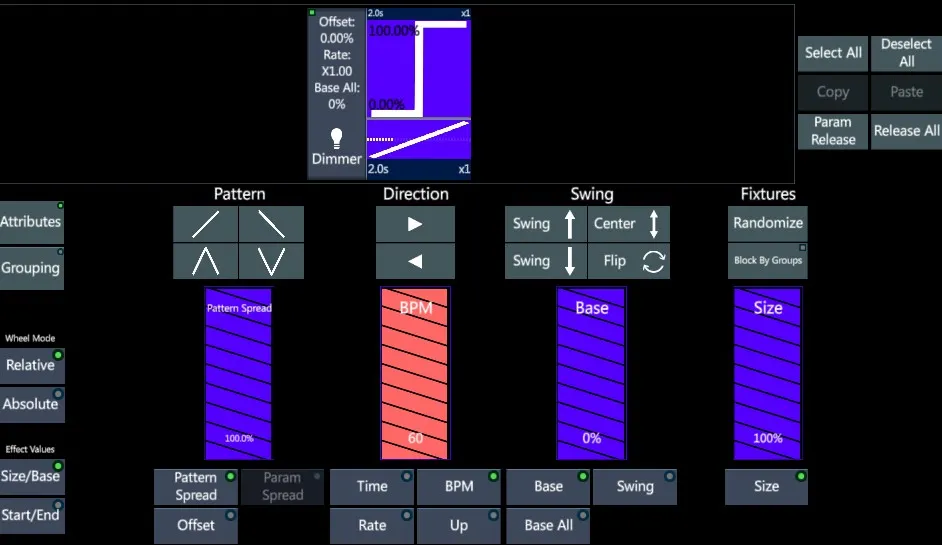
7.6.1 Attributes
The Effect Editor on the Smart Screen has 2 tabs available:
Attributes - Used for managing Effect, Pattern and Primitive Settings.
Grouping - Used for setting Blocks Of and Sub Blocks, to split the fixture selection order.
Effect Settings can be applied in two modes:
Relative - Changes are applied maintaining the offsets between the curves’ settings.
Absolute - Changes are applied with values that are equal for all the selection.
The toggle choice between Relative and Absolute can be found both in the Basic and in the Advanced Effect Engine.
Effect Settings
Many different Settings can be used to customize the effect’s cycle and the curves’ distribution through the fixtures and the parameters involved.
The following Effect Settings affect both the Pattern and the Primitives:
Offset All - Moves the start time of the Effect Event along the X axis of the Effect Track.
Param Spread - Is a toggle button that enables the proportional offsetting of the start times of multiple Effect Tracks at the same time.
👉 {Param Spread} is a quick way to make CMY or RGB effects where colors need to spread apart so as not to mix to black or white.
Pattern Settings
Some Effect Settings apply only to the Pattern, so they are called Pattern Settings.
The Pattern is the curve that sets the order of fixture selection during its transitions across the effect.
The Basic Effect Engine provides a selection of 4 Pattern possibilities:
Fade In = Linear order
Fade Out = Inverted order
Saw Tooth = Mirrored order from sides to center
Mirror = Mirrored order from center to sides
The Advanced Effect Engine permits to assign any curve from the Curves database as the Pattern.
The following Settings affect the Pattern:
Spread - Sets the percentage of offset between each fixture in a selection. 100% would evenly divide up the selection’s transition across the Primitive, while 0% would have all fixtures transitioning in unison.
UP - Based on the UP group #, each UP group will complete a full cycle across the Primitive before the next UP group can start.
With a selection of 8 fixtures assigned to a sine wave curve and a spread of 100%: - if UP is set to 1, fixture 1 will have to complete its full cycle before fixture 2 will begin, - if UP is set to 2, fixture 1 and 2 will split the cycle before the next two fixtures start.
Primitive Settings
Some Effect Settings apply only to the Primitive, so they are called Primitive Settings.
The Primitive is the curve applied to the parameter, that makes its values changing accordingly to the curve’s shape during the transitions cycle.
The following Settings affect the Primitive:
Time - The duration of time it takes each fixture to complete one cycle across the primitive.
BPM - The duration of time it takes each fixture to complete one cycle across the primitive, calculated in BPM (considering the Curve’s Steps).
Size - The amplitude of the primitive’s curve, stating the param range of values.
Base - The start point of the primitive, stating the starting param values.
Swing - The direction from the parameters start point (Base).
Swing {Up} {Center} {Down} - The keys to set the Swing at 0%, -50%, -100%.
If the Base value of tilt is 50% (0°) and the Swing is Center (-50%), tilt would split center with a sine wave primitive assigned to it. Up (0%) would send the tilt from strait down to full out into the audience. Down (-100%) would send the tilt from strait down to full up upstage.
Effect Time
The Effect Time slider can alternatively be switched between Time, to set the cycle in seconds, or BPM, to set the cycle in beats per minute.
The BPM timing will be based on the selected Curve’s Step Count.
Effect Time can be assigned in BPM (Beats Per Minute) in both the basic and advanced effect engine.
7.6.2 Grouping
Grouping tab allows to split the fixture selection order.
Tap the {Grouping} key - The Grouping tab will show
If the Offset Pattern Spread is not above 0%, tap the {Wave On} key. The Spread will be changed to 100%.
Set the {Blocks Of} [#] - This interleaves the Pattern into Groupings.
The Default for Blocks and Sub Block is 1/0 - No Groupings.
When {Blocks Of} is set to 1 or above, the Sub Blocks will move to 1 and Interleave Groups will be possible.
2/1 would interleave a selection into Odds/Evens.
3/1 would interleave a selection of 12 fixtures into [1+4+7+10] - [2+5+8+11] - [3+6+9+12]
- Set the {Sub Blocks Of} - Combines fixture in a selection, to act like single fixtures.
12/2 would combine [1+2] - [3+4] - [5+6] - [7+8] - [9+10] - [11+12]
👉 For Grouping to be noticeable there must be a Pattern Spread above 0%.
👉 As a shortcut, Setting {Sub Block Of} back to 0 allows {Blocks Of} to combine fixtures instead of interleaving - 2/0 would combine [1+2] - [3+4] - [5+6] - [7+8] - [9+10] - [11+12]
Blocks by Groups is a toggle option that allows to use Vibe Groups instead of Blocks and Sub Blocks.
👉 This feature is very useful when an effect needs to run synchronized between groups of fixtures that don’t have the same amount of fixtures.
To Block by Groups, select the Groups as Fixture Selection before entering the Effect Editor.
👉 Make sure {Sub Blocks Of} is set to 0 or the groups will act as interleave instead of blocks.
7.6.3 Pre-Built Effects
Pre-Built Effects are the quickest and simplest way to build effects on Vibe.
They are based on pre-configured Parameters, Primitives and Effect Settings.
However the user can customize Pre-Built effects by editing all the available settings, using the Pre-Built library as a source to built new effects without starting from scratch.
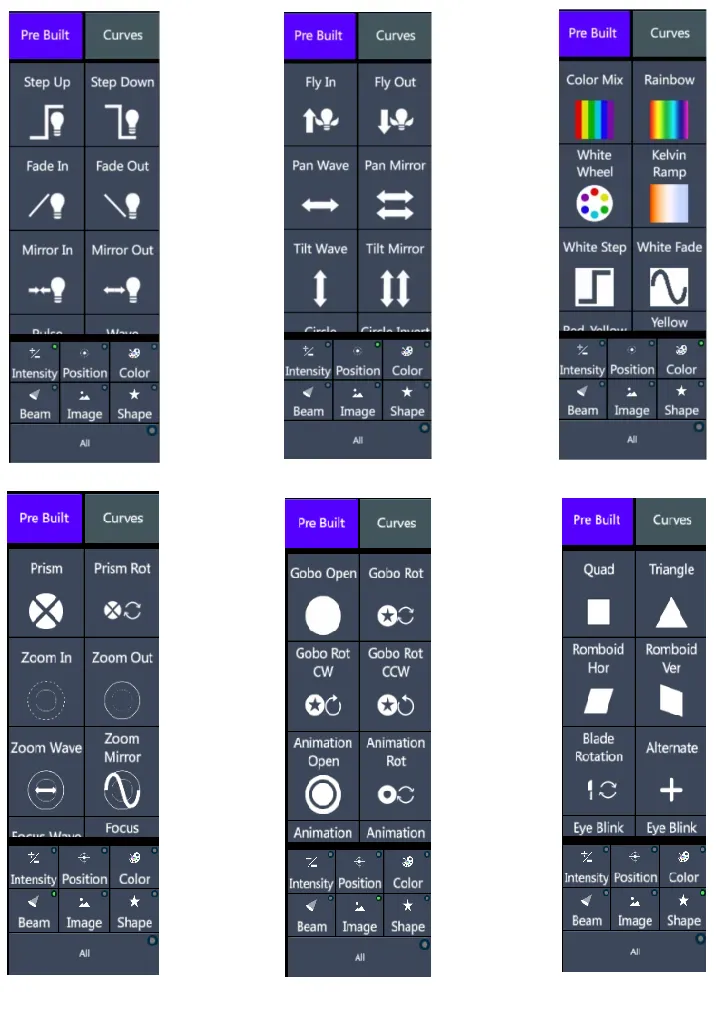
Pre-Built Effect are divided by Parameter Banks and they can be assigned to any fixture, as long as the selected fixtures have the parameters involved by the effect.
INTENSITY
Step Up Dimmer jumps up with a step curve and linear 100% spread.
Step Down Dimmer jumps down with a step curve and a linear 100% spread.
Fade In Dimmer fades up with a fade in curve and linear 100% spread.
Fade Out Dimmer fades down with a fade out curve and linear 100% spread.
Mirror In Dimmer jumps up with a step curve and mirrored in 100% spread.
Mirror Out Dimmer jumps up with a step curve and mirrored out 100% spread.
Pulse Dimmer fades up and down with a saw tooth curve and linear 0% spread.
Wave Dimmer fades up and down with a sine curve and linear 100% spread.
Rnd Fix Dimmer jumps up with a step curve and linear 100% spread applying Random order to the Fixtures.
Rnd Sub Dimmer jumps up with a step curve and linear 100% spread applying Random order to the Sub-Fixtures. Not implemented yet..
POSITION
Fly In Tilt down while Dimmer is at full and roll back while dimmer is at zero, with mirrored 100% spread.
Fly Out Tilt up while Dimmer is at full and roll back while dimmer is at zero, with mirrored 100% spread.
Pan Wave Pan fades up and down with a sine curve, 20% size and linear 100% spread.
Pan Mirror Pan fades up and down with a sine curve, 20% size and linear 100% spread in blocks of 2.
Tilt Wave Tilt fades up and down with a sine curve, 20% size and linear 100% spread.
Tilt Mirror Tilt fades up and down with a sine curve, 20% size and mirrored 100% spread.
Circle Fixtures move in circle shape clockward around the base point.
Circle Invert Fixtures move in circle shape counter-clockward around the base point.
Eight Fixtures move in eight shape clockward around the base point.
Eight Invert Fixtures move in eight shape counter-clockward around the base point.
Square Fixtures move in square shape clockward around the base point.
Square Invert Fixtures move in square shape counter-clockward around the base point.
👉 Circle, Eight and Square Effect will be more precise if working on virtual XYZ parameters, based on a correct fixture calibration. If no calibration data exists, they will be applied to Pan and Tilt.
COLOR
Color Mix Colors jump with a step curve and linear 0% spread. This effect is applied to virtual HSI parameters.
Rainbow Colors fade with a fade in curve and linear 100% spread. This effect is applied to virtual HSI parameters.
White Wheel Color Wheel jumps from its current frame to the White Open frame. If more Color Wheels are available, the target wheel needs to be defined in the popup.
Kelvin Ramp Color Temperature fades up and down with a saw tooth curve and a linear 0% spread.
White Step Colors jump to White from their current value with a step curve and linear 0% spread. This effect is applied to virtual Saturation parameter.
White Fade Colors fade to White from their current value with a fade in curve and linear 0% spread. This effect is applied to virtual Saturation parameter.
Red-Yellow Colors fade between Red and Yellow with a sine curve and linear 0% spread. This effect is applied to virtual HSI parameters.
Yellow-Green Colors fade between Yellow and Green with a sine curve and linear 0% spread. This effect is applied to virtual HSI parameters.
Green-Cyan Colors fade between Green and Cyan with a sine curve and linear 0% spread. This effect is applied to virtual HSI parameters.
Cyan-Blue Colors fade between Cyan and Blue with a sine curve and linear 0% spread. This effect is applied to virtual HSI parameters.
Blue-Magenta Colors fade between Blue and Magenta with a sine curve and linear 0% spread. This effect is applied to virtual HSI parameters.
Magenta-Red Colors fade between Magenta and Red with a sine curve and linear 0% spread. This effect is applied to virtual HSI parameters.
👉 Wheel based effects jump to the first open frame, so they are visible only when the starting value of the parameter corresponds to a different frame position.
BEAM
Prism Prism Wheel jumps from its current value to the Open value with a step curve and linear 0% spread. If more Prism Wheels are available, the target wheel needs to be defined in the popup.
Prism Rot Prism Rotation fades between both directions with a saw tooth curve and linear 0% spread. If more Prism Wheels are available, the target wheel needs to be defined in the popup.
Zoom In Zoom fades up with a fade in curve and linear 0% spread.
Zoom Out Zoom fades down with a fade out curve and linear 0% spread.
Zoom Wave Zoom fades up and down with a sine curve and linear 0% spread.
Zoom Mirror Zoom fades up and down with a sine curve and mirrored 100% spread.
Focus Wave Focus fades up and down with a sine curve and linear 0% spread.
Focus Mirror Focus fades up and down with a sine curve and mirrored 100% spread.
Frost Ramp Frost fades up and down with a saw tooth curve and linear 0% spread.
Frost Mirror Frost fades up and down with a step curve and mirrored 100% spread.
Iris Ramp Iris fades up and down with a saw tooth curve and linear 0% spread.
Iris Mirror Iris fades up and down with a step curve and mirrored 100% spread.
👉 Wheel based effects jump to the first open frame, so they are visible only when the starting value of the parameter corresponds to a different frame position.
IMAGE
Gobo Open Gobo Wheel jumps from its current frame to the Open frame with a step curve and linear 0% spread. If more Gobo Wheels are available, either static or rotating, the target wheel needs to be defined in the popup.
Gobo Rot Gobo Rotation fades between both directions with a saw tooth curve and linear 0% spread. If more Gobo Wheels are available, the target wheel needs to be defined in the popup.
Gobo Rot CW Gobo Rotation Speed fades in clockward direction with a fade out curve and linear 0% spread.
Gobo Rot CCW Gobo Rotation Speed fades in counter-clockward direction with a fade in curve and linear 0% spread.
Animation Open Animation Wheel jumps from its current value to the Open value with a step curve and linear 0% spread. If more Animation Wheels are available, the target wheel needs to be defined in the popup.
Animation Rot Animation Rotation fades between both directions with a saw tooth curve and linear 0% spread. If more Animation Wheels are available, the target wheel needs to be defined in the popup.
Animation Rot CW Animation Rotation Speed fades in clockward direction with a fade out curve and linear 0% spread.
Animation Rot CCW Animation Rotation Speed fades in counter-clockward direction with a fade in curve and linear 0% spread.
Gobo Index Gobo Index fades up and down making the frame spinning in both directions with a sine curve and a linear 0% spread.
👉 Wheel based effects jump to the first open frame, so they are visible only when the starting value of the parameter corresponds to a different frame position.
SHAPE
Quad 4 Blades fade between square shape and open, with a cosine curve and linear 0% spread.
Triangle 3 Blades fade between triangle shape and open, with a cosine curve and linear 0% spread.
Romboid Hor 2 opposite horizontal Blades fade their angle, with a sine curve and linear 0% spread.
Romboid Ver 2 opposite vertical Blades fade their angle, with a sine curve and linear 0% spread.
Blade Rotation Blades Rotation fades between both directions with a sine curve and linear 0% spread.
Alternate 2 groups of opposite Blades alternatively jump to 50% with a step curve and linear 0% spread.
Eye Blink Hor 2 opposite horizontal Blades fade their depth with a fade in curve and linear 0% spread.
Eye Blink Ver 2 opposite vertical Blades fade their depth with a fade in curve and linear 0% spread.
Side 2 Side Hor 2 opposite horizontal Blades fade their depth with a saw tooth curve and linear 0% spread.
Side 2 Side Ver 2 opposite vertical Blades fade their depth with a saw tooth curve and linear 0% spread.
Curtain 1 Blade 1 fades its depth with a saw tooth curve and linear 0% spread.
Curtain 2 Blade 2 fades its depth with a saw tooth curve and linear 0% spread.
Curtain 3 Blade 3 fades its depth with a saw tooth curve and linear 0% spread.
Curtain 4 Blade 4 fades its depth with a saw tooth curve and linear 0% spread.
👉 Blade Rotation effect is visible only when the blades are inserted.
👉 Curtain effects can perform a complete movement only if the fixture has a full curtain blading system, otherwise they will stop at the blade’s maximum depth.
To create a Pre-Built Effect:
Make a Fixture Selection: [FIXTURE] or [FIXTURE] [#] [+ ⟶ -] [#]
Press [EFFECT] - The Smart Effect Editor will open in the {Attributes} display with No Effect Events.
Tap on {Pre Built} key on the right of the Smart Screen
Choose the parameter Bank on the bottom of the column
Tap on the desired Effect to launch it
The Params and Curves involved will be loaded on the Effect Engine
The Smart Screen Effects Editor allows users to quickly build effects within the normal work flow of the console while still having access to the main live displays.
Effect Tracks are created for every selected parameter, but they are hidden from the view to get more space on the screen, and some advance operations are removed to speed up programming of simple effects.
After programming an Effect, close the editor by tapping the Red X in the upper right corner or by pressing [Effect].
7.6.4 Smart Effects
Smart Effects are built by using the Smart Effect Editor on the Small Screen.
A Smart Effect is obtained by applying a Pattern and a Primitive to the selected Parameters.
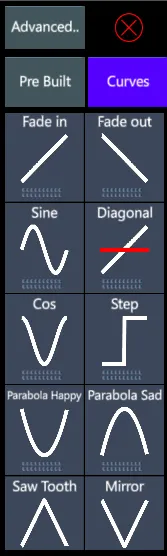
To create a Smart Effect:
Make a Fixture Selection: [FIXTURE] or [FIXTURE] [#] [+ ⟶ -] [#]
Select the Parameter or Parameters to be involved
Press [EFFECT] - The Smart Effect Editor will open in the {Attributes} display with a blank Effect Event.
Tap on {Curves} key on the right of the Smart Screen
Tap on the desired Primitive - The Function shown on the Primitive will be loaded with a default linear Pattern.
The Pattern may be changed by by tapping any of the following:
/ Fixtures move in a positive direction across the selection.
Fixture move in a negative direction across the selection.
/ Fixture are mirrored from the center.
/ Fixture are mirrored from the extremes.
- Set the Offset {Pattern Spread} - Default is 100%.
100% = Selection is divided 100% transitioning across the Primitive.
0% = all fixtures transition in unison.
Set Swing Up, Center, Down, or at a specific level
Adjust Size and Base to set the Low and High ranges of the values
Set the Time and Rate - Rate is a multiplier of the time value. Default Effect Time is 4 seconds to complete the cycle
👉 Similar results to inverting the pattern functions may be achieved by reversing the selection direction with the direction {⟵ Negative}, {Positive ⟶ } keys.
👉 If more options are needed, the Advanced Effects Editor may be opened at any time by pressing [VIBE] + [EFFECTS] or the {Advanced…} key. All the Effects running in the Smart Effects Editor will be synchronized with the Advanced Effect Editor.
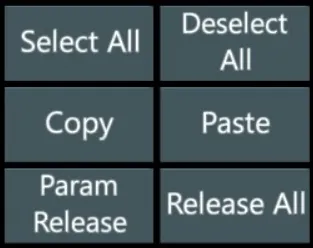
Some actions are available in the Smart Effects Editor near the parameter boxes, in order to:
Select and Deselect all the running parameters
Copy and Paste the selected effect attributes
Release the effect from the selected parameters or from all the running parameters
After programming an Effect, close the editor by tapping the Red X in the upper right corner or by pressing [Effect].
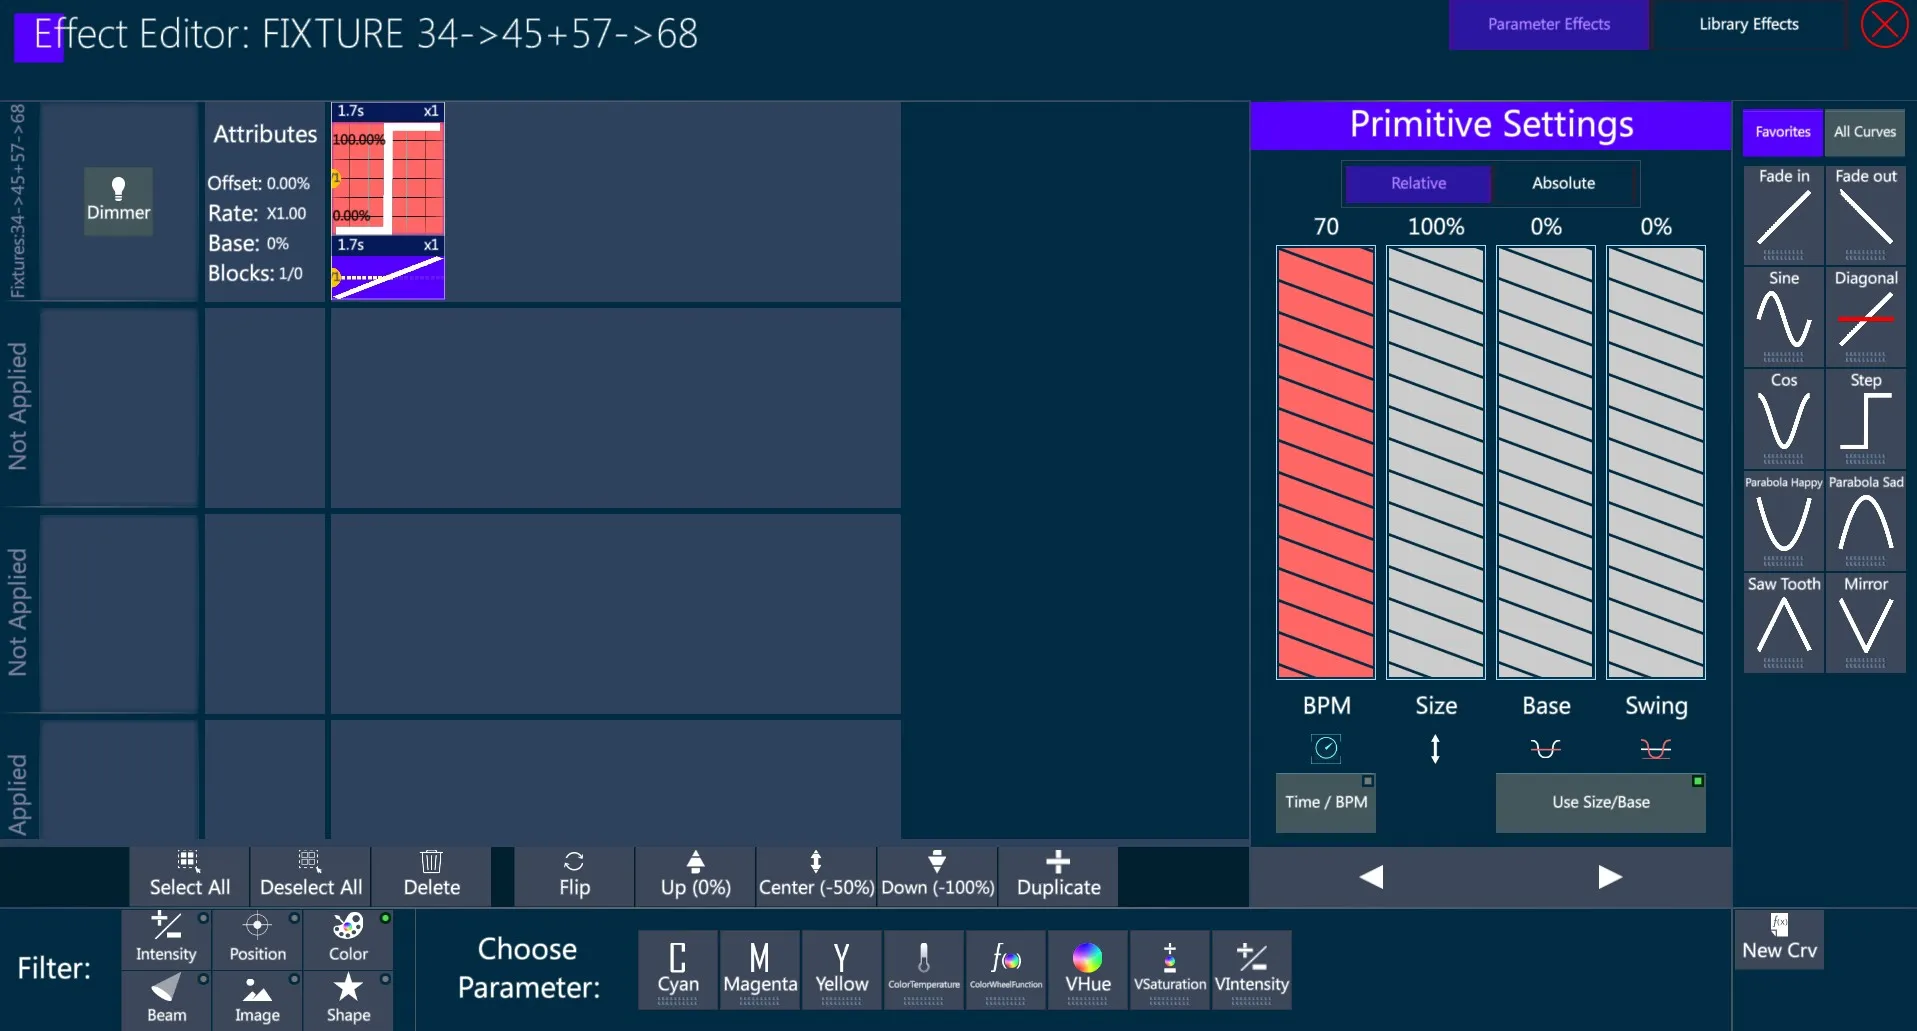
7.6.5 Advanced Effects
Advanced Effects are built by using the Advanced Effect Editor on the Wide Screen, as a popup that opens over the screen’s page.
Both Basic and Advanced Effect Editors work on the same Effect Engine. Whichever is opened will be synchronized between the Effects Engines, but only one Effect Editor may opened at a time.
An Advanced Effect is also obtained by applying a Pattern and a Primitive to the selected Parameters, but it allows many more possibilities as it is characterized by independent and simultaneous Effect Tracks.
Each Effect Track can contain many different frames, called Effect Events, with independent primitives, patterns and settings. The result of an advanced effect can be someway similar to a Timeline of effects.
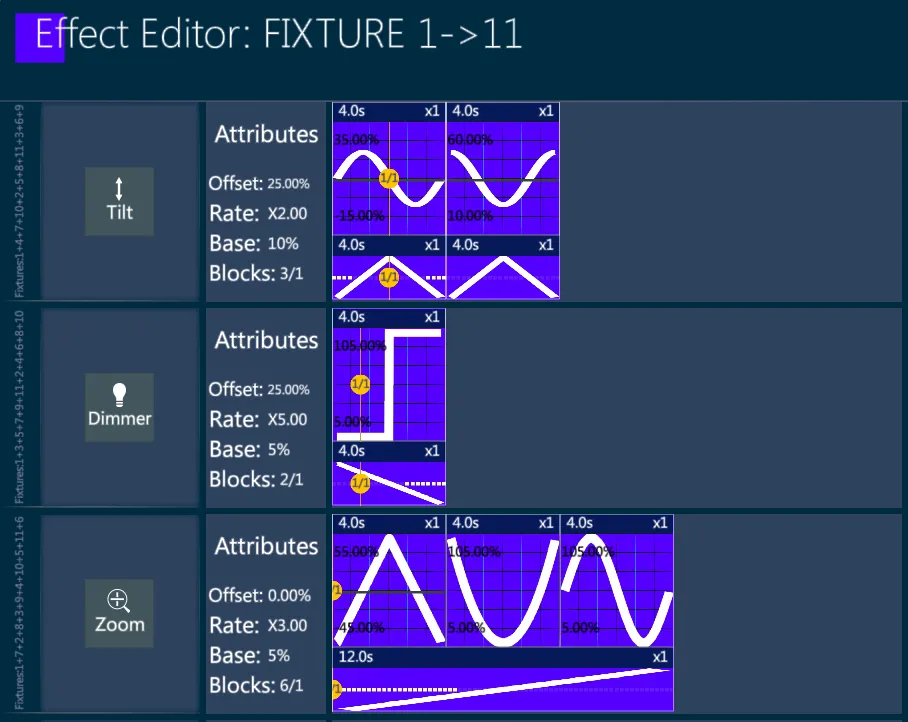
Effect Tracks are made up of Effect Events running horizontally.
Each Track must have:
- At least one Parameter. Additional parameters may be added but they will respond simultaneously to the Effect.
- At least one Effect Event. Additional events may be added to the track each with its own time base, or they may be merged and share the same time base.
Multi-track effects are effects requiring more than one parameter may be stacked on separate Effects Tracks.
Examples of Multi-track effects would be:
- CMY and RGB color effects

- Pan/Tilt Circles

- Blade effects- It is possible to make simultaneous changes to Primitive, Pattern, and Effect settings by toggling them on/off. The selected elements will get a red background.
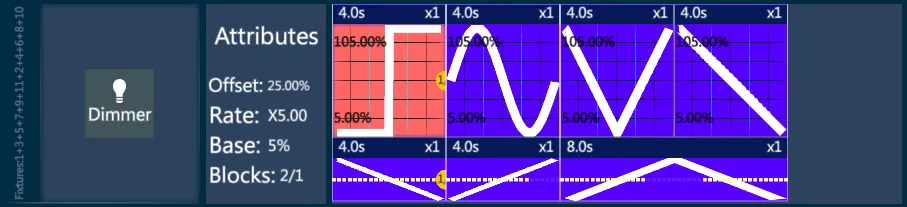
The Advanced Effect Editor differs from the Basic Effect Editor in the following ways:
Parameter selection is made in the Effects Editor not before entering it.
Effect Tracks are shown.
Multiple Parameters may be assigned to the same Effect Track.
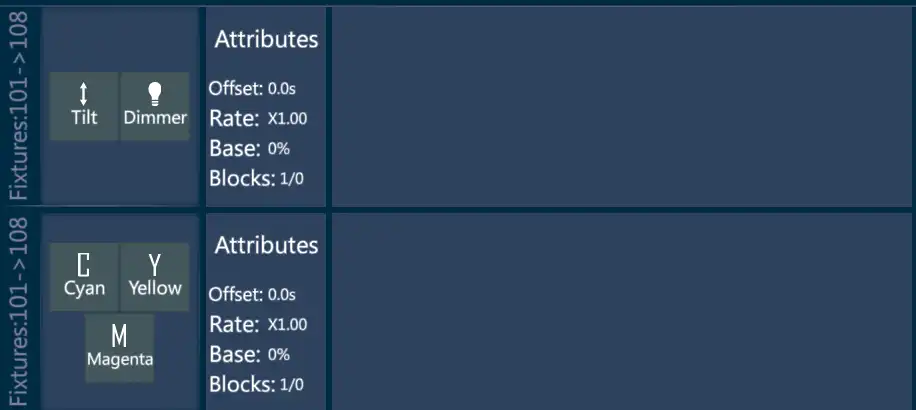
- Multiple Events may be assigned to the same Effect Track.
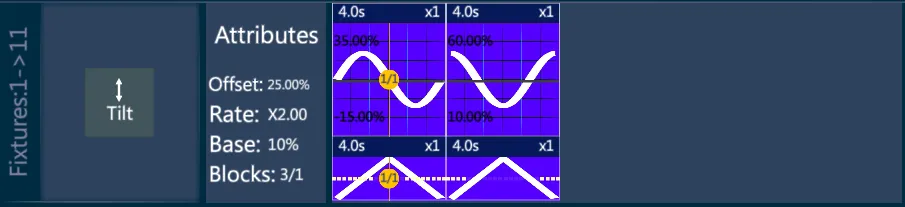
Effect sharing the same Effect Track can uses separate patterns or share patterns.
Pattern Size, Rate, and Base may be spread to create randomized looking effects.
Repeat allows to set the number of times each Effect Event repeats before moving on the the next Effects Event, when they are on the same Effect Track.
Only a fixture selection is needed before entering the editor. Parameters are selected on the effect editor using the {Filter} and {Choose Parameter} keys.

To create an Advanced Effect:
Make a Fixture Selection: [FIXTURE] or [FIXTURE] [#] [+ ⟶ -] [#]
Press [VIBE] + [EFFECT] to open the Advanced Effect Editor
Select a Banks in the Filter area
Select a Parameter in the Choose Parameter area - the parameter background will turn purple.
Tap a blank space in the Parameter Column of an unassigned Effect Track - the parameter will be assigned to the Attributes Column.
Tap a Curve from the Favorites tab or the All Curves tab - the primitive curve background will turn purple.
Tap a blank space in the Effect Event Column - an Effect Event will be created with a Primitive and a Pattern.
To adjust Pattern and Primitive settings, tap on them and set the options with the virtual sliders in the right area
To adjust Effect settings, tap on the Track’s empty area and set the options with the virtual sliders in the right area
Close the Advanced editor using the Red X in the upper right corner.
Store the whole Effect directly to a cue or scene or to an Effects Library.
Advanced Effects can have many Effect Events on the same Effect Track based on different parameters.
Advanced Effects can have many Effect Tracks based on different parameters that will run simultaneously, but only one track per Param is allowed.
Combine Parameters:
Tap a parameter bank in the Filters area
Tap a parameter in the Choose Parameter area - the parameter background will turn purple
Tap a space in the Parameter Column already containing a parameter - the parameter will be merged into the parameter column
- All Primitives and Patterns will affect both parameters.
Stack Effects Events:
Tap a Function from the Favorites tab or All Functions tab - the Function background will turn purple
Tap the space to the right of an existing Effect Even - a new Effect Event will be stacked beside the existing one
- Each Stacked Effect Event can have its own Primitive and Pattern.
Combine Effects Events:
- Drag and drop the primitive of an Effect Event over an adjacent primitive - the primitives will be merged into the same event
- The primitives will now be combined and will share the pattern settings.
Duplicate Effects Events:
Tap either the pattern or primitive are of an Effect Event - the background of the pattern or primitive will turn red and the Effects Toolbar will open under the Effects Tracks.
Tap {+ Duplicate} - a duplicate of the Effect Event will be added to the right of the source Effect Event
Copy an Effect Track:
Copies the Effect Event settings to a new parameter, this will synchronize the effect between the parameters.
Tap a parameter bank in the Filters area
Tap a parameter in the Choose Parameter area - the parameter background will turn purple
Tap a blank space in the Parameter Column below an assigned Effect Track - the parameter will be assigned
Press the empty area to the right of the source Effect Event - the blank area will turn light blue and the Effects Toolbar will open under the Effects Tracks
Tap {Copy} - the source Effect Event’s settings will be copied
Tap in the blank area to the right of the new parameter - the area will turn blue and the Effects Toolbar will open under the Effects Tracks
Tap {Paste} - the source Effect Event settings will be pasted to the new parameter.
Delete an Effect Event:
Tap either the pattern or primitive of the event to be deleted - the background will turn red
Tap {Delete} on the Effects Toolbar below the Effect Tracks
Release a parameter from an effect:
Effect Parameters may be released using Edit Cue or Update pop-up.
- Edit Cue
👉 Cue must be active on a controller or it will be loaded to the Master Controller and bump its current Qlist out.
[QLIST] [#] [CUE] [#] [EDIT] - Cue values will be placed in the Editor and the [UPDATE] key will flash red.
Press [VIBE] + [EFFECT] - The Advanced Effect Editor will open.
Select the fixtures requiring parameters to be released.
Tap the parameter or parameters in the parameter column to select the parameters - the parameters will turn purple.
Tap {Release} on the Effects Toolbar - Parameters will disappear from the Effect Editor - stage values will be returned to their recorded base values or home values if they had no programmed base values.
Press [UPDATE] to complete the edit and restore control to the source controller.
- Update
👉 Cue being edited must be active on a controller.
Select the fixtures requiring parameters to be released.
Press the the parameter’s push wheel, or tap the wheel display above the wheel, to select the parameter.
Press [VIBE] + [EFFECT] - opens Advanced Editor.
Tap the parameter or parameters in the parameter column to select the parameters - the parameters will turn purple.
Tap {Release} on the Effects Toolbar - Parameters will disappear from the Effect Editor - Stage values will be returned to their recorded base values or home values if they had no programmed base values.
Press [UPDATE] - The Update popup will open.
Make sure the proper cue is selected in the Cue column.
Tap Apply or press [ENTER] to complete the update operation.
7.6.6 Library Effects
Library Effects are built by using the Advanced Effect Editor on the Wide Screen.
Library Effects are effects between libraries that can be stored in cues and scenes as well as in the effect library and managed as a normal effects, but they keep the library references.
Editing any of the reference libraries will automatically update the library effect (same as Cues and Scenes stored with library references).
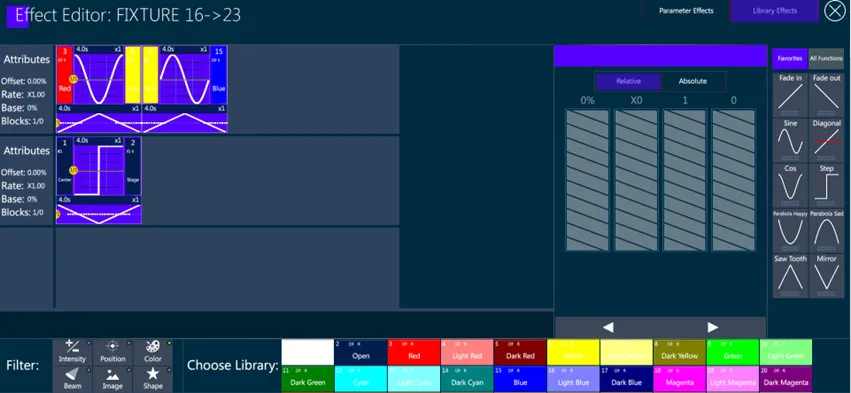
To create a Library Effect:
Make a Fixture Selection: [FIXTURE] or [FIXTURE] [#] [+ ⟶ -] [#]
Press [VIBE] + [EFFECT] to open the Advanced Effect Editor
Tap {Library Effects}
Select a Banks in the Filter area
Select a Library in the Choose Library area - the library background will turn purple.
Tap the effect track to add the starting library
Choose another Library in the Choose Library area
Tap the right side of the effect event to add the ending library
Tap a Curve from the Favorites tab or the All Curves tab - the primitive curve background will turn purple.
Tap on the effect event to assign the fading curve between the libraries - an Effect Event will be created with a Primitive and a Pattern.
To adjust Pattern and Primitive settings, tap on them and set the options with the virtual sliders in the right area
To adjust Effect settings, tap on the Track’s empty area and set the options with the virtual sliders in the right area
Close the Advanced editor using the Red X in the upper right corner.
Store the whole Effect directly to a cue or scene or to an Effects Library.
Same as Advanced Effects, Library Effects can have many Effect Events on the same Effect Track based on different libraries.
Same as Advanced Effects, Library Effects can have many Effect Tracks based on different libraries that will run simultaneously, but only one track per Bank is allowed.
An Effect can have both Advanced and Library Events, but the same parameter cannot be on more Tracks at the same time.
Library Effect settings and operations are managed in the same way as Advanced Effect settings and operations are done.
7.6.7 Effect Library
Once an effect has been created, it may be directly stored in cues and scenes or saved in Effect Libraries for future use.
Effect Libraries are stored like any other Library and they have a specific Effect Library Softkey view to recall them.
By Default Effect Libraries are “Parameter Specific” with disabled Reference, Timing and Base, and they filter and store all parameter types.
Default Settings for Effect Libraries can be changed in System Settings popup, in the Defaults tab. Individual settings can be set on each stored Effect Library.
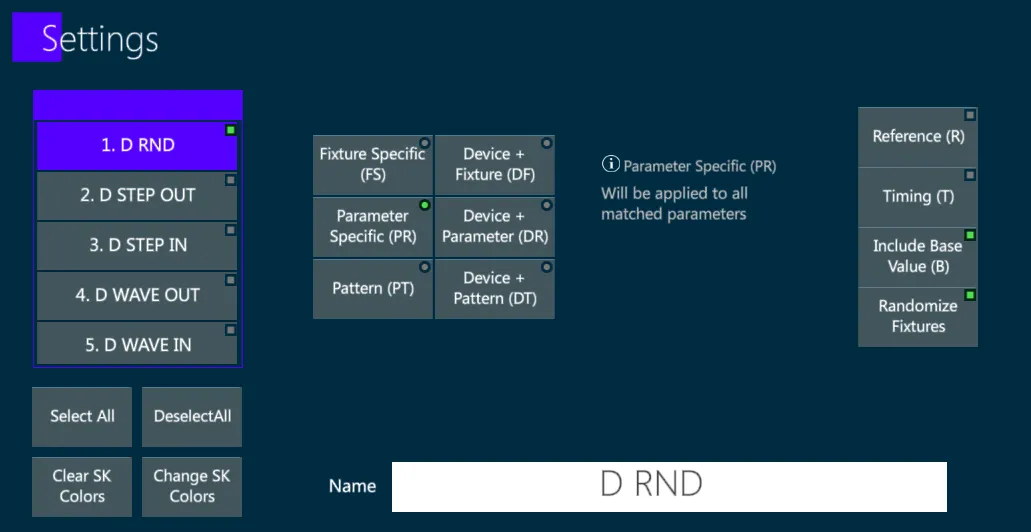
- Effect Libraries have the option to Include Base (or Exclude) the base values. The include base is useful when effects must start from an absolute value.
👉 An Effect Library without Include Base, when triggered in the Editor from the softkey will use the current param values as a base. When the effect is stored into a Scene or a Cue, the parameter values will be stored too and will be used as base values when the Scene or Cue is triggered.
Effect Libraries have the option to Randomize the selection order. When randomize is enabled, every time the library is applied in the Editor it changes the fixtures’ selection order. Once the effect is stored into a Scene or a Cue, the selection order is kept as it was when storing.
Effect Libraries operations are managed in the same way as all other library operations are done.